Using Objects
What you will learn in this guide
In this guide you will learn how to use the Object node, the Create New Object and the Set Object Properties node to create and store Objects in your app. Objects are local meaning they will not be stored in a database. They are very useful to store data and states that applies to a usage session of an app or a screen. They are also essential when working with Arrays in Noodl since only Objects and Records can be stored in a Noodl Array.
Overview
The guide covers the following topics
- Objects in Noodl
- Creating Objects
- Setting Properties in Objects
- Dynamically creating Objects using the Create New Object node.
- Objects in Arrays
- Using Objects in Lists with the Repeater node
Objects are very similar to Variables in Noodl and it's recommended to go through the Variable guide before reading this guide.
What's an Object in Noodl?
Objects in Noodl are used to hold data. Objects are local meaning they only exist while the App is running. This is the main difference between Objects and Records - Records are stored in a database.
Another related node in Noodl is the Variable node. It's also local, but can only store one value, while an Object can store a number of values, each in a property. So essentially an Object holds a couple of data points (properties) that belong together.
Some typical cases could be information about a person (for example First Name, Last Name, Address, Age), all the information about a football match (Home Team, Away Team, Match Date, Score), etc, etc. There is no limitation on how many properties you can have.
Noodl Objects vs Javascript of JSON objects
If you are familiar with Javascript or JSON you are probably used to work with Objects. You can think of Noodl Objects as very similar to Javascript/JSON objects but they are not exactly the same. Many Noodl nodes will convert Javascript/JSON object to Noodl objects automatically. For example if a JSON object is returned from a REST call using the REST node it will come out as a Noodl Object from the REST node.
The id of an Object
All Objects in Noodl have an id. This is the unique identifyer of the Object and if you have two Object nodes in your app, and you give them the same id they will point to the same data. Changing properties on one of the nodes will immediately change the data any other Object node with the same id.
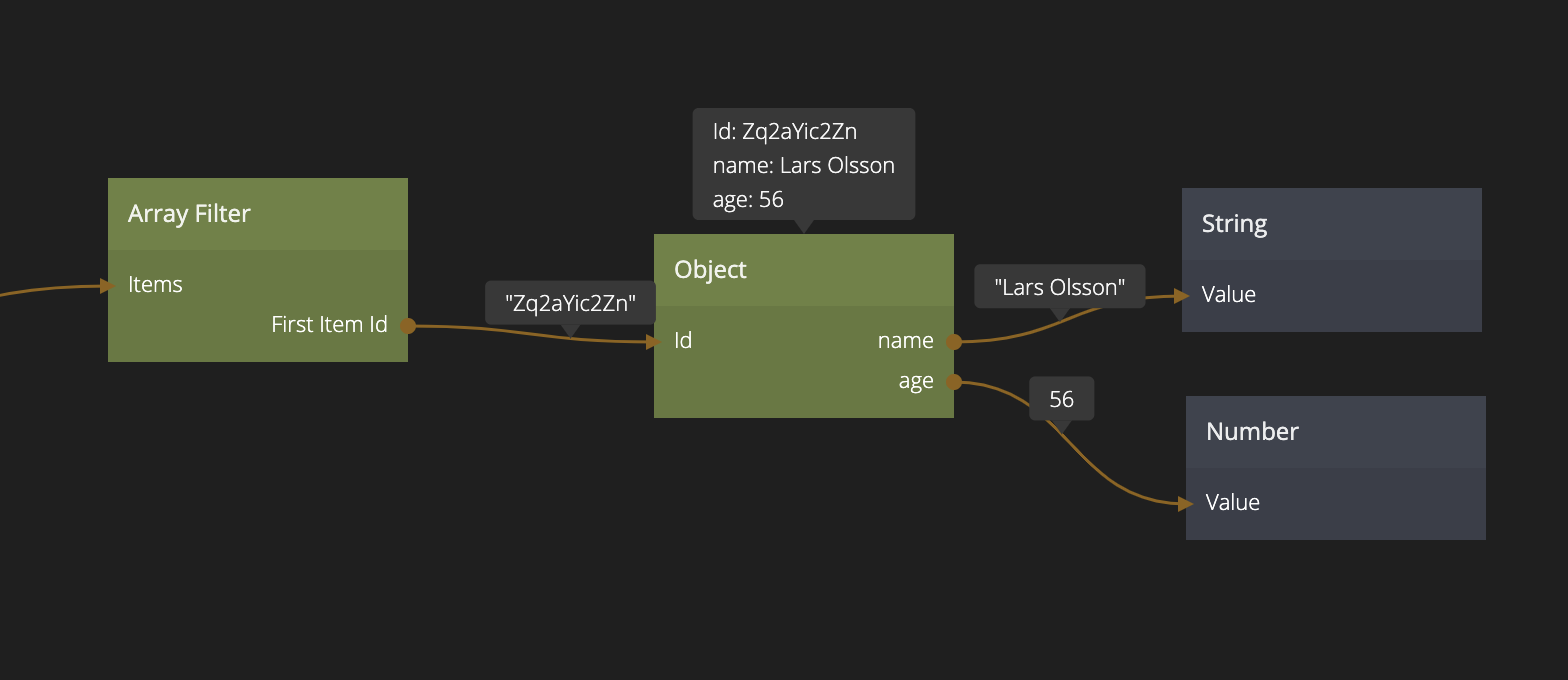
In Noodl, when a Node need to refer to an Object you use the id to identify it. For example, an Array Filter have an output called First Item Id which will hold the id of the first object in the resulting array of object after a filter action have been done. By connecting that First Item Id to the Id of an Object you can access its properties.
The properties of an Object
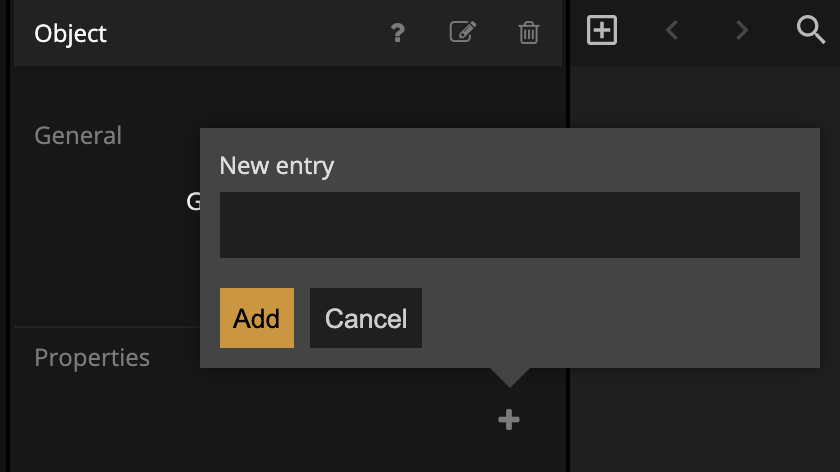
An Object typically have a number of properties. On the Object node they have to be explicitly created to be able to access them as outputs and inputs by clicking the + in the properties panel.
Note that just because an Object node doesn't have a property added, it doesn't mean that the underlying Object don't have it. It's just that this particular node won't have the property available as input and output until you add them.
Creating Objects
Let's get started and create some objects!
Objects are typically created in two different ways. Either you add in a Object node in a component and give it an id then the object will be created (if it doesn't exists already) when the component is created. The other way is to use the Create New Object node and trigger its Do signal. That will create a unique new Object with a unique id. Actually, there is a third way of creating Objects - you can do it through Javascript in a Function or Script node. We are not going to cover it in this guide but you can find more information about it here.
So to summarize the two main ways of creating Objects
- Statically create by adding an Object node with an id in a component.
- Dynamically create by triggering the Do signal in a Create New Object node.
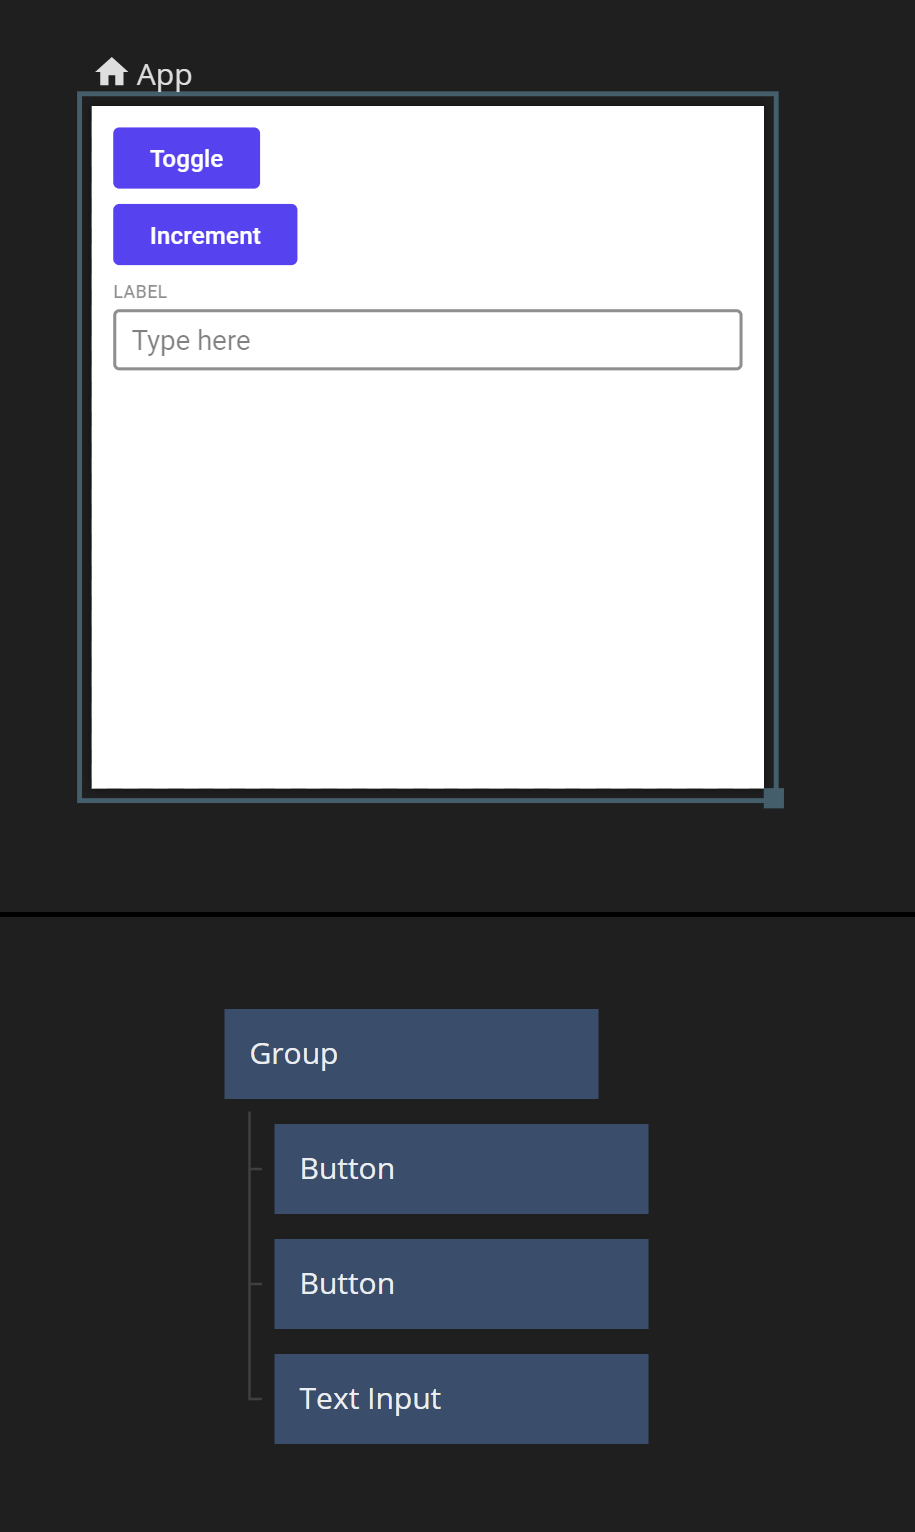
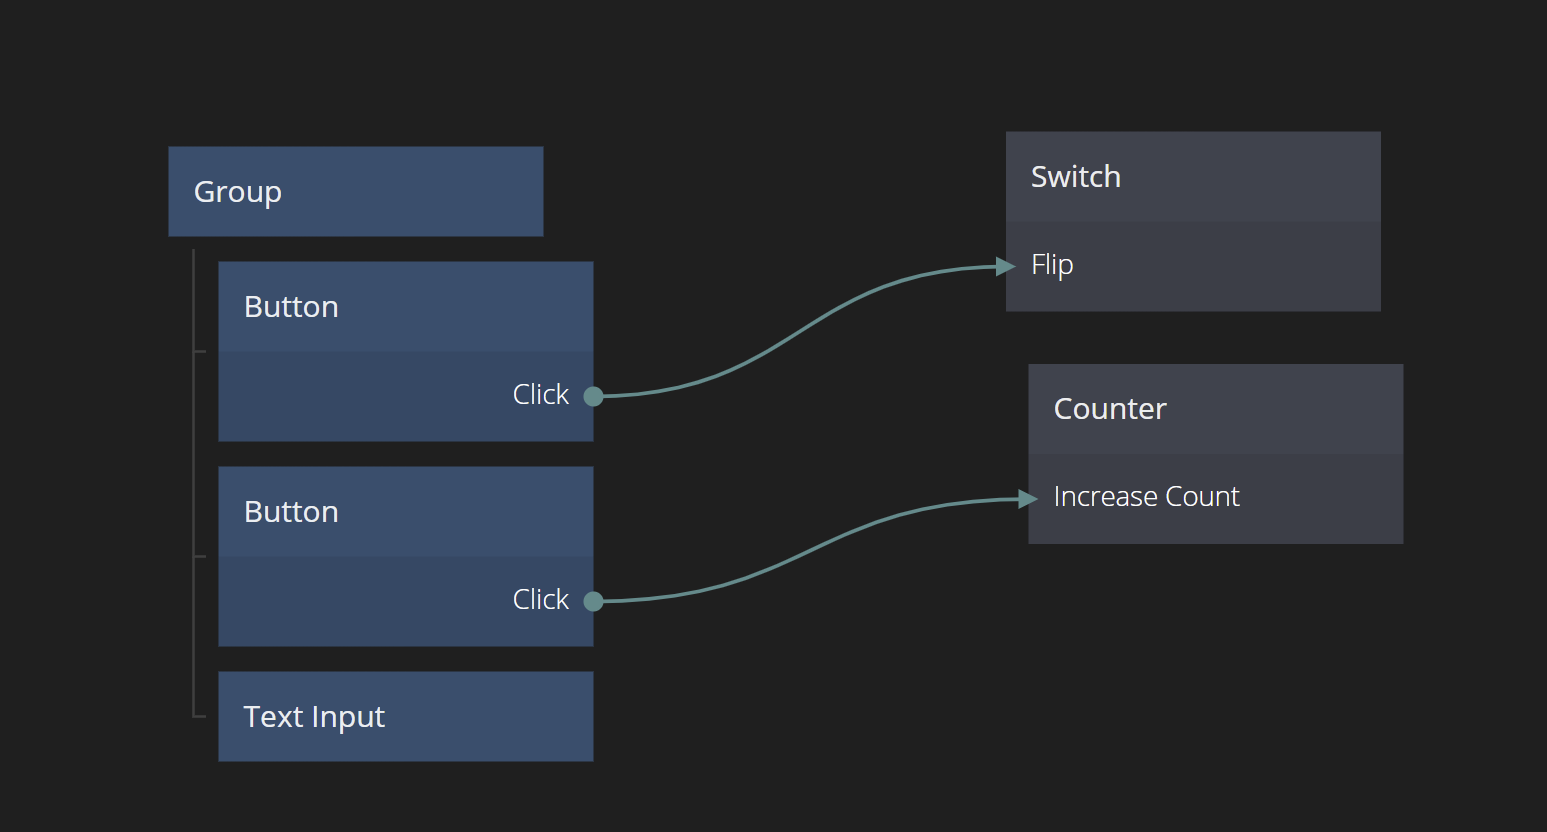
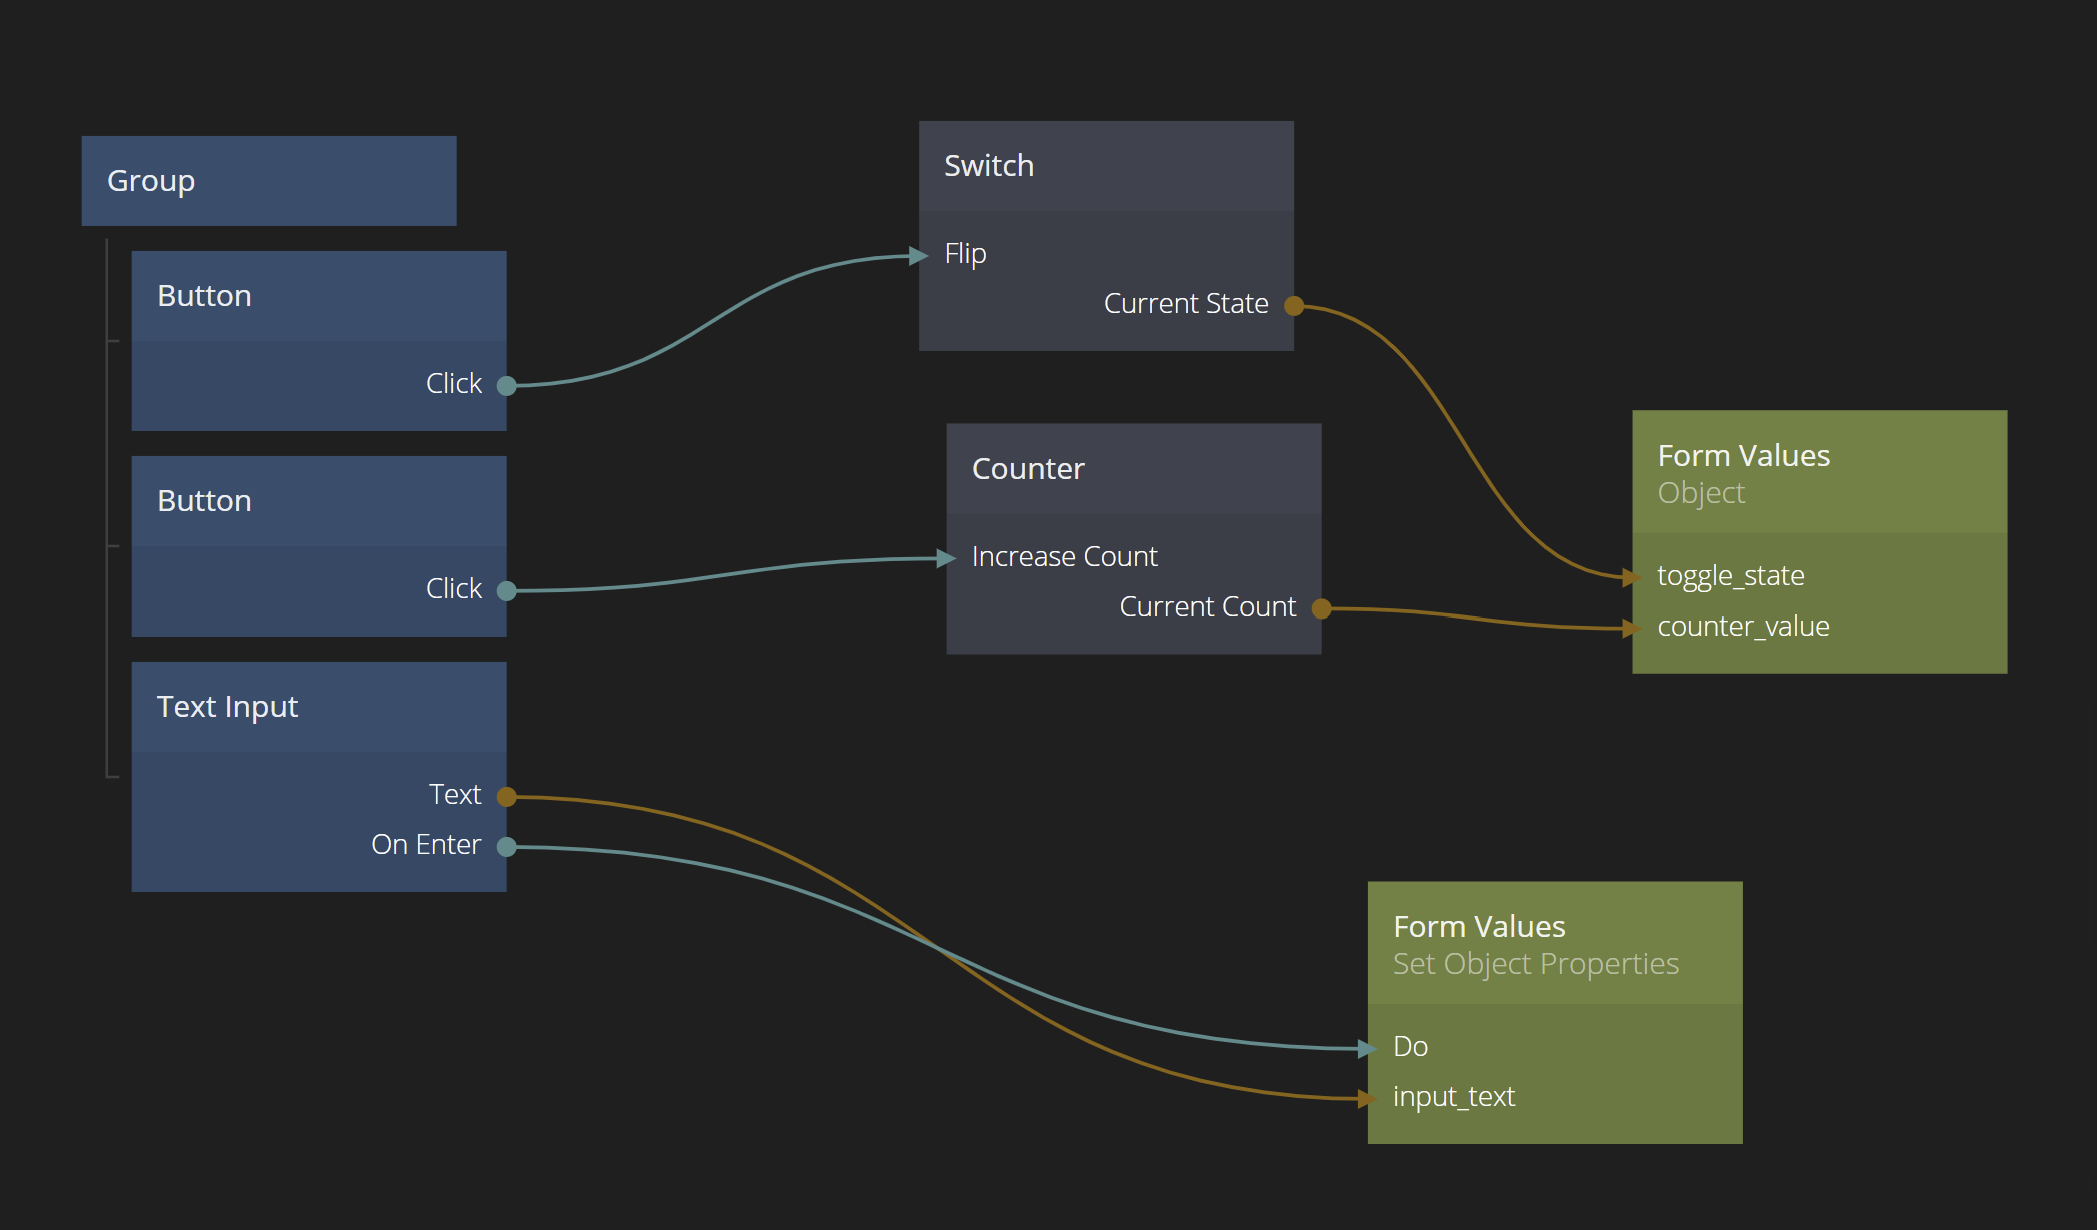
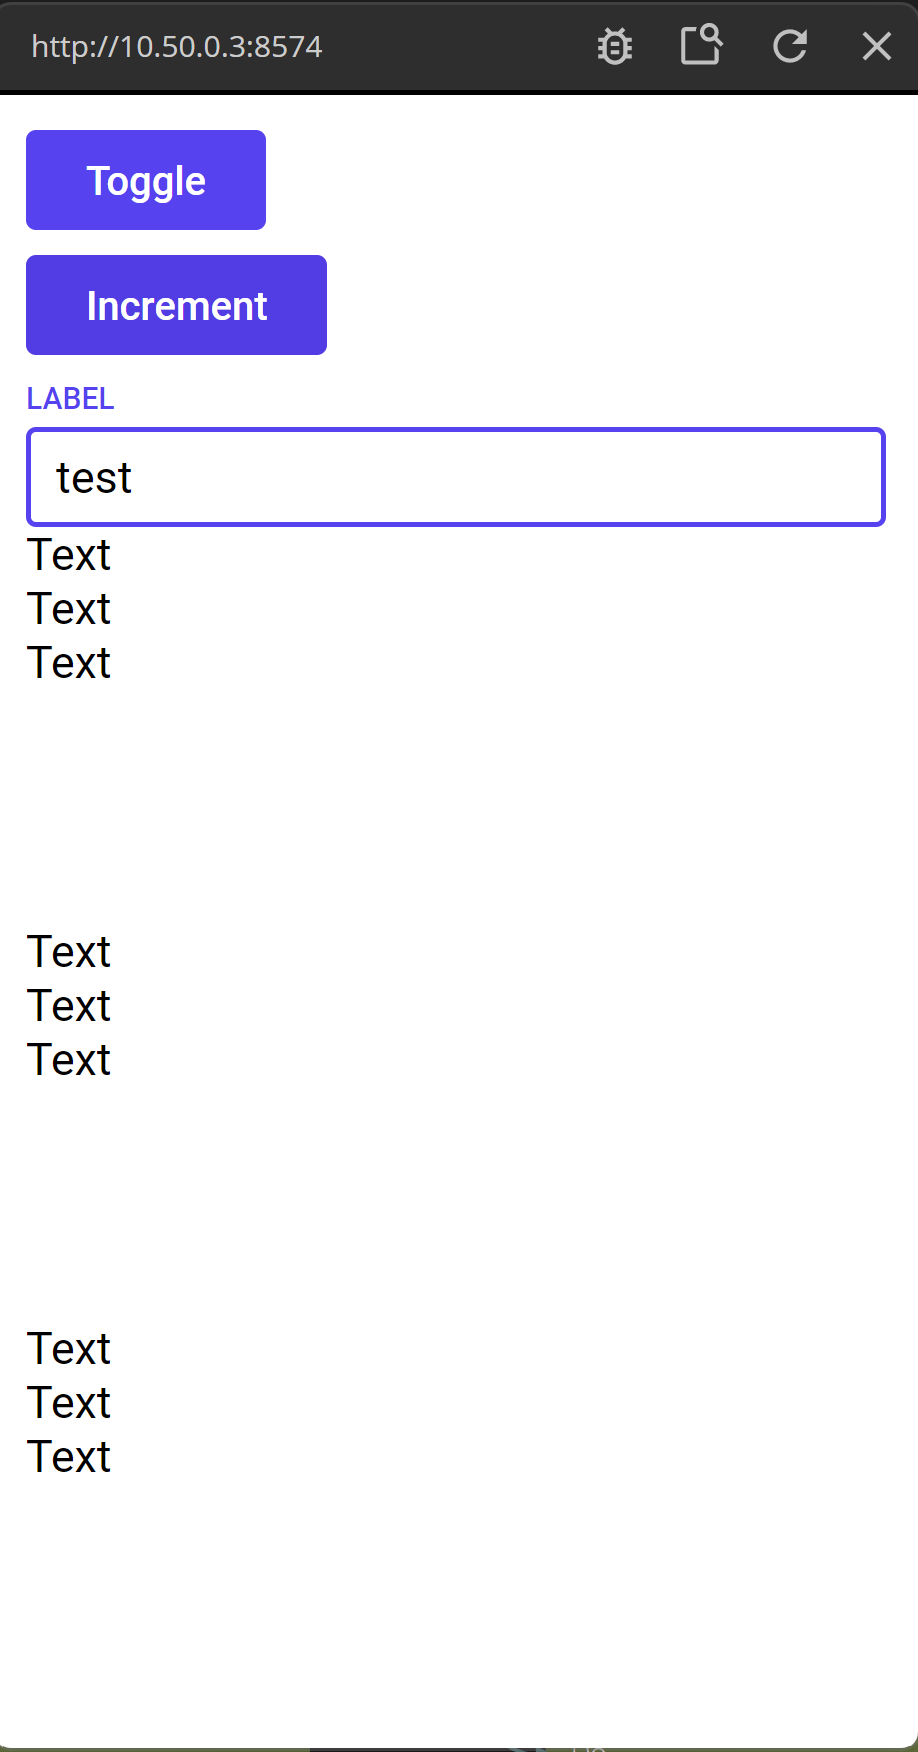
Let's start with the former. Start a new project using the "Hello World"-template. Then add in two Buttons and a Text Input node right under the root node. Remove the Text node and fix the layout slightly by adding som margins and padding. Change the text on the Buttons to "Toggle" and "Increment".
Setting Properties
We want the "Toggle" button to toggle a Switch from false to true, the "Increment" button to increase a Counter, and the Text Input to generate a text. This will allow us to generate some data to put in an Object
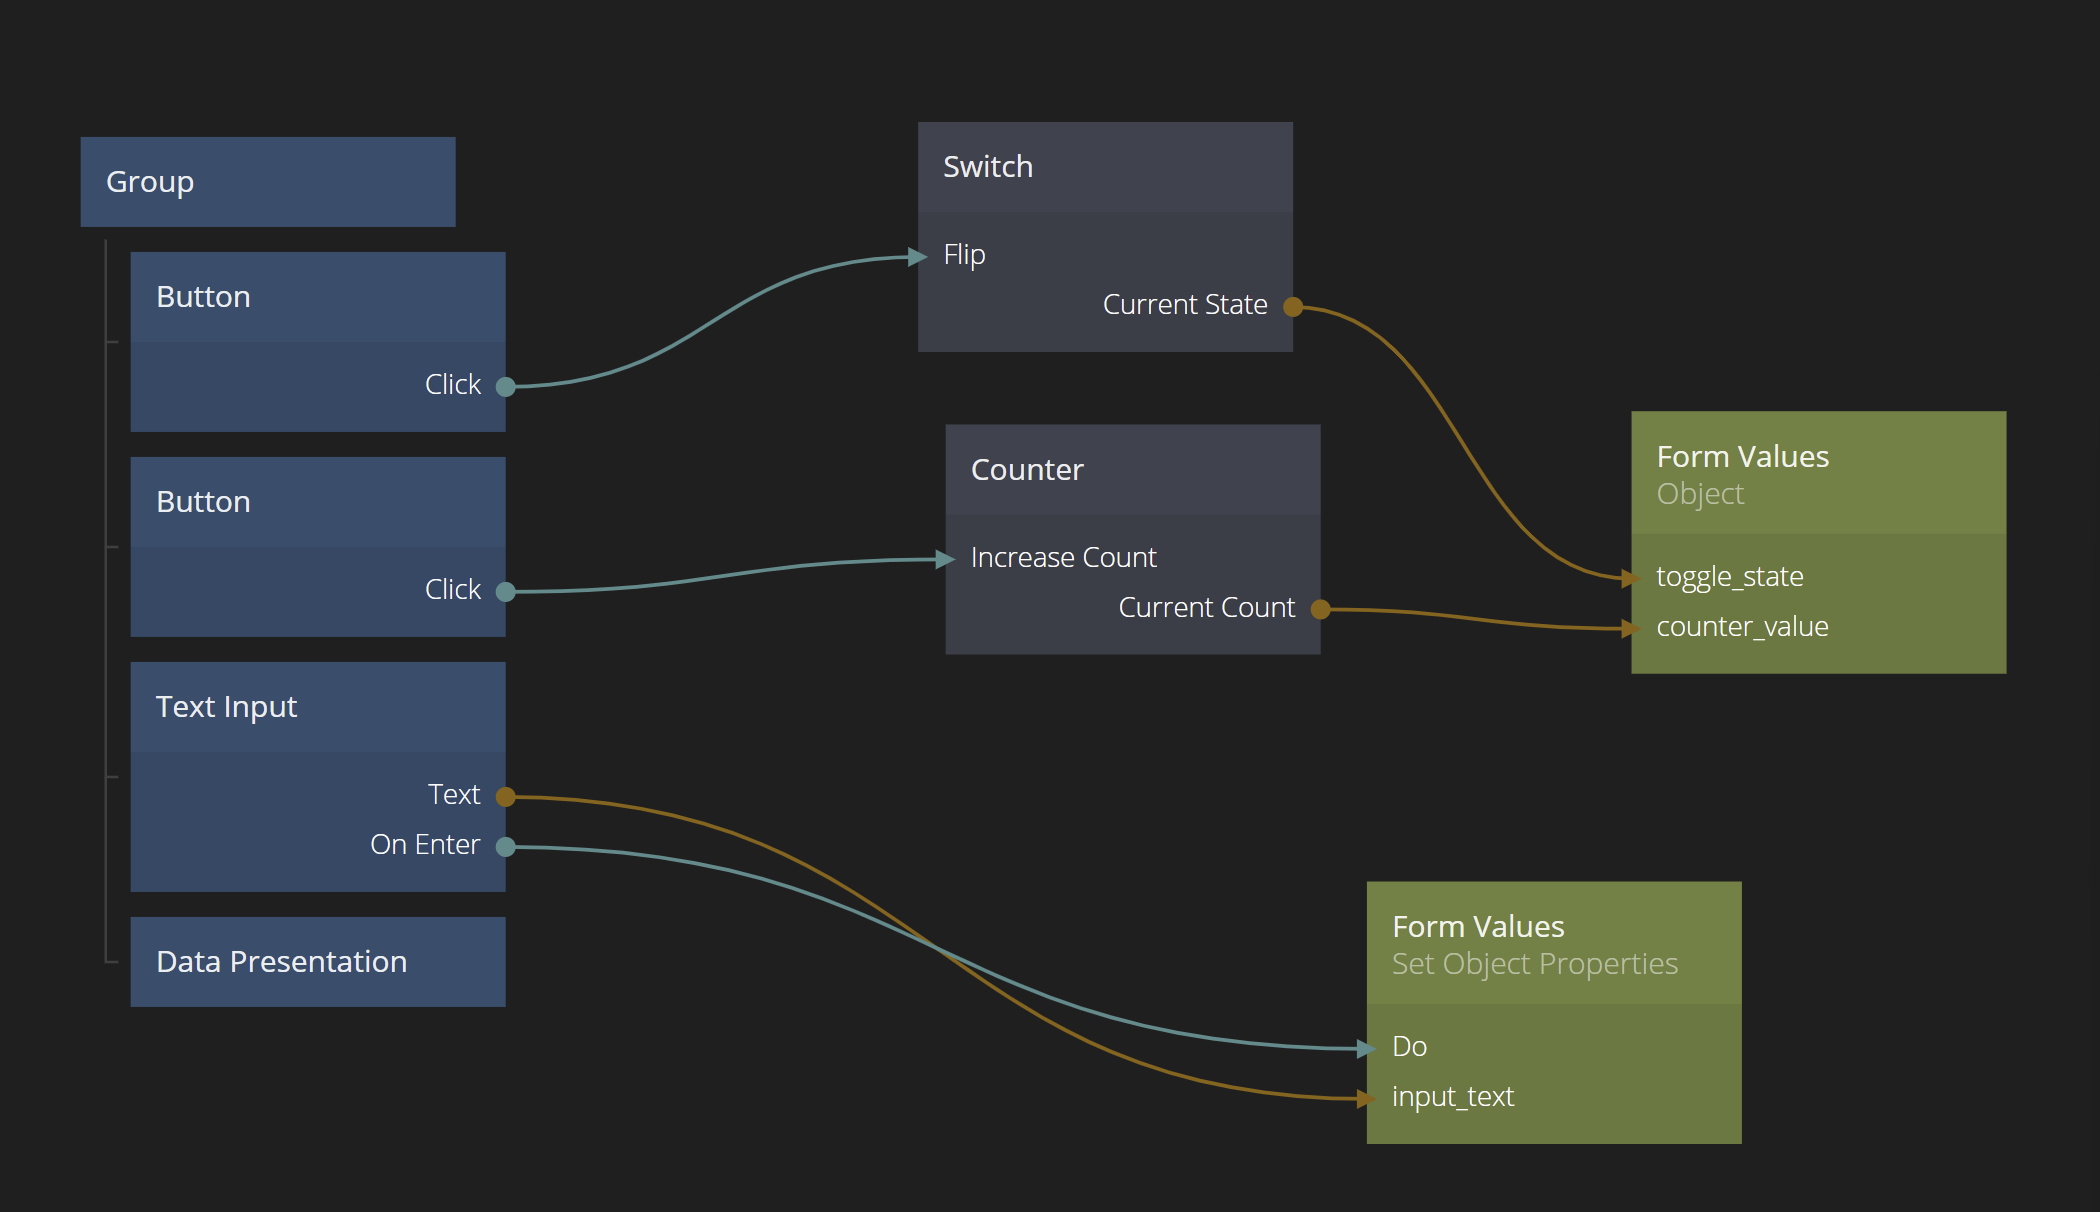
So add in the Switch and the Counter and hook them up.
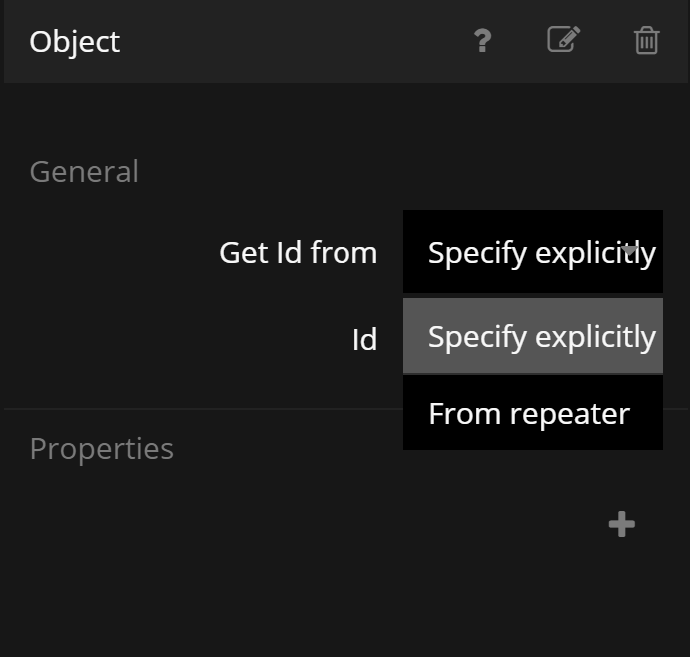
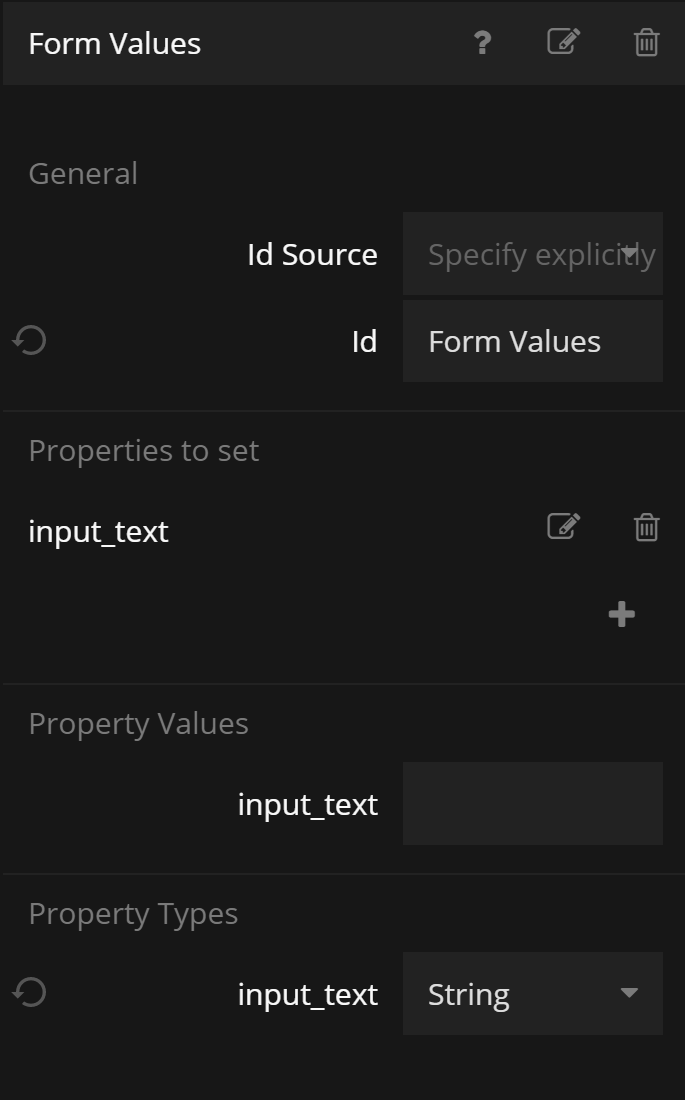
Now let's save the values in an Object. So create an Object node, make sure the id is set to Specify explicitly. This allows us to set an id of the Object. The other option, From repeater, is used if the component with this Object would be a list item in a Repeater node, which we will look at later in this guide.
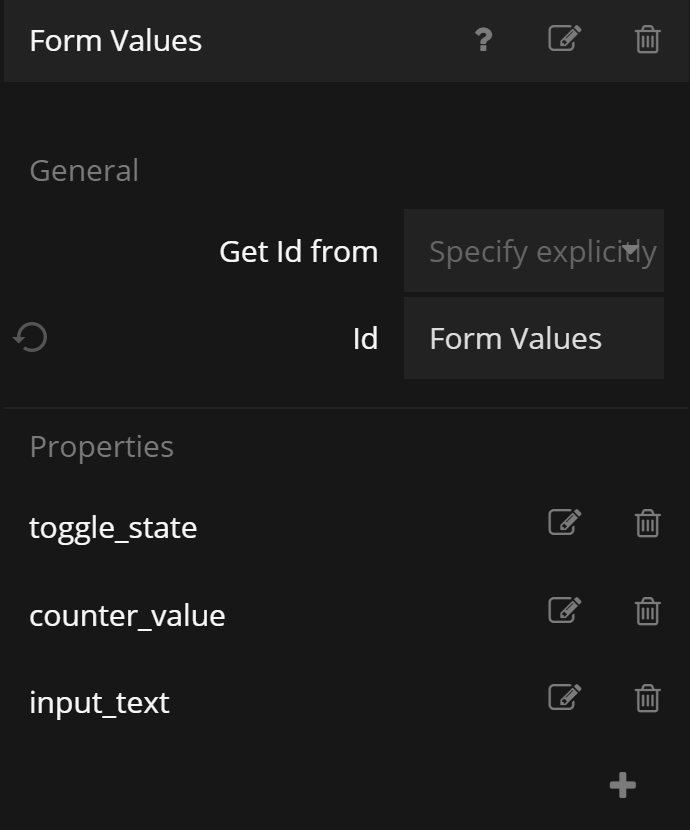
Give it the id Form Values. Then add three properties: toggle_state, counter_value and input_text.
Finally, connect the outputs to the Object as below.
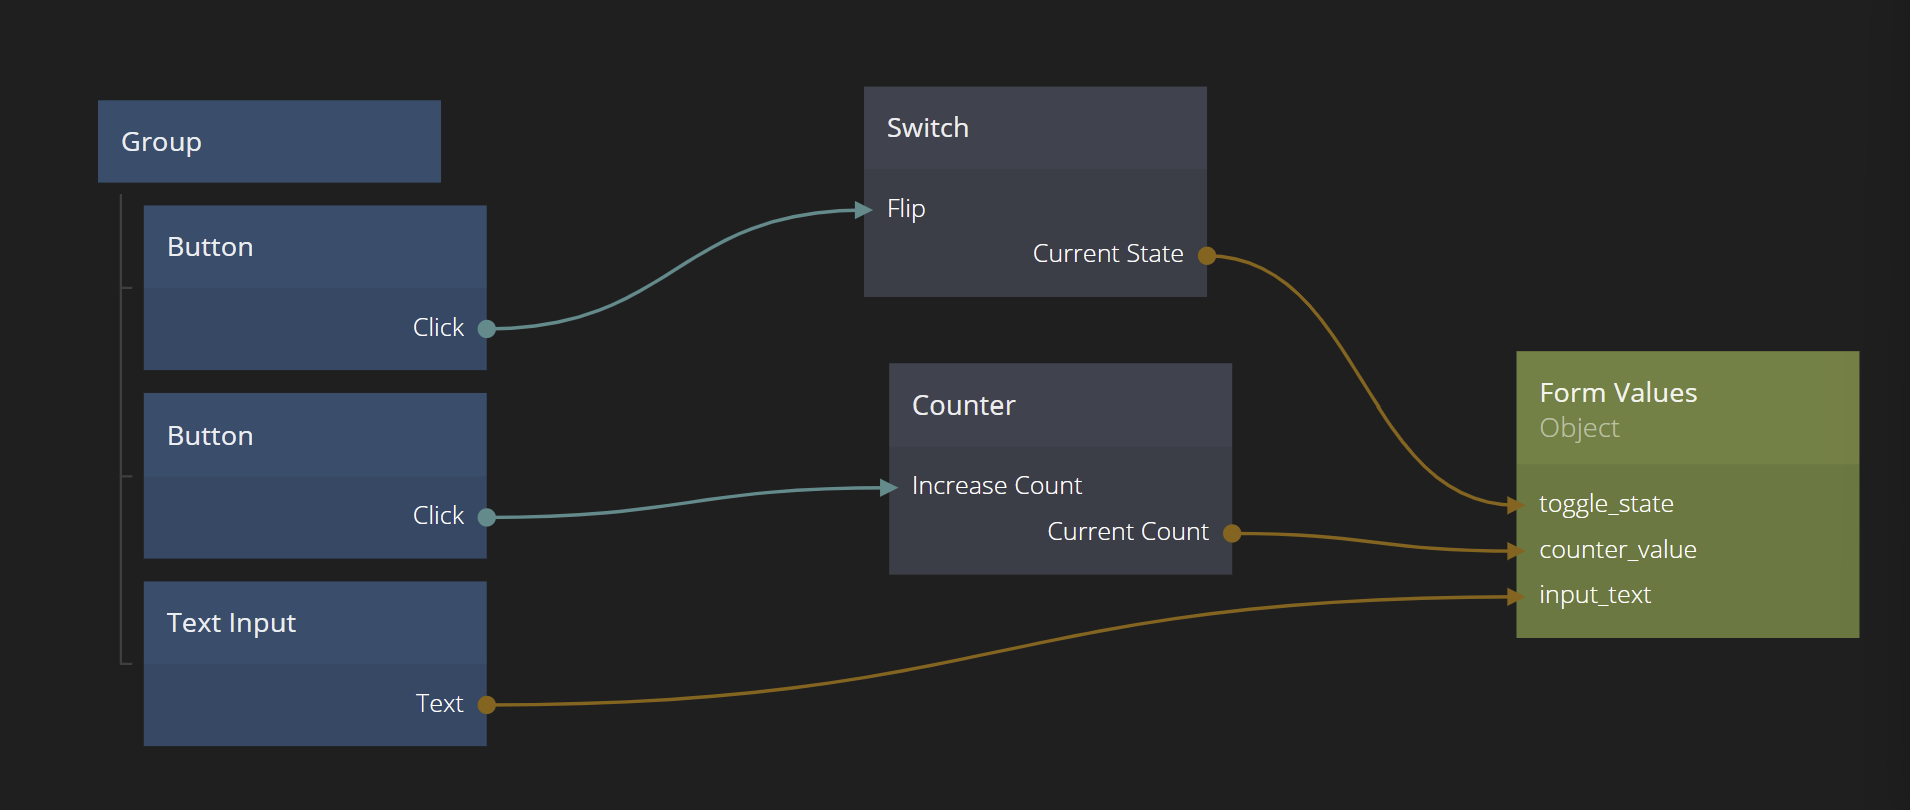
Now, whenever any of these outputs are changed, the new value is stored in the Object. This might be exactly what you want - or you might want to control much more specifically when the value is store. For example, maybe you only want to store the text from the Text Input when the user hits enter.
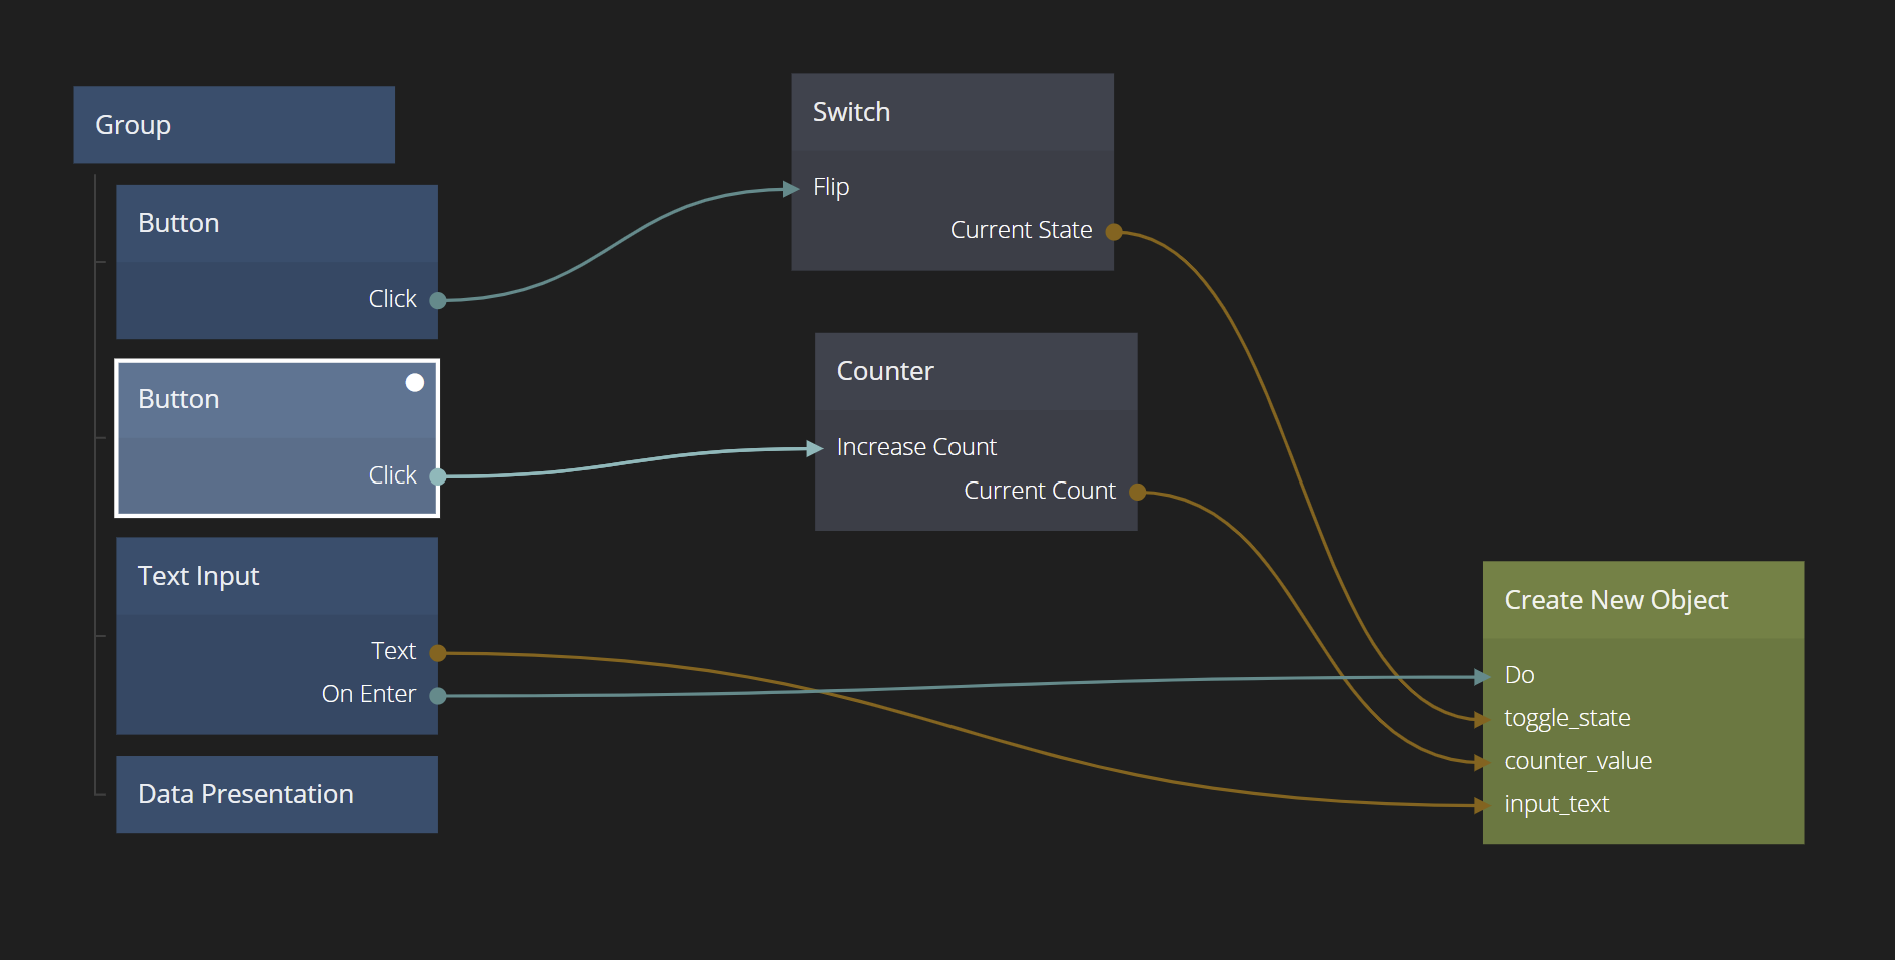
To do this more controlled set, we can use the Set Object Properties node. So let's add one in, make sure it's pointing to the same underlying Object by giving it the same id, i.e. Form Values. You will actually see it suggested when clicking the id input property.
Now you can add in the input_text property on the Set Object Properties node. You can also see that in the Set Object Properties node you can force what type the value should be when setting it. For example, forcing a Number, would store the number 1 rather than the string "1" if you type it in the Input Text node. However, we want it to always be strings in this case, so pick String.
Now connect the onEnter signal of the Text Input to the Do input signal on the Set Object Properties and make sure the Text output is hooked up to the input_text property. The nodes should look like below.
By hovering on the Object node and pinning the debug box by clicking on it, you will be able to see that the input_text property is only set when hitting enter.
Note the following:
- Not all properties need to be created on the Object or Set Object Properties node if you are not using them.
- You can mix and match "lazy" setting directly on the Object node and controlled setting using the Set Object Properties node depending on need.
Using Objects as global holders of data
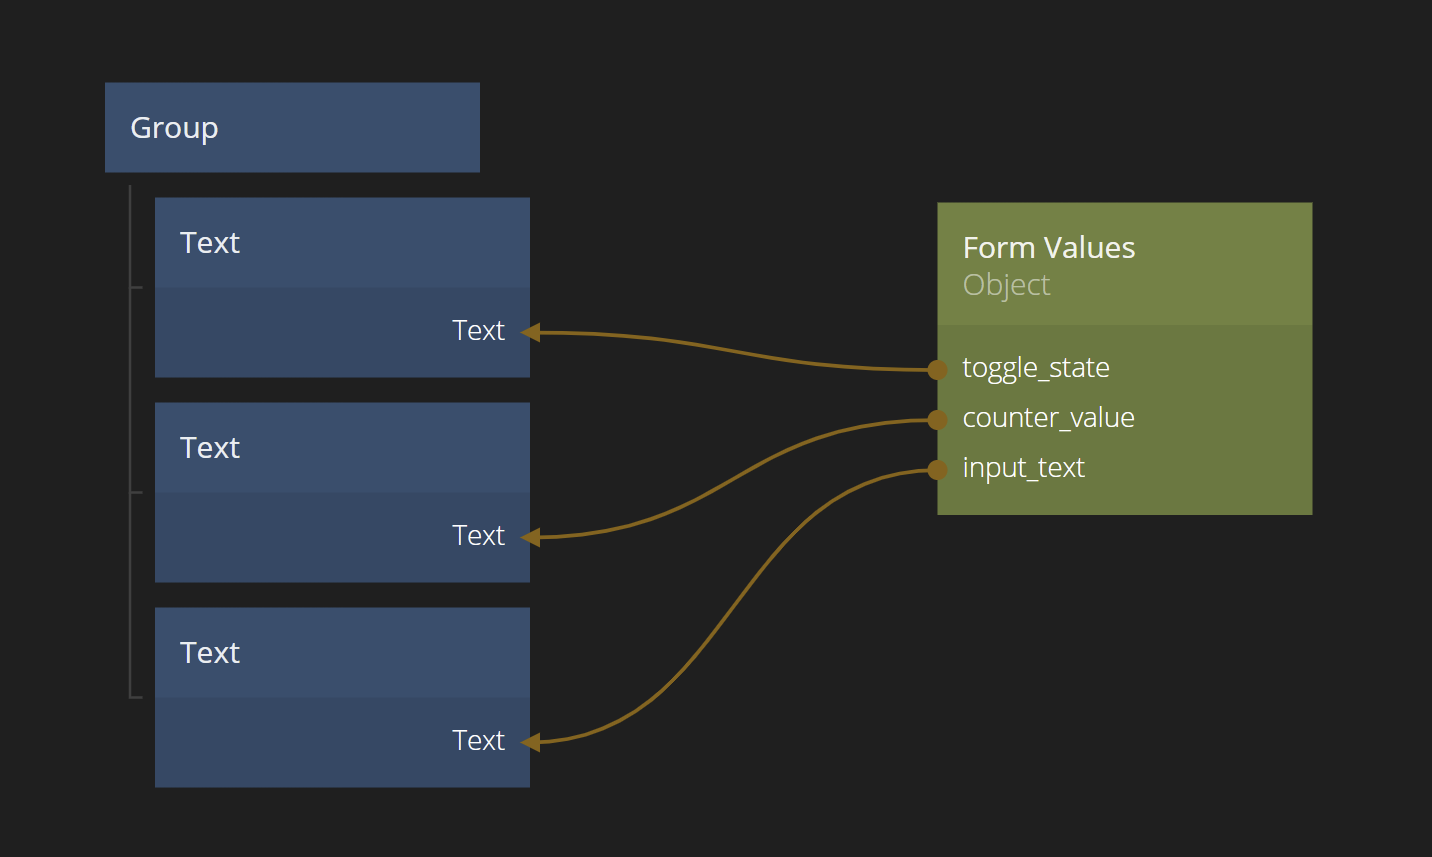
So let's use our Object in another component to show that it's available anywhere, as long as you know the id. Create a new visual component and call it Data Presentation.
Add three Text nodes to the root Group.
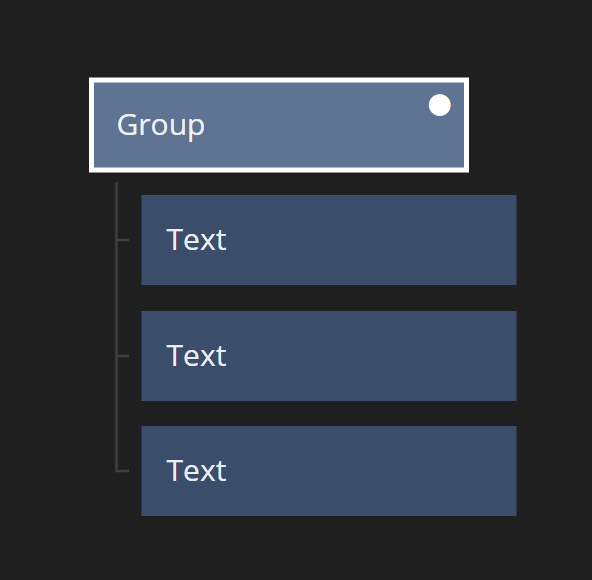
Now add om an Object node, give it the id Form Values and hook it up to the Text nodes. Don't forget to add the properties to the Object.
Finally we add the new component to our main component.
Now when changing the values you will see them updating immediately in the Data Presentation component.
Dynamically creating Objects
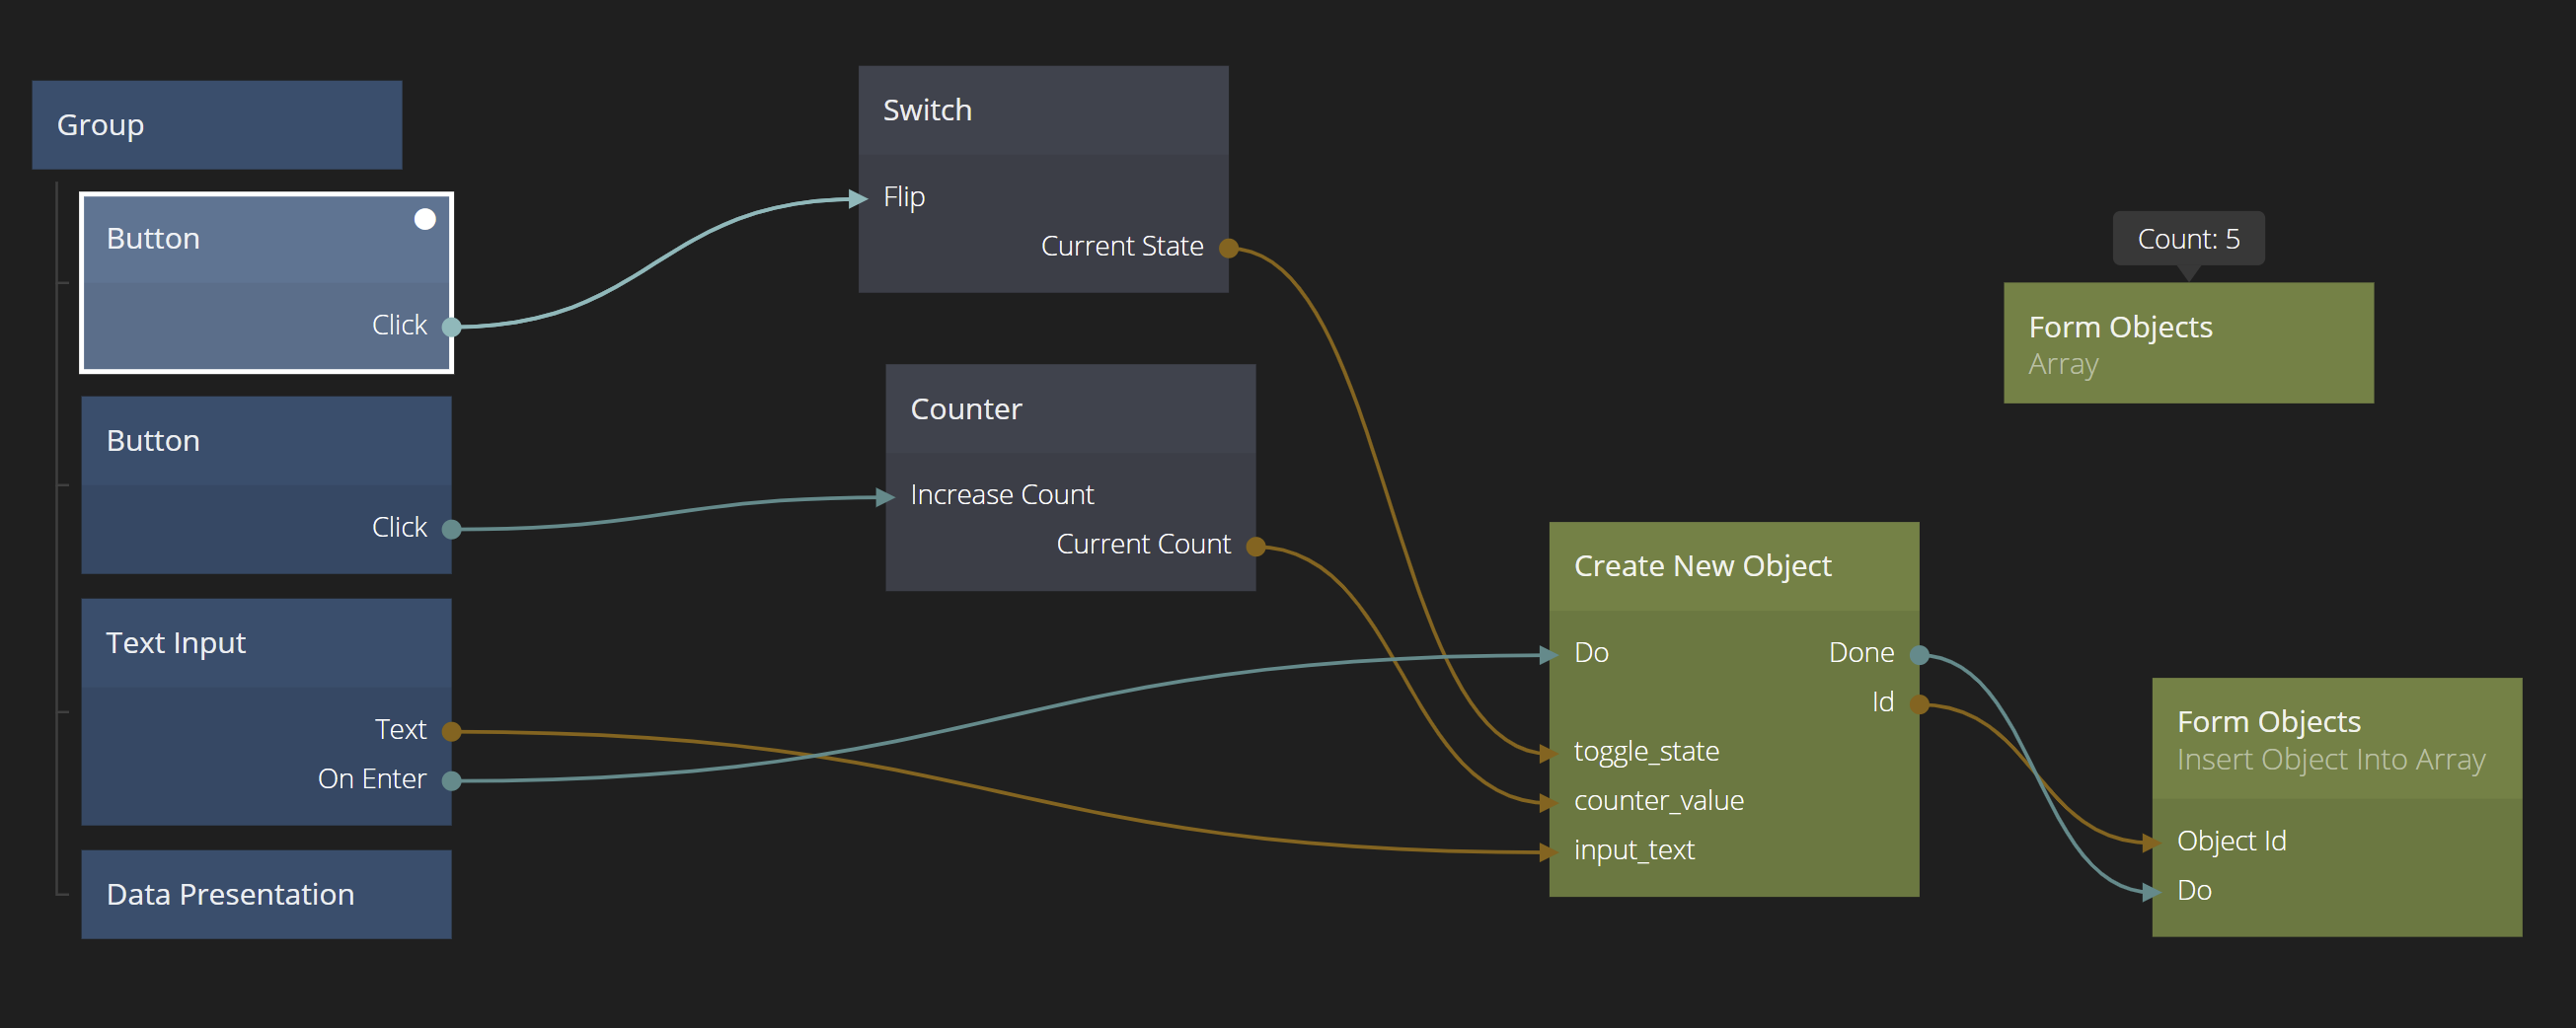
We will change it up a bit and create more Objects - actually we will create one every time the user hits enter. So lets change our nodes. In the Main component, remove the Object and Set Object Properties node. Instead add in a Create New Object node. Add our properties to the node, i.e. toggle_state, counter_value and input_text.

Then hook up the output values to the properties as before. Also connect onEnter to Do on the Create New Object.
Now whenever we hit enter we create a new Object with the properties set according to the Counter, Switch and Text Input. However the Objects are left somewhere in memory where we cant reach them. Each new Object have an id but we don't save that id anywhere. Let's fix that! Let's put the Objects in an Array.
Storing Objects in an Array
Add in an Array node. Give the Array the id Form Objects. Also add a Insert Object Into Array node.
If you check the documentation of the Insert Object Into Array node, it needs the id of the Object that should be inserted. Conveniently there is an output from our Create New Object that holds the id of the newly created object.
To insert the Object into the Array we need to trigger the Do signal on Insert Object Into Array. Also, we should not forget to specify the id of the Array we want to insert it into, namely the Form Objects.
The construct can be seen below.
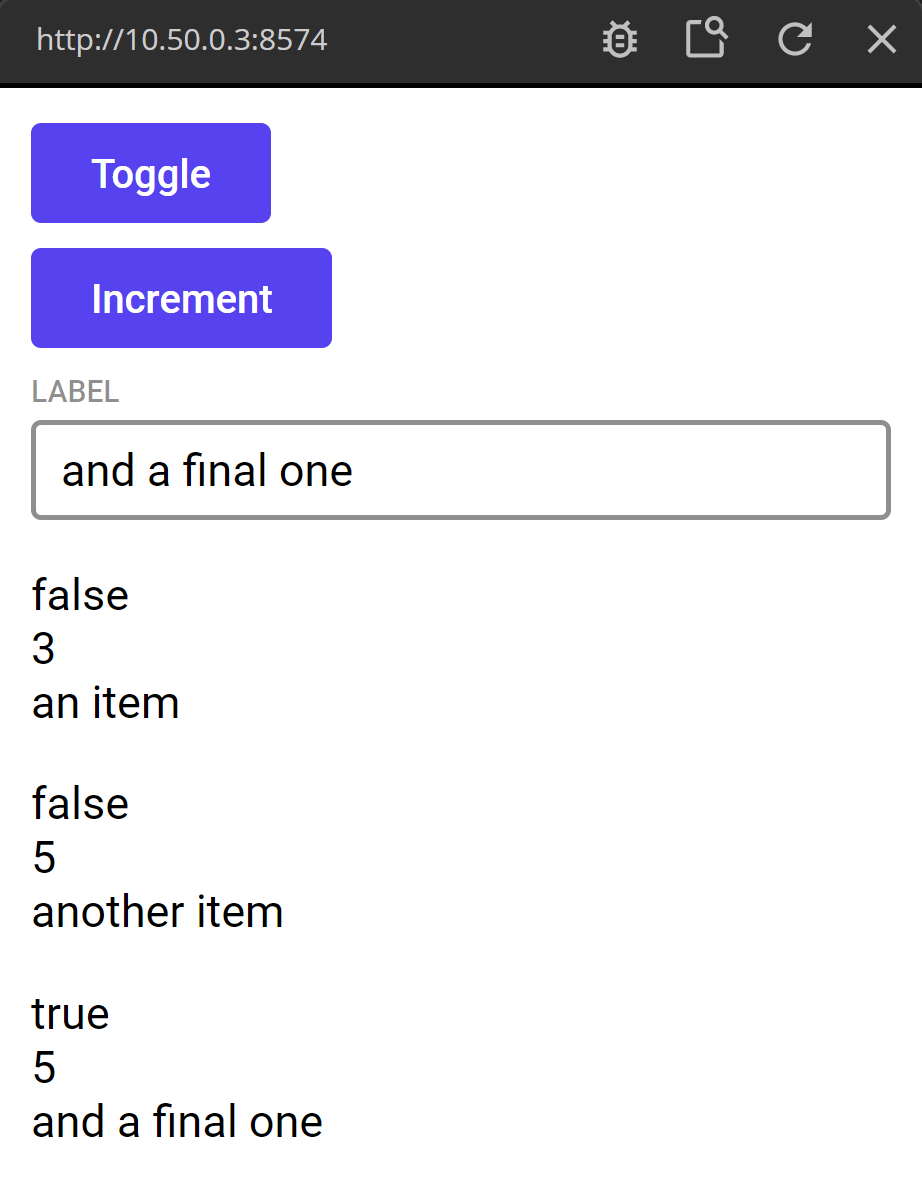
Now if you bring up the debug info on the Array by hovering on it and clicking the debug box, you will see the number of items in the Array. Everytime you hit enter in your App it should be growing as we are creating Objects and inserting into the Array.
Using Objects in list with the Repeater node
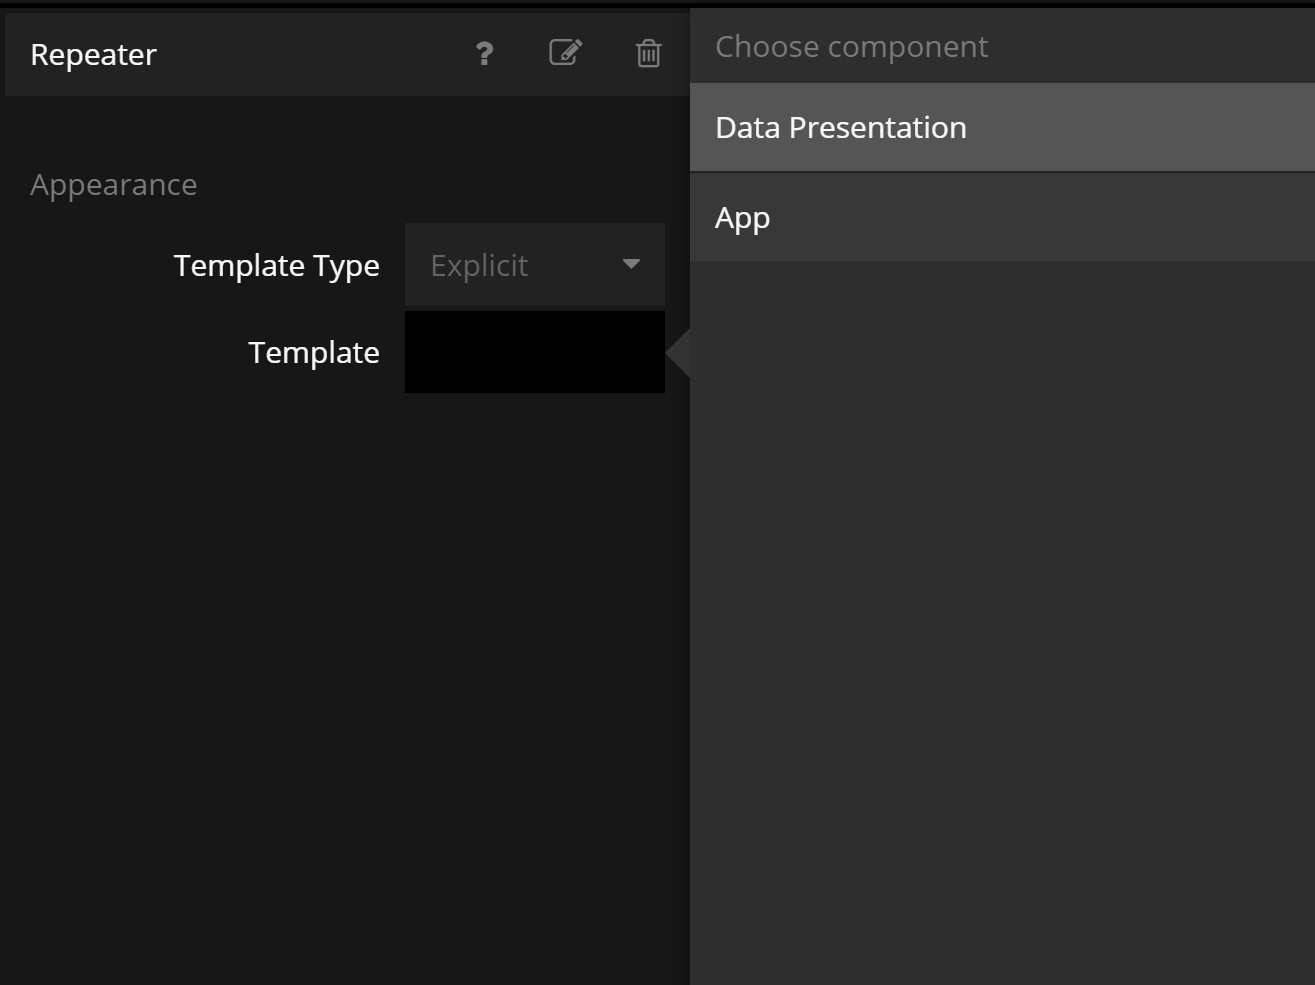
To wrap up this guide, let's also show all the Objects we are creating. We want to put them in a list, so we are going to need a Repeater node and turn our Data Presentation component into a list item.
So start with removing the Data Presentation node from our main tree. Replace it with a Repeater node. Then connect the Items output of the Array to the Repeater input also called Items. Now we are feeding the repeater from the Array.

Click on the Repeater node and make sure you select the Data Presentation node as the List Item template.
Now if you enter som data in your app and press enter, you will actually see new items pop up in your list, but they will be empty, or contain your old data if you didnt refresh the viewer recently.
The reason is that the Data Presentation component is still looking for data in our old object called Form Values and we removed that Object.
Go into the Data Presentation component. We need to change how the Object there gets its id.

Change it to From repeater and you should now be able to see the correct values in the list. Clean up the layout of the list items by setting their size to content height and add some margins.
Now you know how to use Objects in Noodl. Import the final project by clicking the "Import" button below.