Arrays
What you will learn in this guide
In this guide we will look more closely on how to use Arrays in Noodl. Arrays are fundamental for lists in Noodl and useful for many other things as well.
Noodl have a number of nodes related to Arrays. For accessing and modifying there are Array, Create New Array Insert Object Into Array, Remove Object From Array and Clear Array.
For mapping and filtering an Array the Array Filter and Array Map.
You will also learn to use the Static Array node which is very useful for handling static list data in your App.
Overview
This guide will walk through the following topics
- What's a Noodl Array
- Creating Arrays, statically and dynamically
- Adding and Removing objects from an Array
- Using Static Arrays
- Using Arrays in Lists and Dropdowns
- Filtering Arrays
Arrays are used all the time in Noodl. Hence they occur in many guides. It's suggested to check out the List Basics guide to learn more about how to display Arrays as lists. Also when querying data from a Backend Database the data is returned in an Array hence it could be interesting to check out some fo the Cloud Data guides in conjunction with this guide.
Before reading this guide, it's a good idea to have a basic understanding of what an Object is, which is described in this guide.
What's a Noodl Array
A Noodl Array is an ordered list of items, Objects or (if the array is the result of a database query) Records. An Array i Noodl is represented with an Array node.
note
Note that a Noodl Array is not the same as a JavaScript array. They are easy to convert between but you cannot access a Noodl Array using JavaScript Array functions. Instead there is a Noodl Array API that will be covered later in the guide.
The Id of an Array
As with the Variable and Object, an Array is uniquly identified by its Id. Any node referencing an Array, through an Array node or Insert Object Into Array etc, do it through an Id.
Therefore it's quite common to connect the Id from one node, e.g. an Array node, to the Id of another node, for example an Insert Object Into Array to make sure they are operating on the same Array. You can also just write the Id into the nodes if the Id is static.
Below are three typical cases of how to use the Id of an Array and make sure a Clear Array node is acting on the same Array.
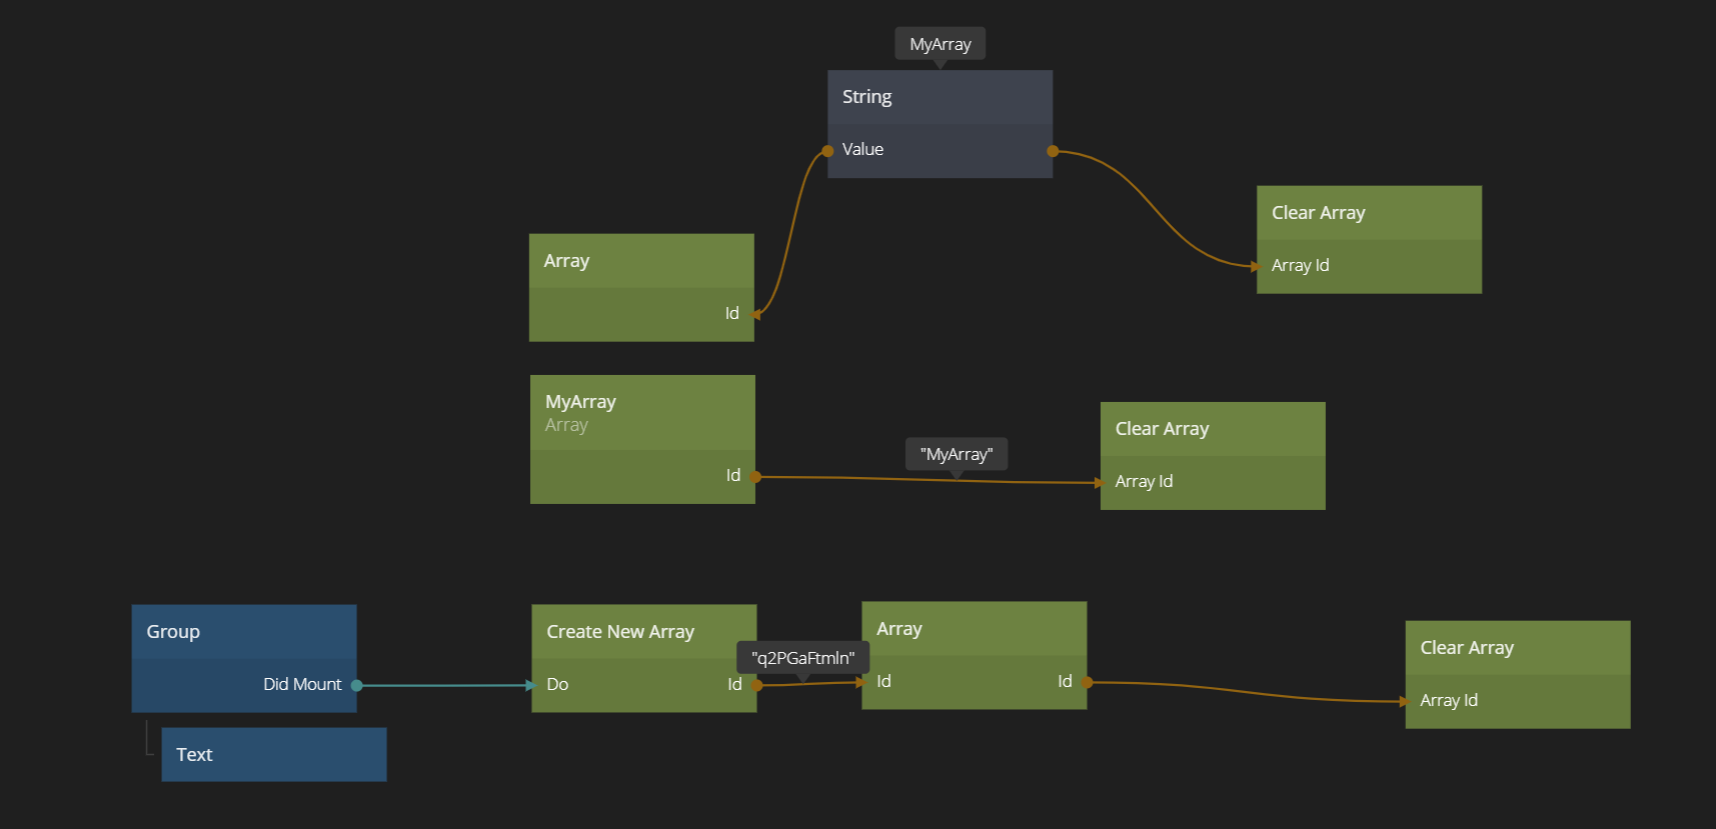
In the first case the Id of an Array is stored in a String node (or for example a Variable) which is then used to refer to the Array in different node.
In the second case the Id is set directly in the Array node, and then that Id is used to point the Clear Array to the correct Array. The Id is set in the property panel.

In the last case the Id is generated from a Create New Array below (more on that later) and then used to make sure the Clear Array node operates on the correct node.
The Items of an Array
The Items of an Array are either Objects or Records. An item can be a member of multiple Arrays. This means that two different Arrays (i.e. with different Ids) can have exactly the same items, but they are still different Arrays. An item can only occur once in an Array.
When you hover over an Array node in the node canvas you will see how many items the Array currently has.

You can easily assign items to an Array by setting the Items input of an Array node. This is often done used for example when you do a query to the database through a Query Records, or handling the result of a Array Filter or Static Array. See three examples below.
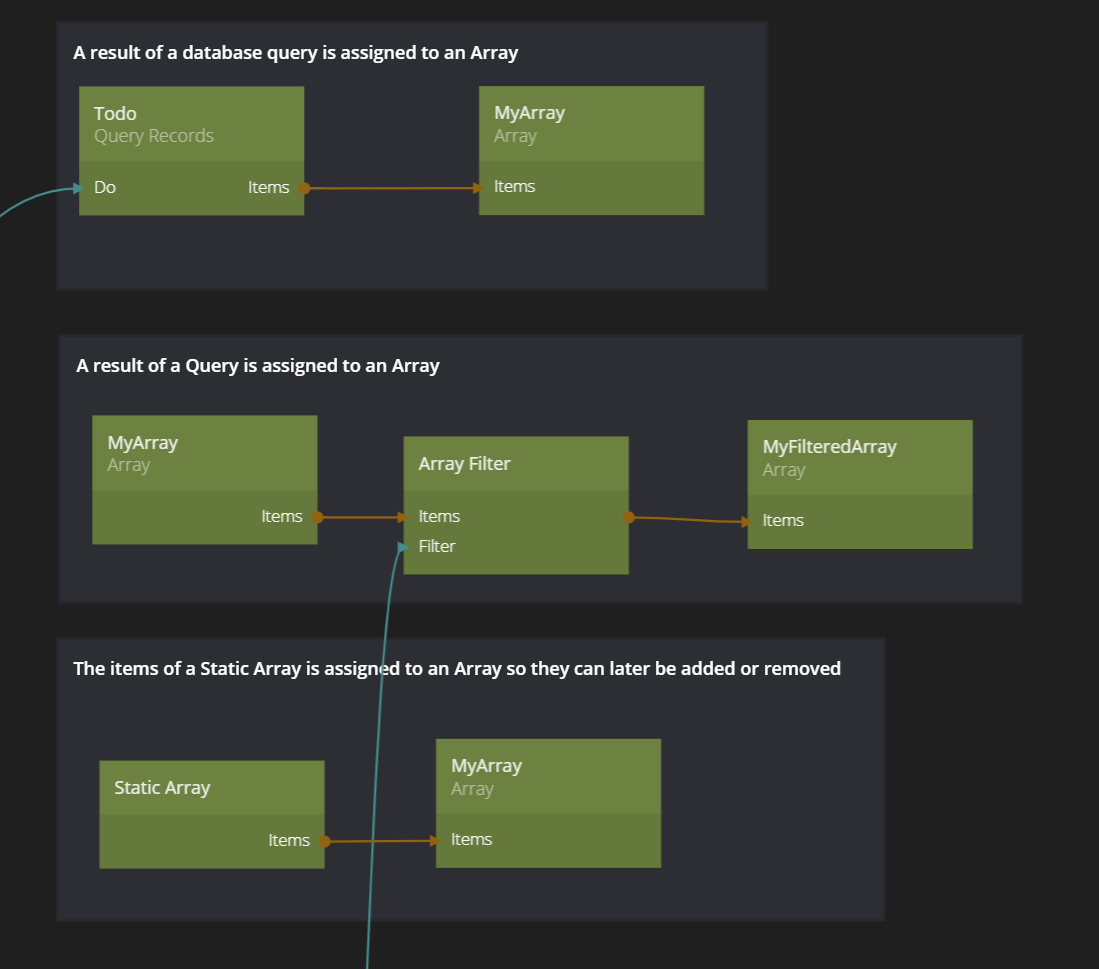
Most often you assign items to an Array because you want to process them (perhaps add or remove some more items) or keep track of them to be used later.
Creating Arrays
As you saw in the example above there are two main ways of creating an Array.
Static creation - You simply add an Array node in you node graph. You can give the Array an Id (as discussed above) or simply leave it blank, which means an Id will be assigned automaticallt to the Array.
Dynamic creation - You create a new Array on a certain event, for example using a Did Mount signal or a Click signal.
note
If you give your Array a static Id and if you have multiple instances of the component with the Array node (for example a couple of list items), the same Array will be referenced in all those components. This may or may not be what you want, so keep that in mind.
Creating a Recipe App
Now let's start playing around with Arrays. Let's create a small recipe app. The overall idea would be to have a list of Recipes (stored in an Array) and each recipe have a bunch of ingredients, also stored in an Array. So in the end we'll have an Array with Arrays.
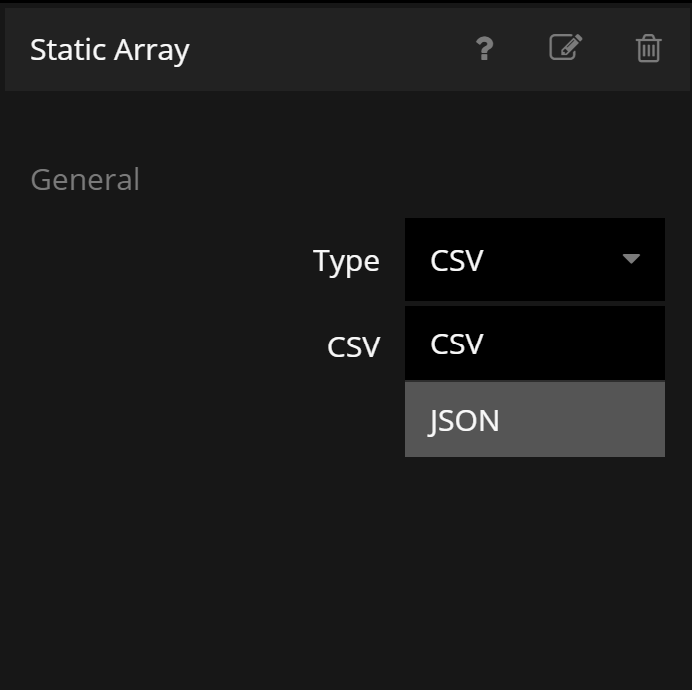
Let's start with some sample data! Create a new project, using the "Hello World"-template. Then create a Static Array node. Make sure it's set to JSON format.
Then copy and paste the following into the JSON data.
[
    {
        "name": "Swedish Pancakes",
        "description": "A simple tasty recipe of classic Swedish pancakes (8-10 pcs)",
        "containsMeat": false,
        "ingredients": [
            { "amount": "150 g", "name": "Wheat flower" },
            { "amount": "1/2 tsp", "name": "Salt" },
            { "amount": "3", "name": "Eggs" },
            { "amount": "600 g", "name": "Milk" },
            { "amount": "1 tbsp", "name": "Butter" }
        ],
        "instructions": "Mix flower, salt, milk and eggs well. Fry thin pancakes on medium heat in butter, 3-4 minutes on each side"
    },
    {
        "name": "Swedish Meatballs",
        "description": "A swedish classic. Eat with potatoes, gravy and lingonberries.",
        "containsMeat": true,
        "ingredients": [
            { "amount": "500 g", "name": "Minced meat" },
            { "amount": "1", "name": "Egg" },
            { "amount": "1 clove", "name": "Garlic" },
            { "amount": "3 tbsp", "name": "Bread crumbs" },
            { "amount": "1/2", "name": "Yellow Onion" },
            { "amount": "2 tsp", "name": "Concentrated beef stock" },
            { "amount": "2 tbsp", "name": "Full cream" },
            { "amount": "1 tsb", "name": "Salt" },
            { "amount": "1/2 tbsp", "name": "Ground pepper" },
            { "amount": "2 tbsp", "name": "Butter" }
        ],
        "instructions": "Chop the onion finely. Put in a bucket. Press the garlic into the bucket. Add egg, bread crumbs, cream, beef stock, salt and pepper and mix. Let it rest for 10 mins. Mix in the minced meat. Make small balls and fry (8-10 at a time) in butter until golden brown and cooked through."
    },
    {
        "name": "Kalops",
        "description": "This Swedish stew should be eaten with potatoes and pickled red beets.",
        "containsMeat": true,
        "ingredients": [
            { "amount": "1 kg", "name": "Boneless Beef" },
            { "amount": "2 tbsp", "name": "Butter" },
            { "amount": "2", "name": "Yellow onions" },
            { "amount": "4", "name": "Carrots" },
            { "amount": "3", "name": "Bay leafs" },
            { "amount": "30", "name": "Allspice grains" },
            { "amount": "1 litre", "name": "Water" },
            { "amount": "2 tbsp", "name": "Concentrated beef stock" },
            { "amount": "1 1/2 tbsp", "name": "Corn starch" },
            { "amount": "1 tsb", "name": "Salt" },
            { "amount": "1/2 tbsp", "name": "Ground pepper" }
        ],
        "instructions": "Cut the meat into 3x3 cm pieces. Peel and cut onions and carrots into 3cm pieces. Fry the meat in a pan with butter until it has a nice surface. Add onion, carrots, bay leafs and allspice. Pour over the water and beef stock. Bring to boil and leave until the meat is tender (2-3 hours depending on meet). Thicken the stew with the corn starch. Add salt and pepper."
    }
]
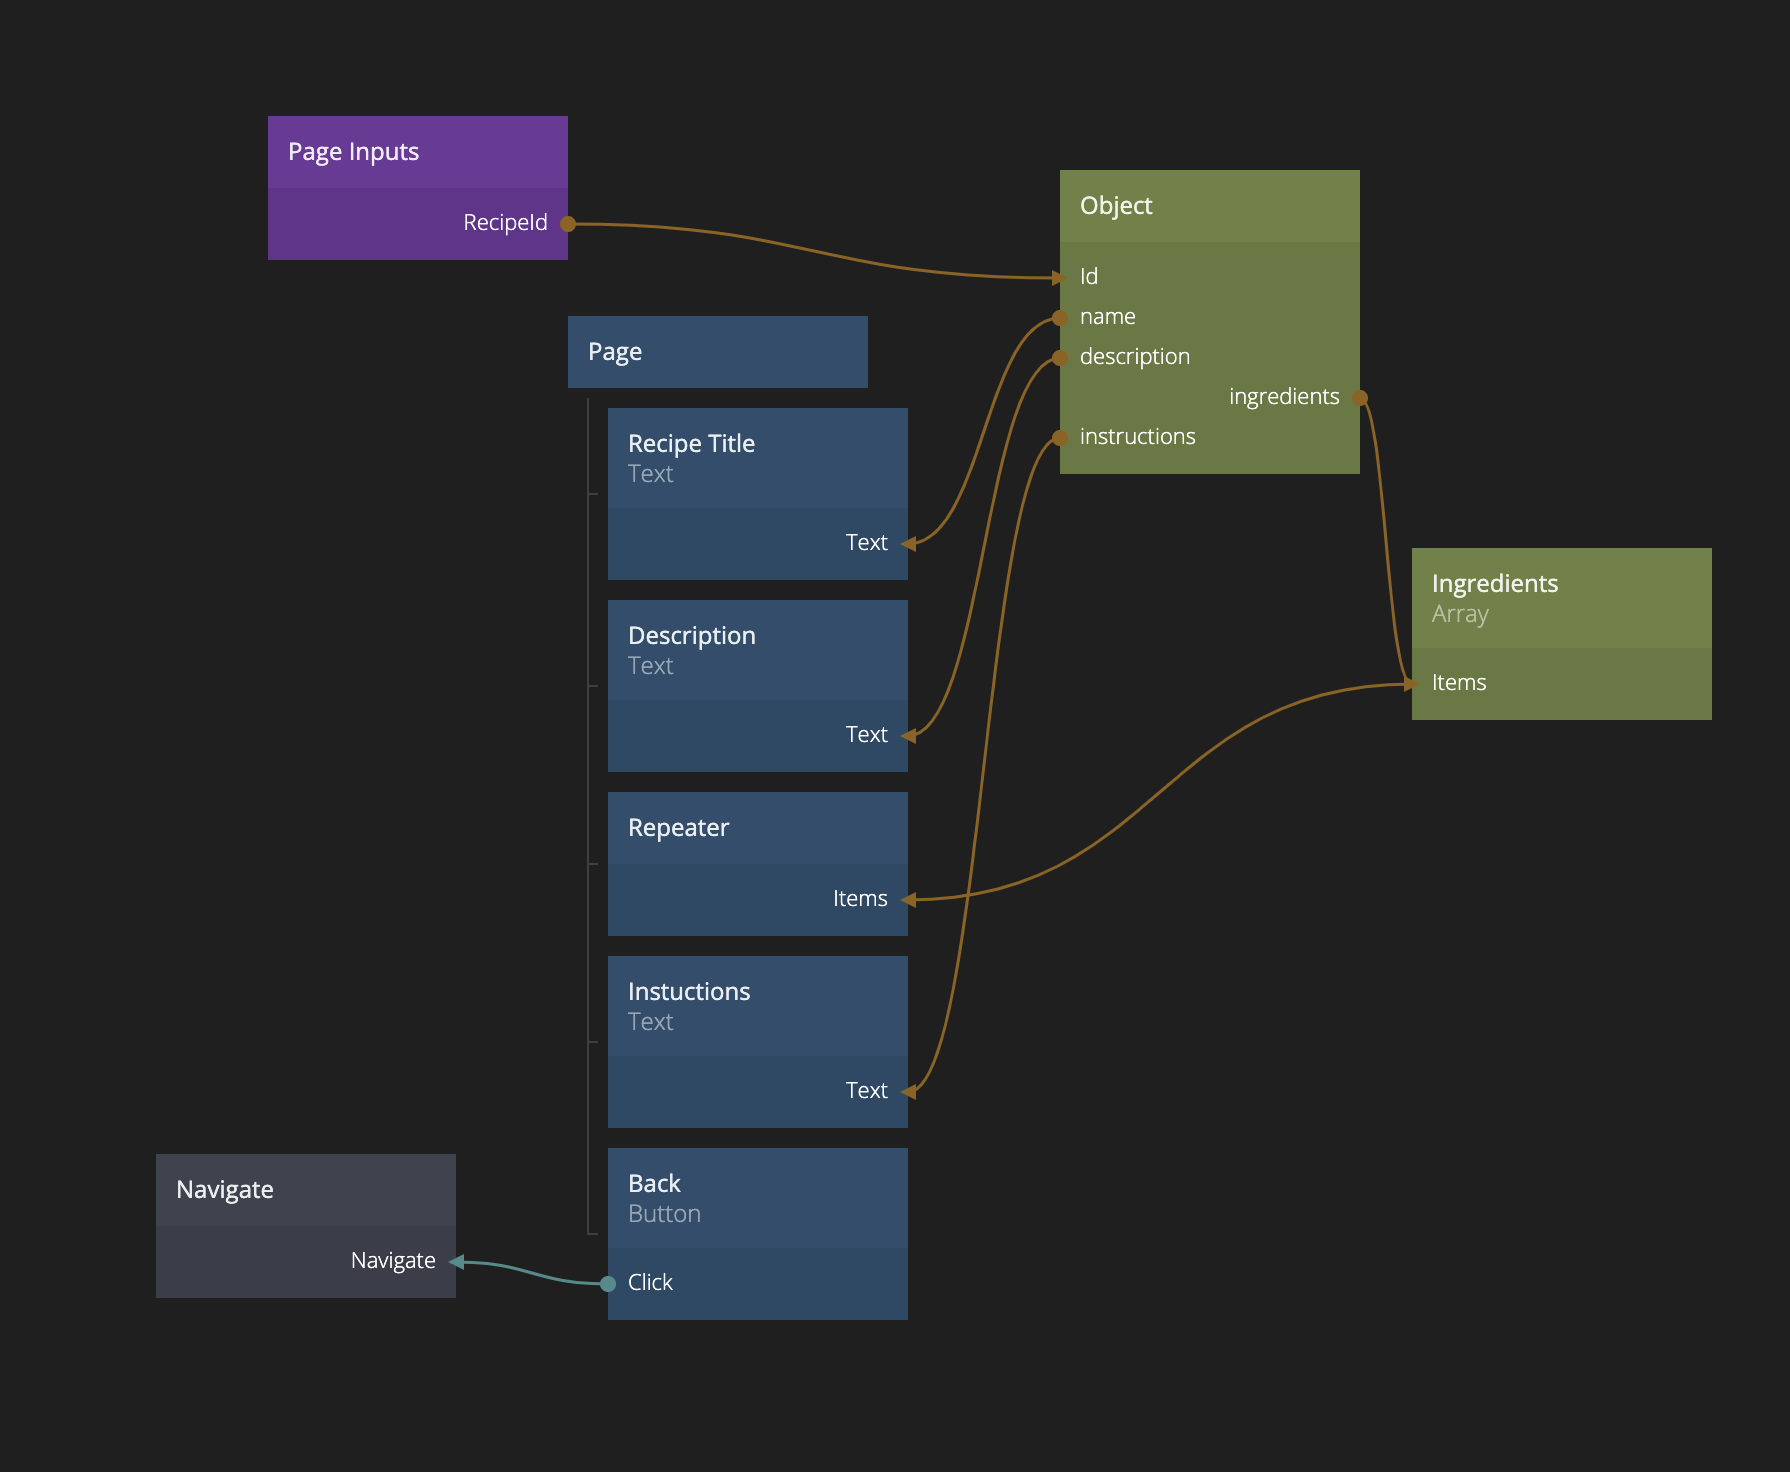
Now we have some data to play with. Let's start by taking a look at it. We want to look at both the outer list (the recipes) and one of the inner lists (a specific) recipe, just to get a feel for it. Connect the Items output of the Static Array to an Array Filter node. Then take the First Item Id of the Array Filter and connect it to an Object node. Add a property to the Object node called ingredients and connect that one to an Array node. Also open up the debug popup on the connections to see what's going on.
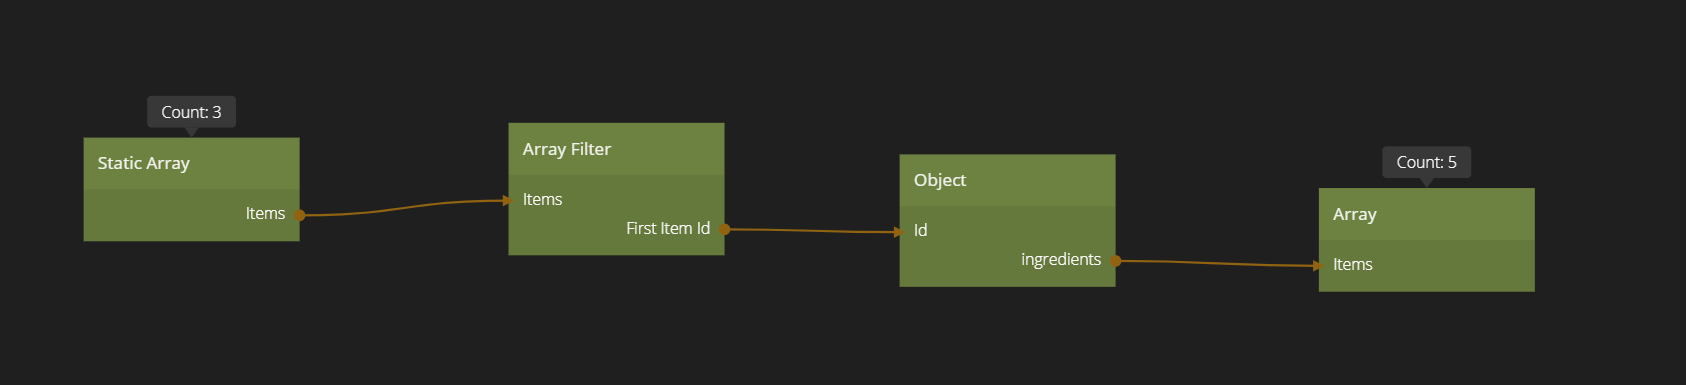
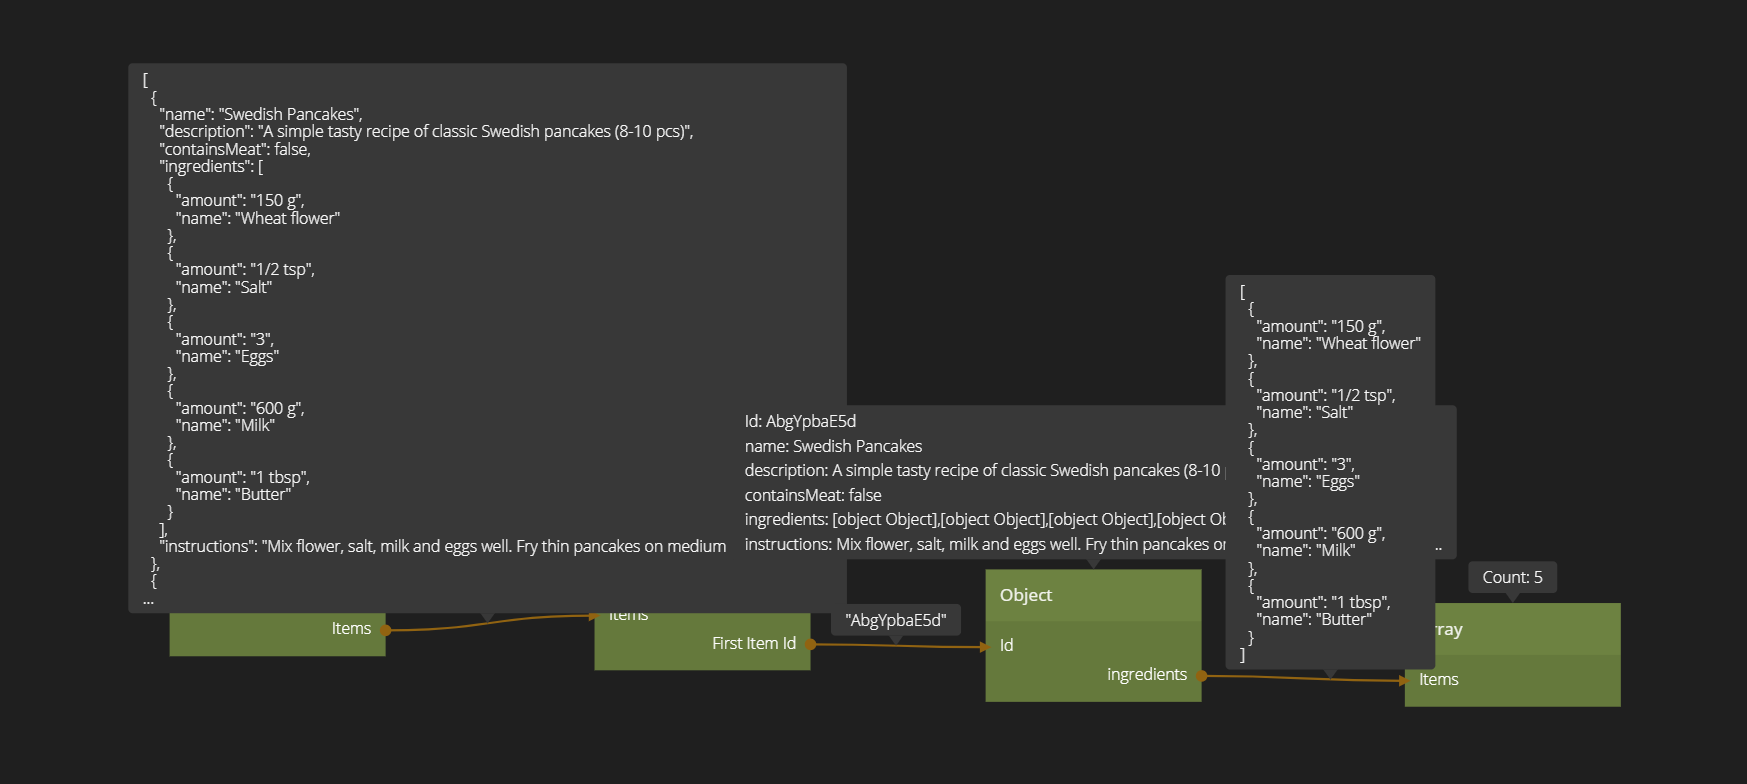
Filtering out the first item in an Array
To explain in more on what's going on. We take the items from the Static Array and feed them into a Filter Array node. The filter actually doesn't have any filters enabled but we can make use of its First Item Id output which holds the Id of our first Object in the Array (the Pancake recipe). In that Object we look at the ingredients property which contains an Array of items. These items are set as Items for another Array which now will contain the ingredients of the Pancake recipe. Phew! The Array Filter / First Item Id output is very useful if you want to get a sample of what's in a list.
Let's create some simple UI around our recipes. To make the app a little easier to interact with, we need a simple navigation system. You can learn more about how to do navigation in this guide. In this guide we will not go into details.
Making a list to show the Array
Start by adding a Page Router in the root component. Also get rid of the Text node.

Click on the Page Router and add a new page called Recipe List.
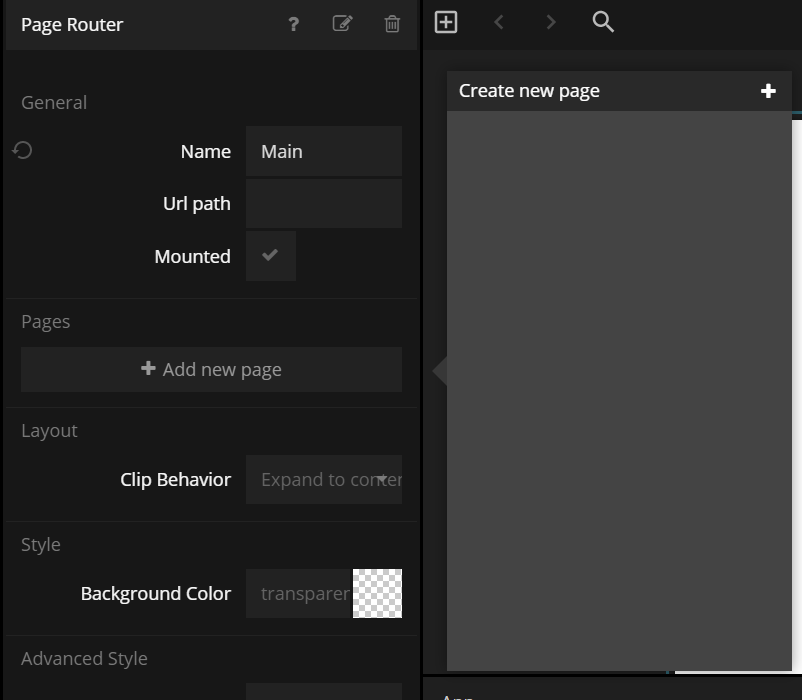
You will now have a new Page component in your component tree.
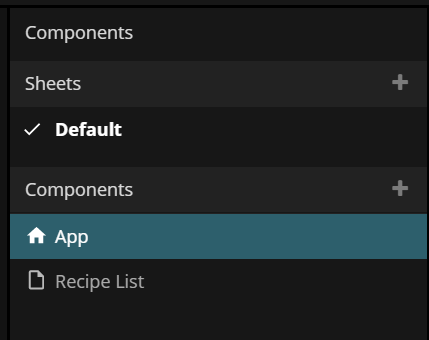
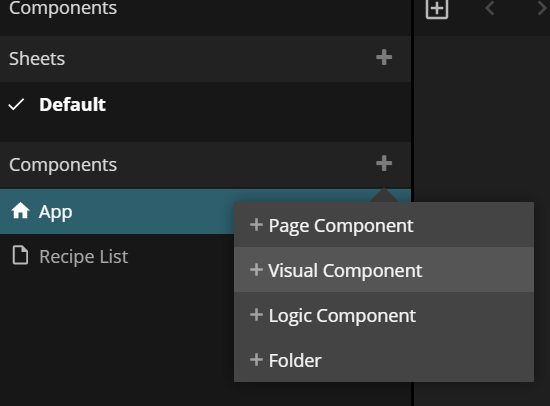
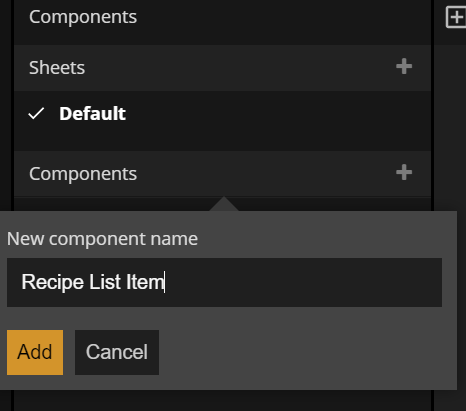
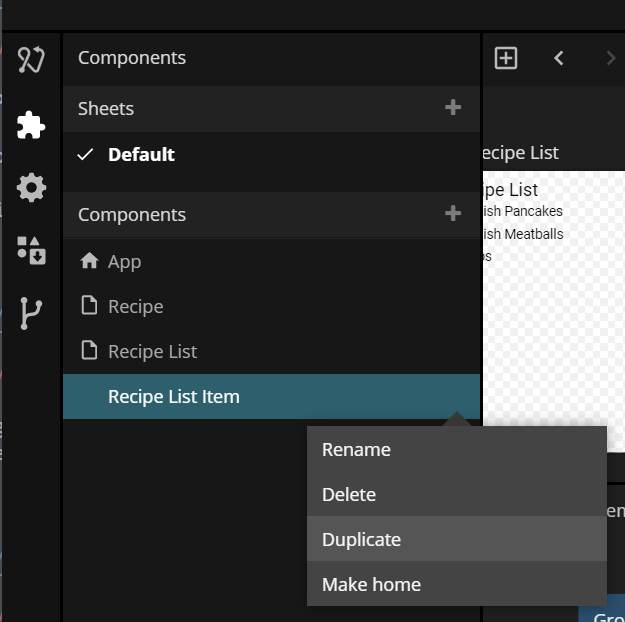
Create yet another component. This time a visual component called Recipe List Item. This will be a list item for a list we soon are going to build.
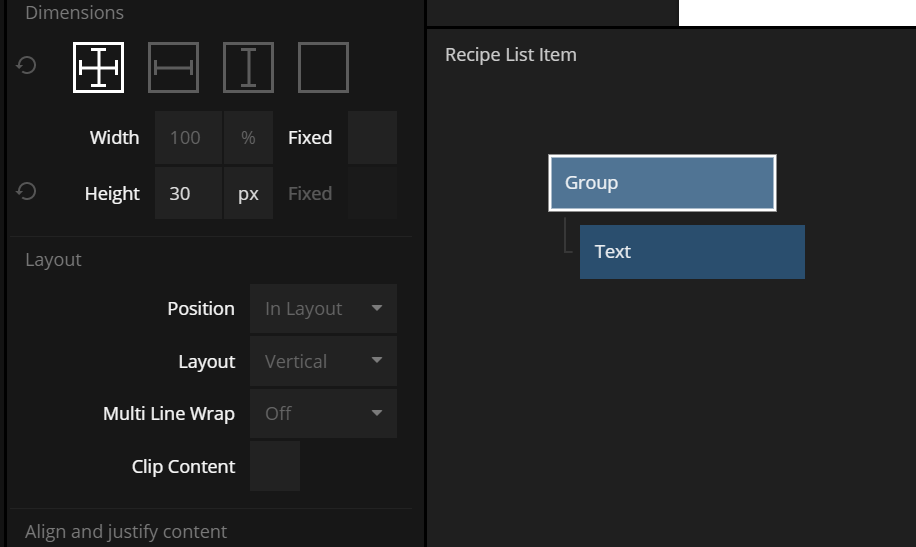
In that component, set the size of the list item to be width 100% and height 30 px. Also add a Text node to the root Group. Center the text vertically and left align it.
Now go to the newly created Recipe List page. Add a text node that will be the title. Maybe increase the font size to 24 px. Give the Page some white space by adding 10 px padding top and left direction.

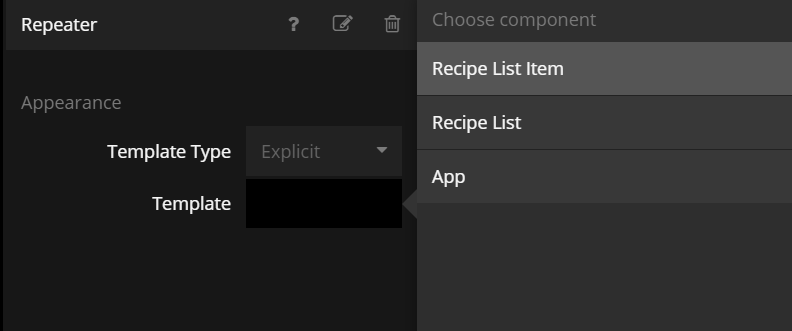
Then add a Repeater node under the title Text node. Make sure the newly created Recipe List Item is used as a template.
Now move (for example using cut/paste) the Static Array node from the main App to this page and connect the Items output to the Repeater.
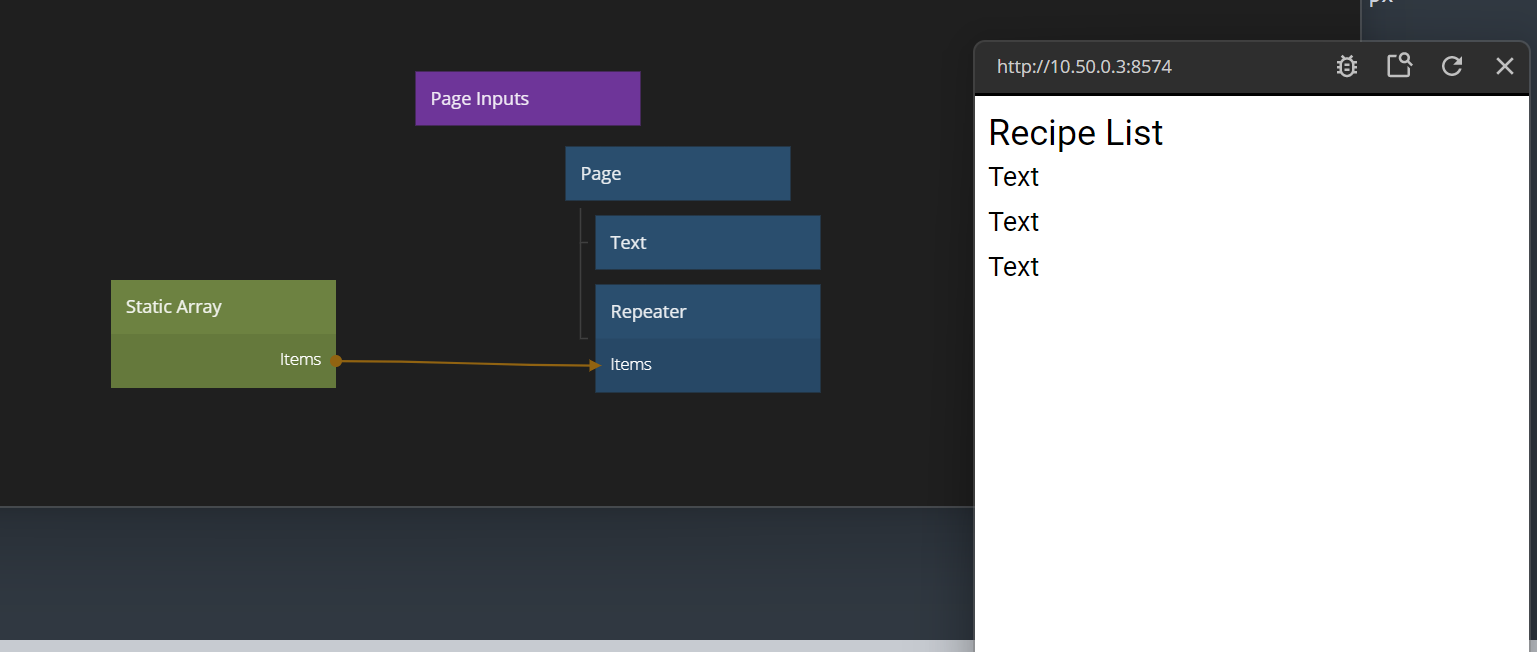
The final step to get the list working is to connect the correct data point in the Object to the Text in the list item. Go to Recipe List Item and add a new Object node. Make sure its Id comes from the repeater.
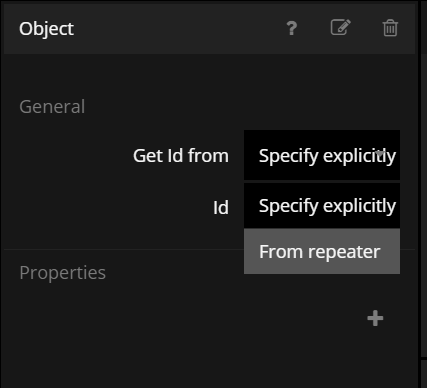
Then add a property on the Object called name and connect it to the Text node.
This simple list will do for now. If you want to learn more about how to make lists it's recommended to go through the list guides, starting with List Basics.
Removing an Object from an Array
So let's add some functionality to the list. Let's make sure we can remove some recipes. We begin by adding an button for it on our list item. Go into the Recipe List Item component.
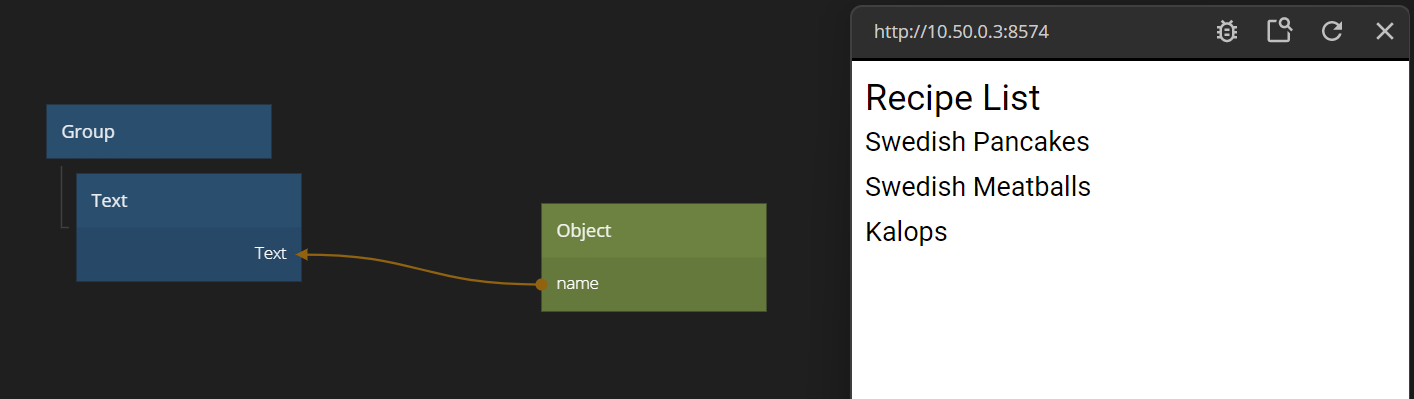
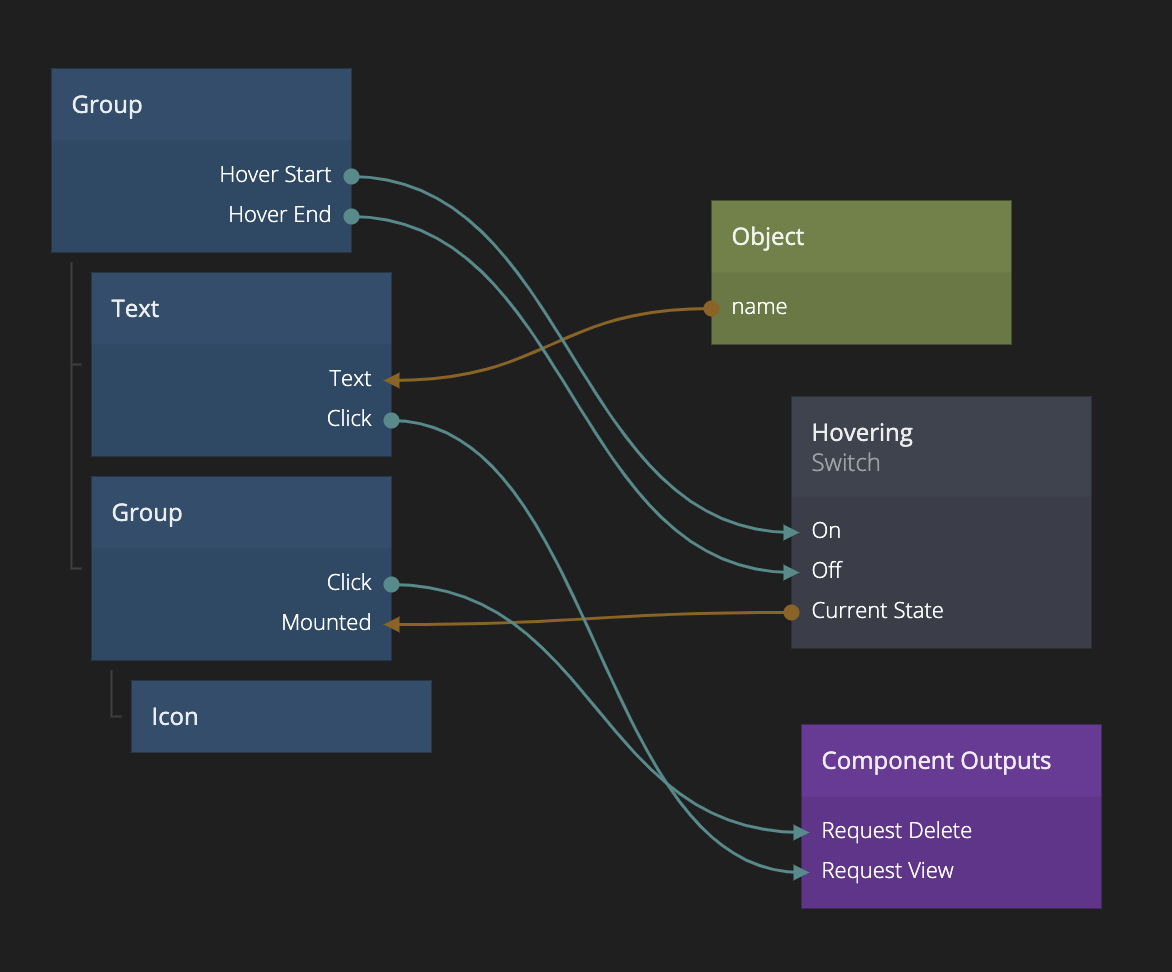
Change the layout of the root Group to horizontal. Then add a new Group as a sibling to the Text node and in that Group node an Icon node. Find a good icon for delete and also make sure it is black, so you can see it properly. Also, change the sizing of the newly added Group node to Content Width and Height. Tweak the size, margins and padding so it looks ok.
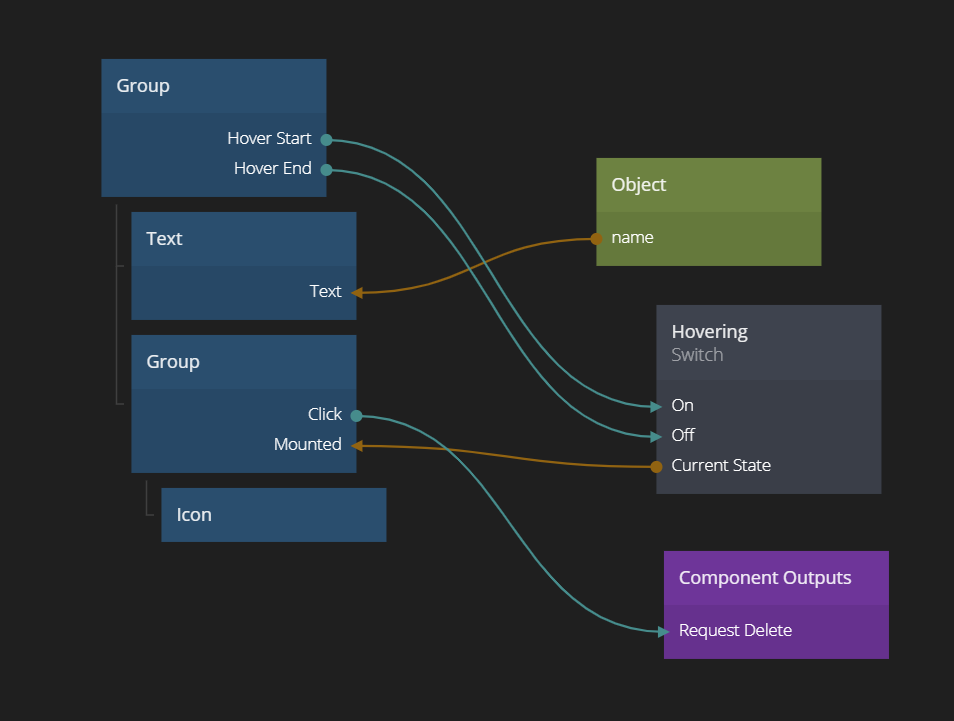
We only want the delete button to show up when you hover the list item. We achieve this by adding a Switch and hooking it up to Hover Start and Hover End and feeding its state to the Mounted input of the inner Group see below.

Finally we want to send a signal out of the list when the user clicks the delete icon. So add a Component Output node. Make and input called Request Delete and connect the Click signal from the inner Group to it.
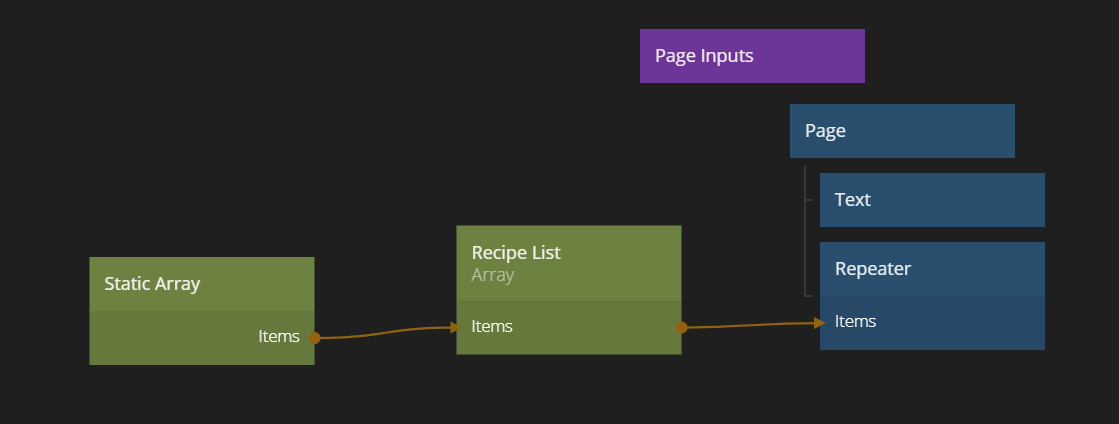
We are now ready to go back to the Recipe List page component and deal with the actual deletion. In that component we first need to add an Array that will hold the recipe items. Before we fed the Items directly from the Static Array. Now, since we need to modify the contents, we need to first feed the Items into an Array. Give the new Array the name Recipe List. The node construct should now look like below.
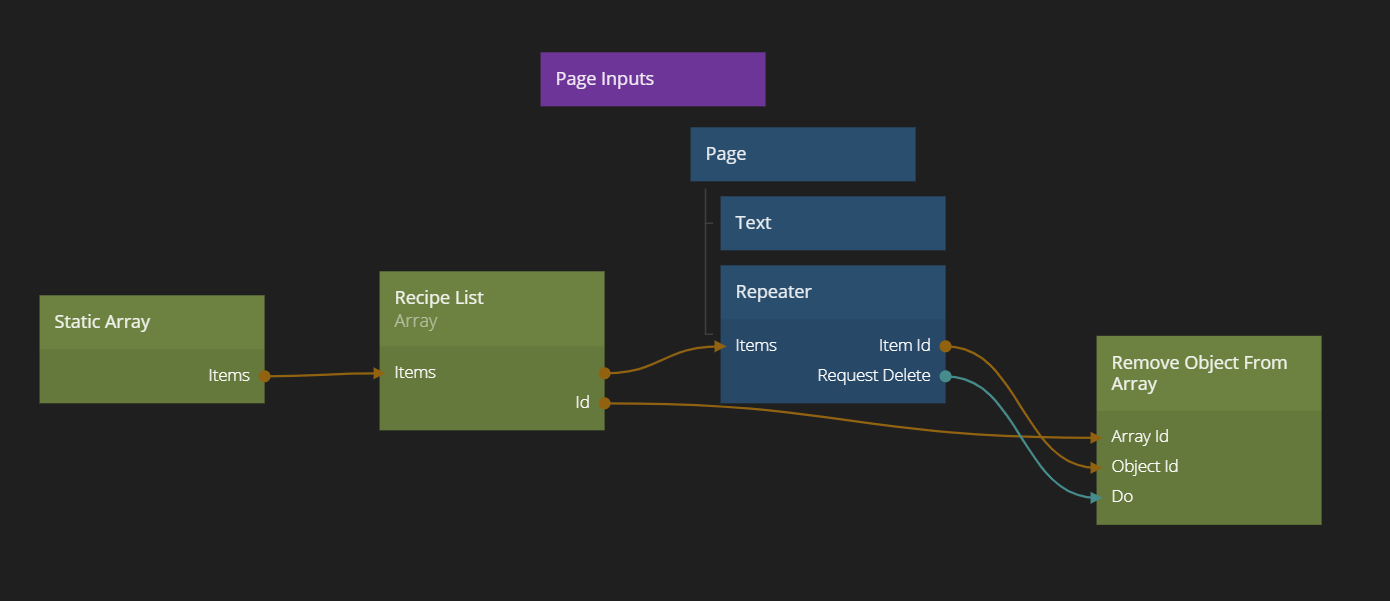
Now we can do the removal. Create a Remove Object from Array node. This node takes two inputs. The Array Id and the Object to Remove Id. The Array Id is the same as the Array we just created (Recipe List) so let's just connect the two Ids. The Object to Remove Id comes from the repeater. The Id of the object that was clicked will forwarded by the Repeater. Also, our output from the Recipe List Item component will come out of the repeater as a signal and we can use that as the signal for triggering the delete by connecting it to the Do signal of the Remove Object From Array node.
Try it out! Don't be afraid to delete recipies. If you refresh your viewer they will all be back since they are not coming from a database but from a Static Array.
Using Count
If you remove all recipes, it might be a good idea to show a text, The recipe list is empty. Lets build that! Start by adding a Text node to the Recipe List page. Center the text (using the Text Alignment property).
We only want to show this text when the Array is empty. So add an Expression node. Type the following into the expression node
count === 0
This will make the expression return true if the input count equals 0, otherwise false. Connect the output Result of the expression to the Mounted input of the new Text node. Then finally connect the Count output from the Array to the count input of the expression.

Try removing all recipes and make sure the text is visible once Count equals 0.
Showing the recipe
Ok, now it's time to show the recipes once you click on them. So let's start by adding another page. As before, click the Page Router and then click Add Page. Add a page name Recipe.
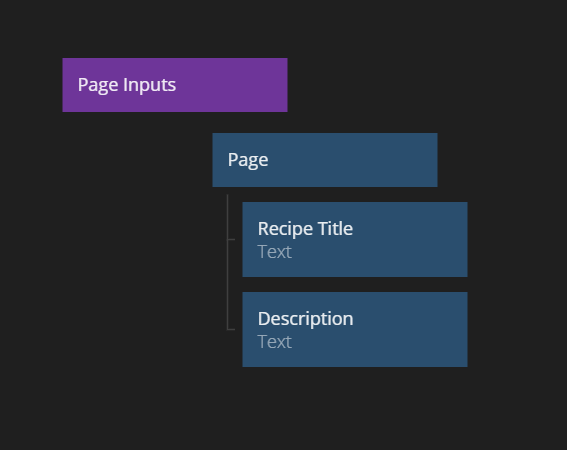
In the new Page start by adding a title text. We can copy the Text node that was used as a title in the Recipe List. Below that we want another Text node which will hold the description. Let's add that as well.
Passing on the Recipe to the Page
We now need to pass on the Id of the Recipe we clicked to the new Page so we can show it. Step 1 is to catch when we click the recipe. Remember, we only catch the case when we click the delete button so far. So go back to the Recipe List Item. Add another output on the Component Outputs node called Request View. Then connect the Click output on the root Text node to it. This will forward the signal to the component containing the list.
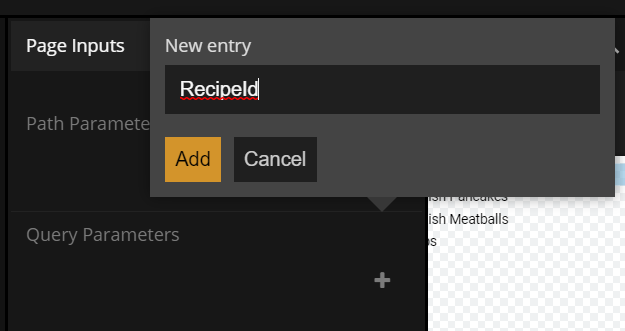
Now go back to the Recipe Page. We want to add a new Path Parameter in the Page Inputs component. Click the Page Inputs node and then add a new Path Parameter called RecipeId. This will mean that we can send the Id of the clicked recipe is part of the url path that we navigate to.
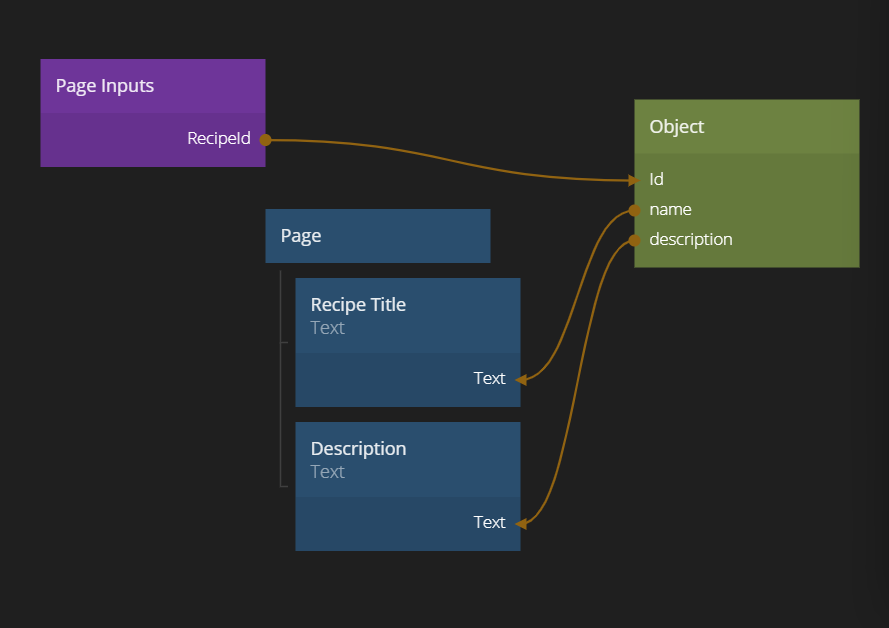
Assuming that the Id is this Path Parameter, we can connect the Object to it and get the name, description and other properties from the Object. Let's set that up. We are still in the Recipe page.
Now we are ready to implemnt the navigation. In the Recipe List page we add a Navigate node. Select the Recipe page to navigate to. This will add an input to the Navigate node which is our Path Parameter RecipeId. Connect the Item Id output of the Repeater to it and finally the Request View signal to the Do signal of the Navigate node. Voila!
Note that there is no Back-button in the Noodl viewer so you either have to use your browser if you want to go back and forth, or simply refresh to get back to the list. That's a little bit annoying but we'll fix it later. We want to show our ingredients first.
Showing the recipe ingredients
So let's build the list that shows our ingredients. Create a new list item, a visual component named Ingredient Item. We can actually duplicate our previous list item and modify it.
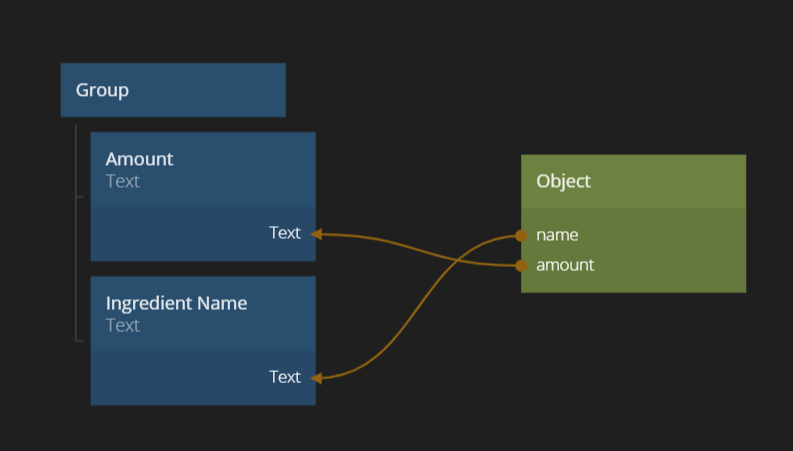
Start with removing the Request View input in the Component Output since we are not going to view individual ingredient. Also remove the delete action and the hover state. Looking at the data, the ingredient have two properties. name, which we already have connected. The other one is amount. Let's add a text node for that and connect it.
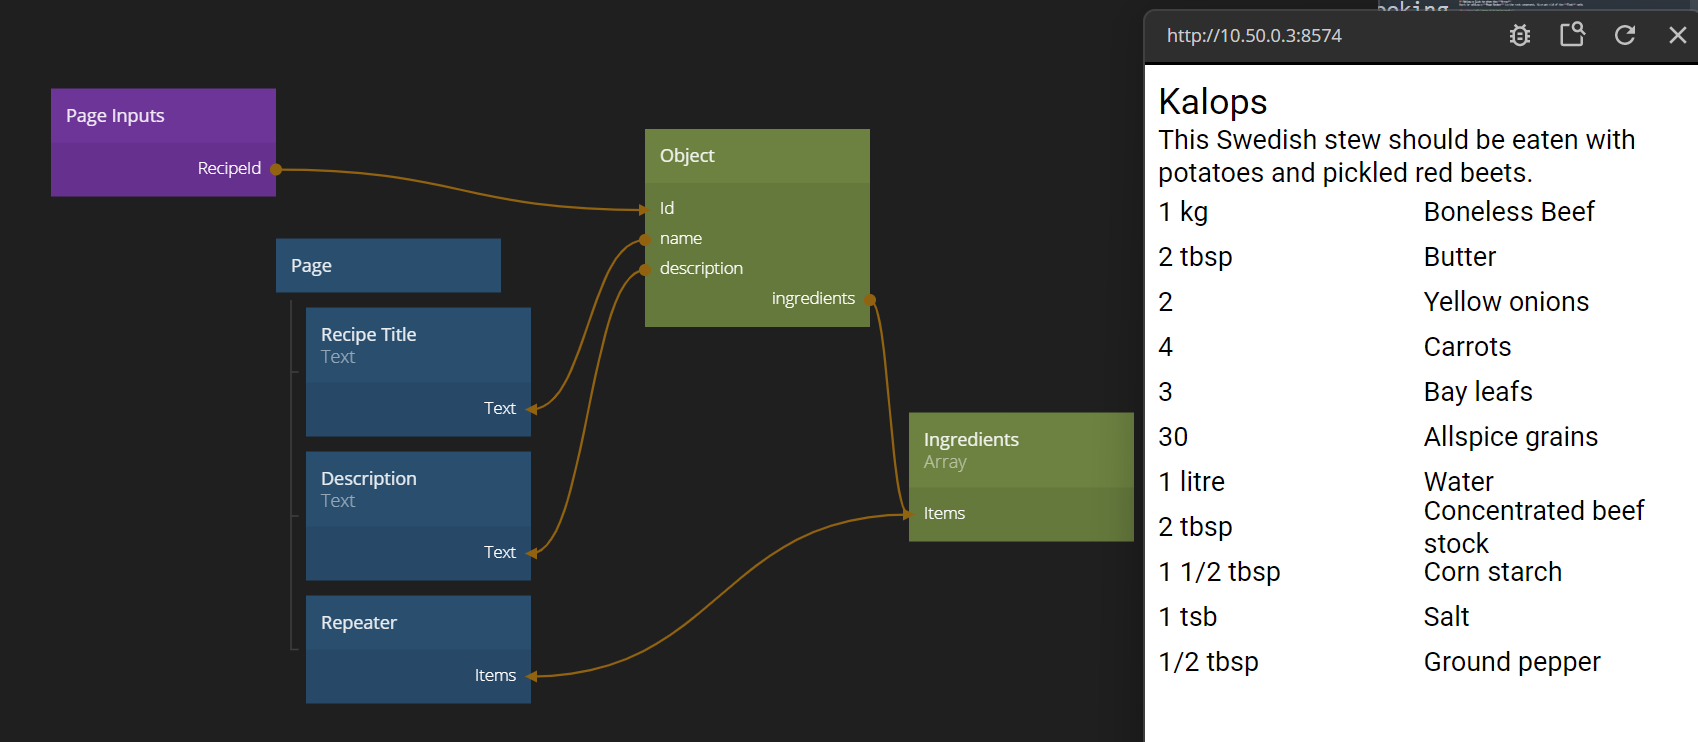
Now we can add the Repeater node that will display the ingredients. Go to the Recipe Page. Add a Repeater node and select the newly created Ingredient List Item as the component template. Now we need to find the list of ingredients. Looking at the data model we see that the property is called ingredients. Add that property to the Object. Then add an Array node. That's the Array that will hold the ingredients. Connect the ingredients property of the Object to the Array. Then connect the Items output of the Array to the Repeater. You now have a list of ingredients!
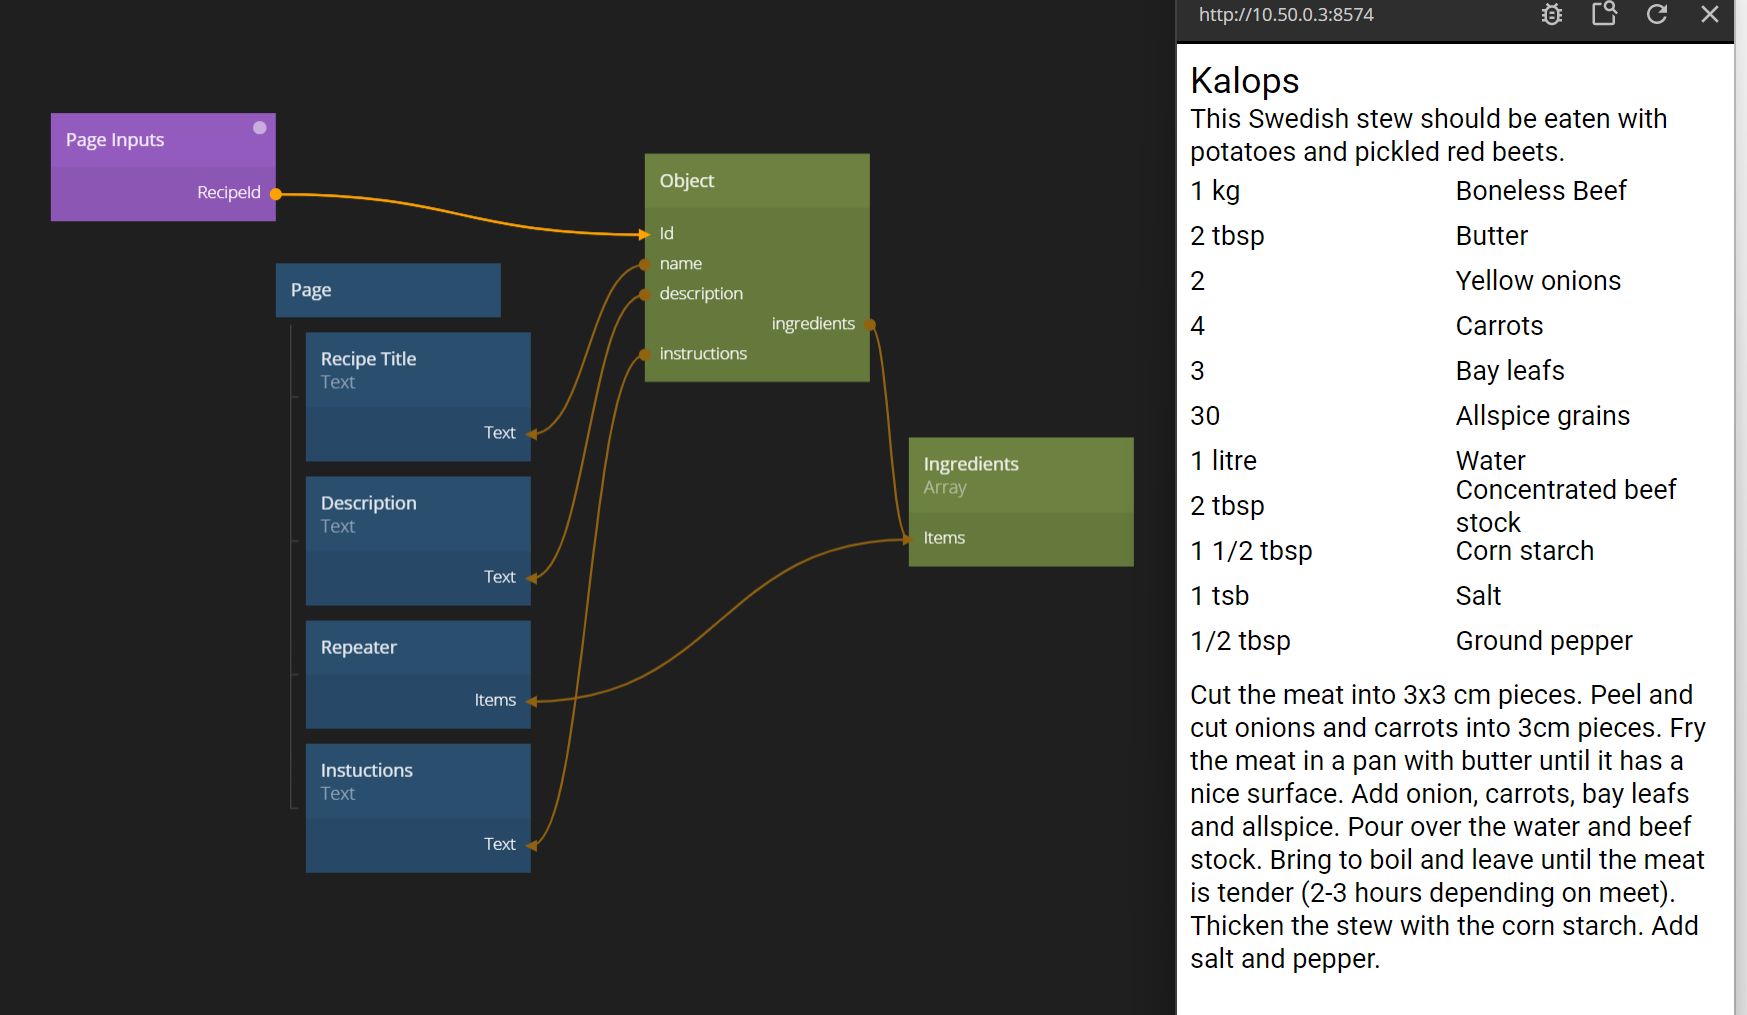
We might as well add the instructions at the end to make the view complete. Add another Text node at the bottom. Call it Instructions. Then add the property instructions on the Object and connect it to the Text node. Maybe add some margin to seperate it a bit from the list.
Finally, let's add that back button. At the bottom, add a Button that triggers a navigation to the Recipe List Page. Connect the button to a Navigate node that takes the user back to Recipe List Page.
Feeding a Dropdown with an Array
We are making progress with our recipe App. Next step is to add a simple filtering functionality to filter out vegetarian / non vegetarian options. Remember, in our data model we have the property containsMeat that is either true or false.
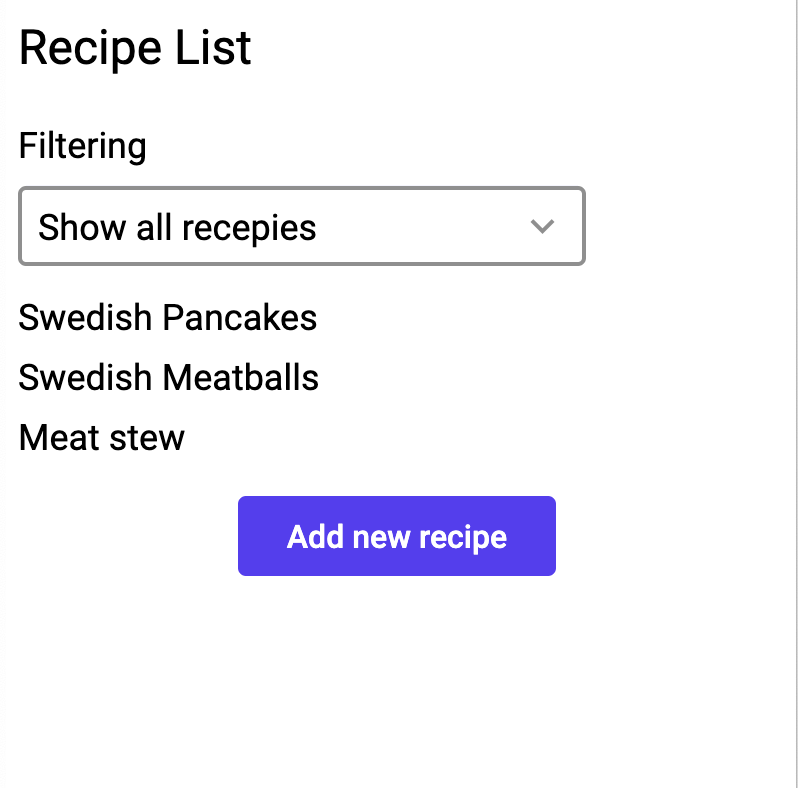
We go back our our Recipe List page. In here we want to add a Dropdown with three options all,meat or vegetarian.
If you read up on the Dropdown node, you can see that to figure out its options it takes items from an Array as an input. The Array should contain items of the following type:
{
    "Label": "a label",
    "Value": "a value"
}
The Label will be shown as a text in the Dropdown and the Value is the value that the Dropdown will have on its output if the associated item is selected.
We can easily feed the Dropdown using a Static Array.
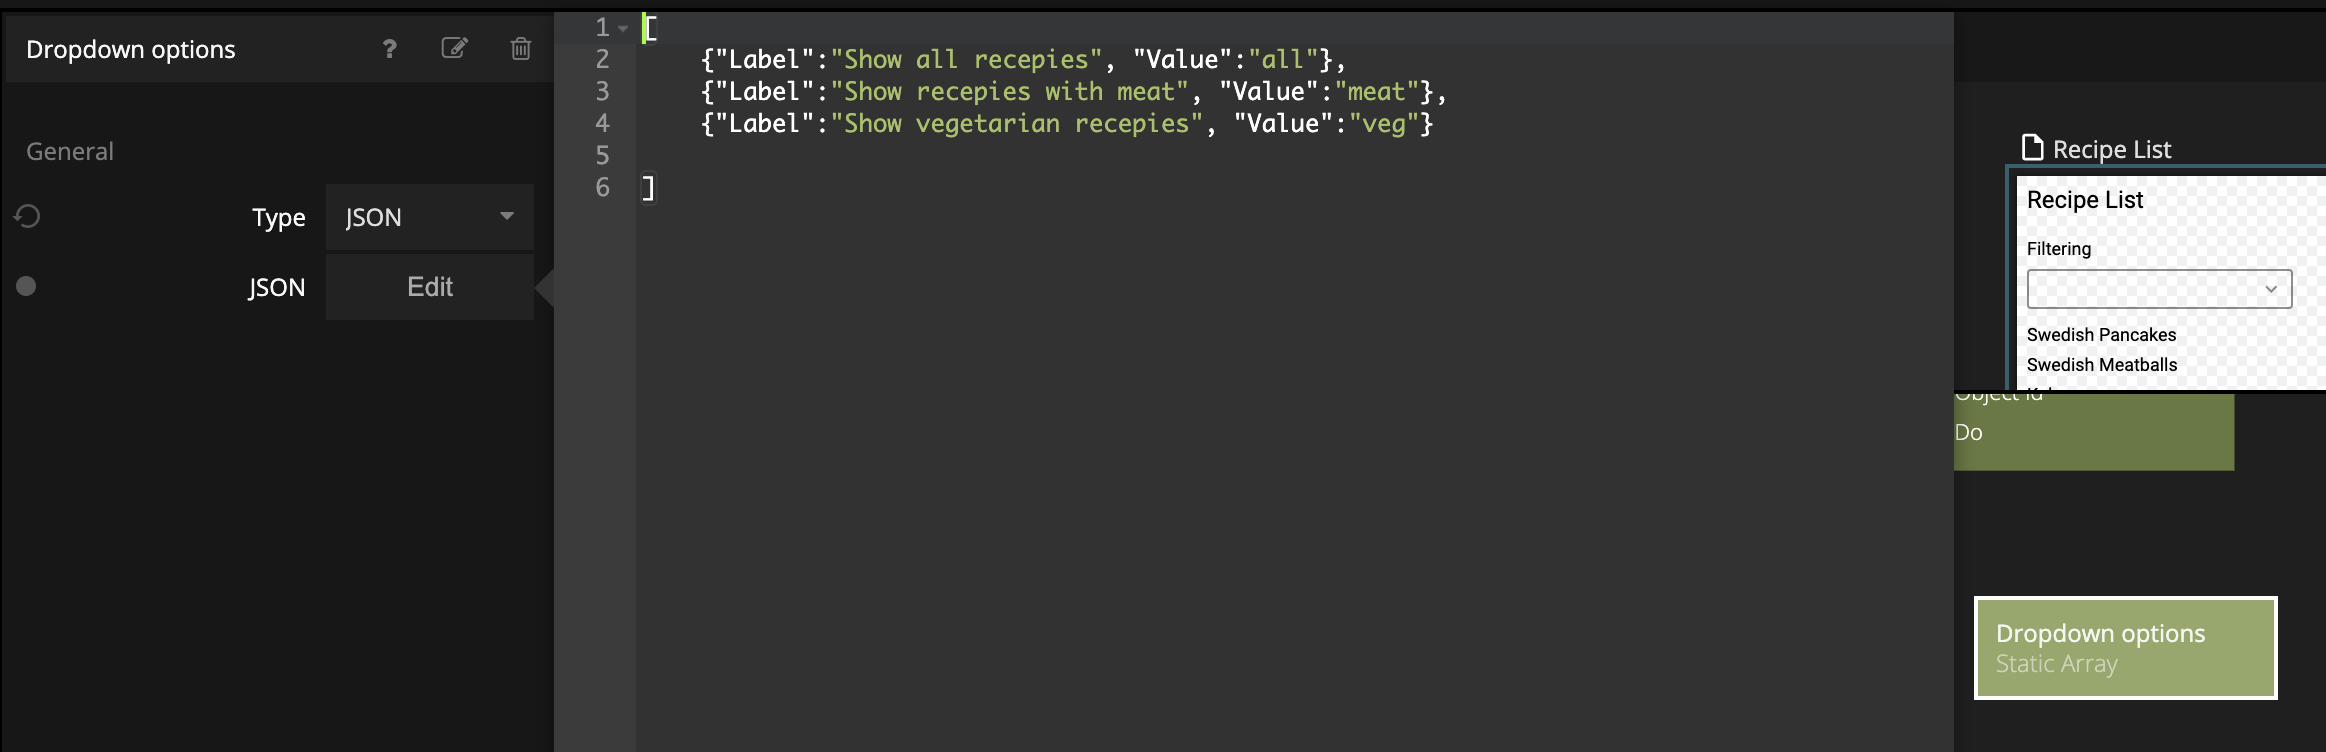
Start by adding a Static Array in the Recipe List page and make sure it's set to JSON format. Name it Dropdown Options for clarity and add in the following data
[
    { "Label": "Show all recepies", "Value": "all" },
    { "Label": "Show recepies with meat", "Value": "meat" },
    { "Label": "Show vegetarian recepies", "Value": "veg" }
]
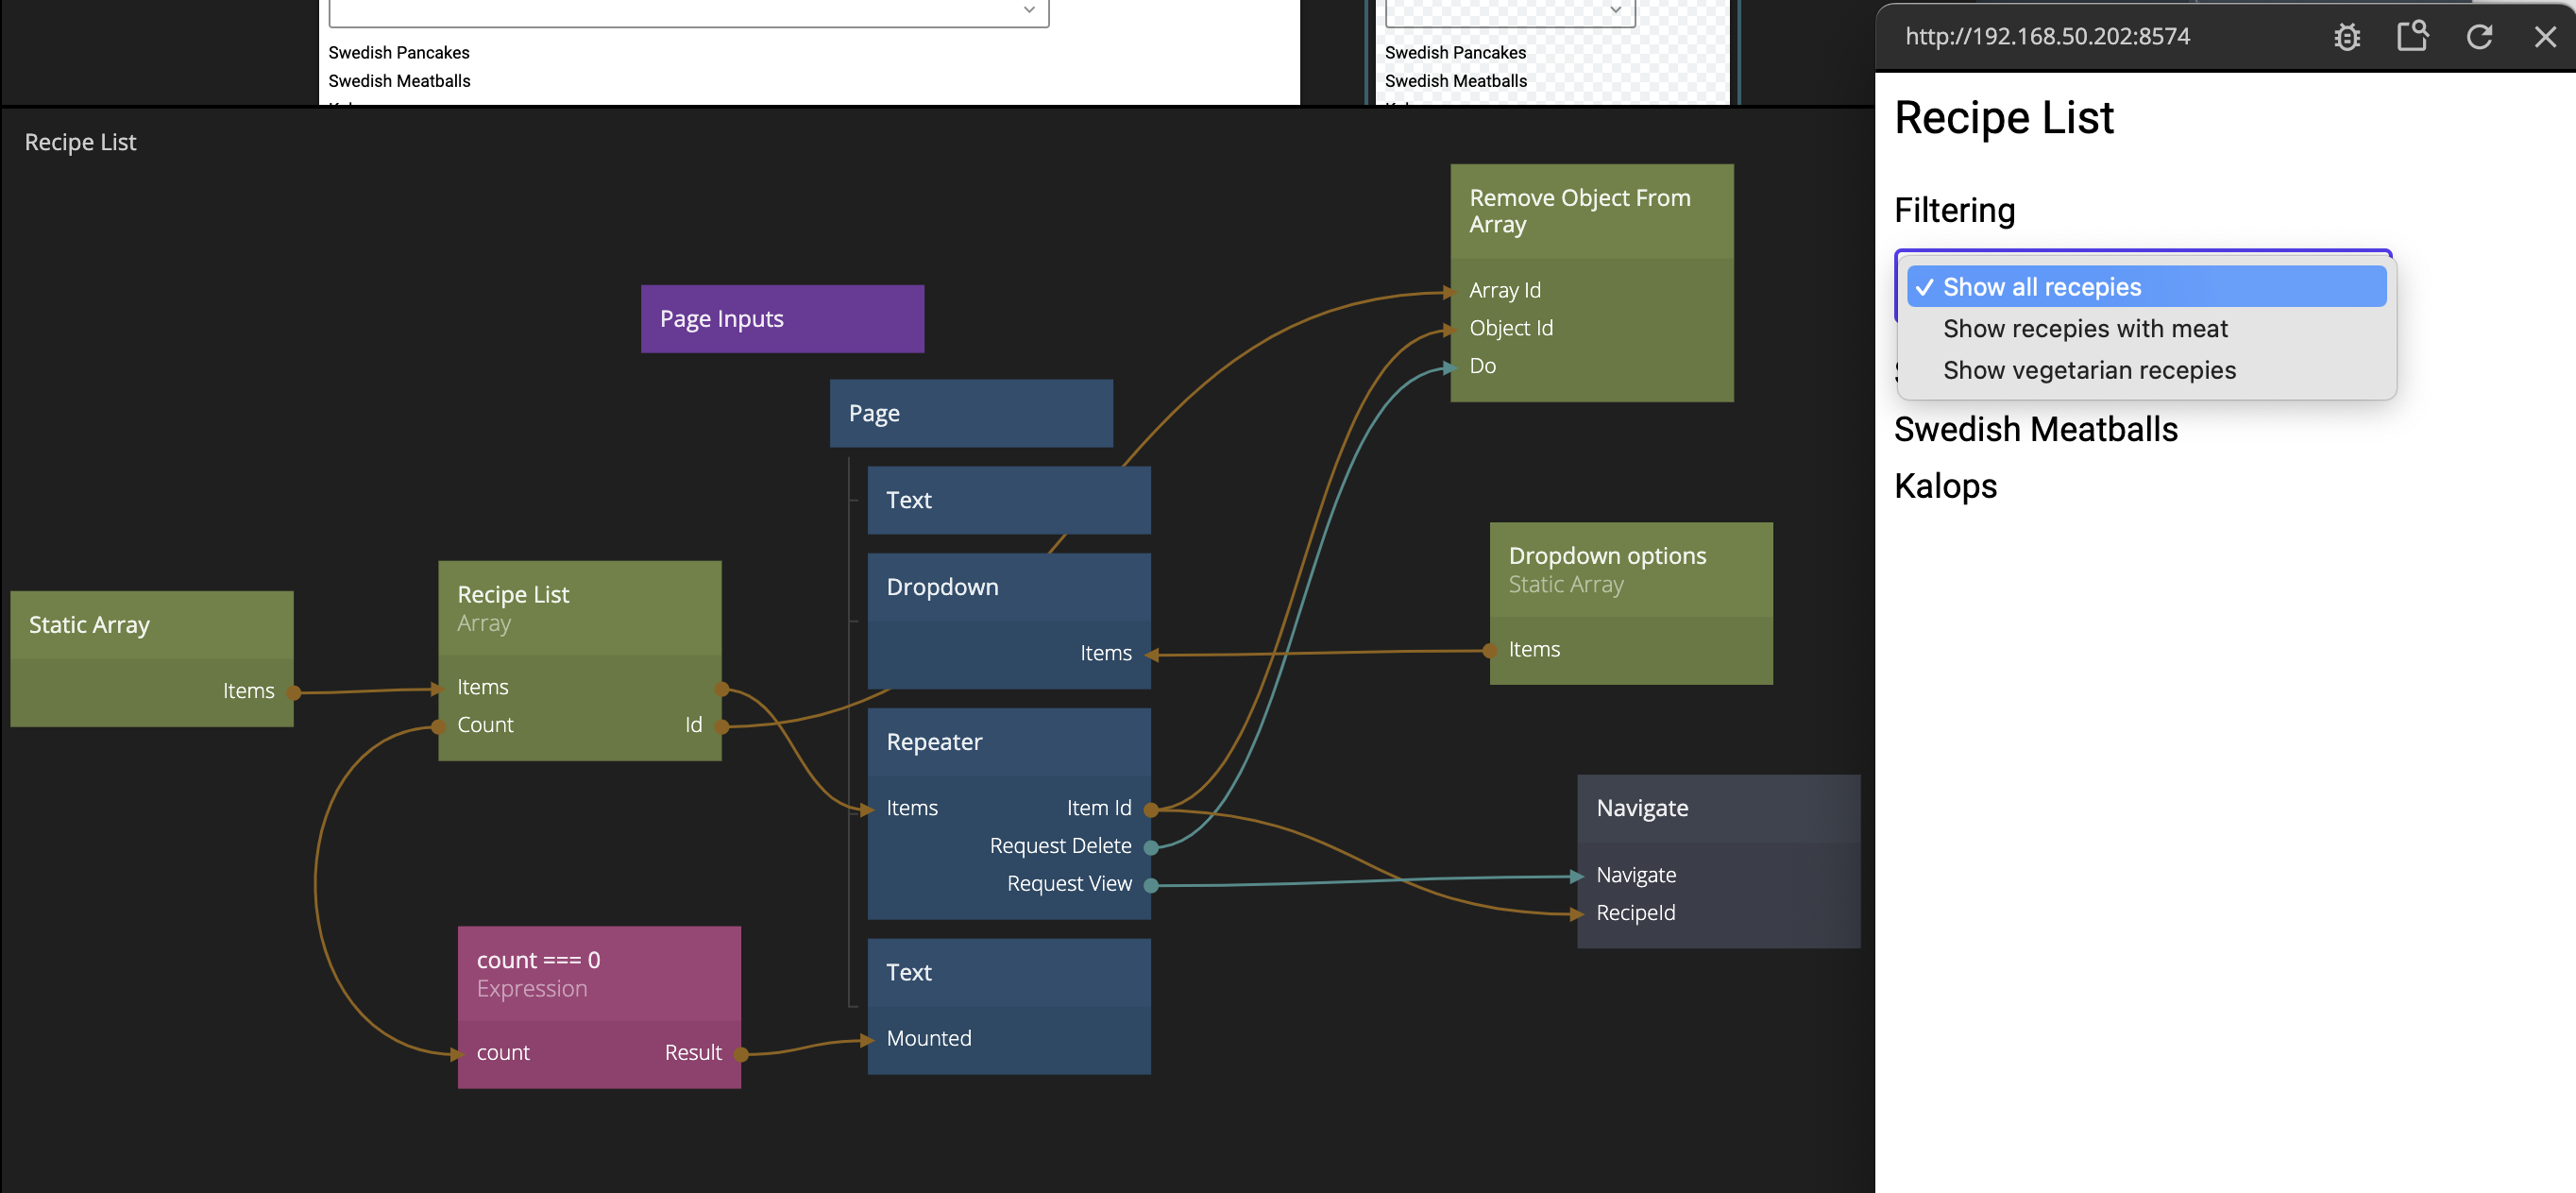
Then add in a Dropdown node, just after the title. Enable the label on it and give it the label Filter. Also give it a bottom margin to seperate it a little from the list items. Then connect the Items from the Static Array to the Dropdown and you should see the options in the Dropdown.
Filtering an Array
We can now proceed with the filtering of the recipe. In our case we have three filtering states:
- No filtering, i.e. we show all recipes
- Show only the meat recipes, i.e.
containsMeat == true - Show only the vegetarian recipes, i.e.
containsMeat == false
We can encode these in a States node. Add in a States node. Give it a name, Filter States. Then create three states. To match up with our dropdown values we will call them all, meat and veg. By calling them exactly what the Value of the dropdown will give us will make it possible to let the Dropdown set the state without any intermediary logic.
Then create two Values for the States node. Call one, Filter Enabled, one containsMeat. Both should be of the type Boolean We will now assign these Values for each state.
all-Filter Enabledshould befalse,containsMeatcan be eithertrueorfalse(doesn't matter).meat-Filter Enabledshould betrue,containsMeatshould also betrue.veg-Filter Enabledshould betrue,containsMeatshould befalse.
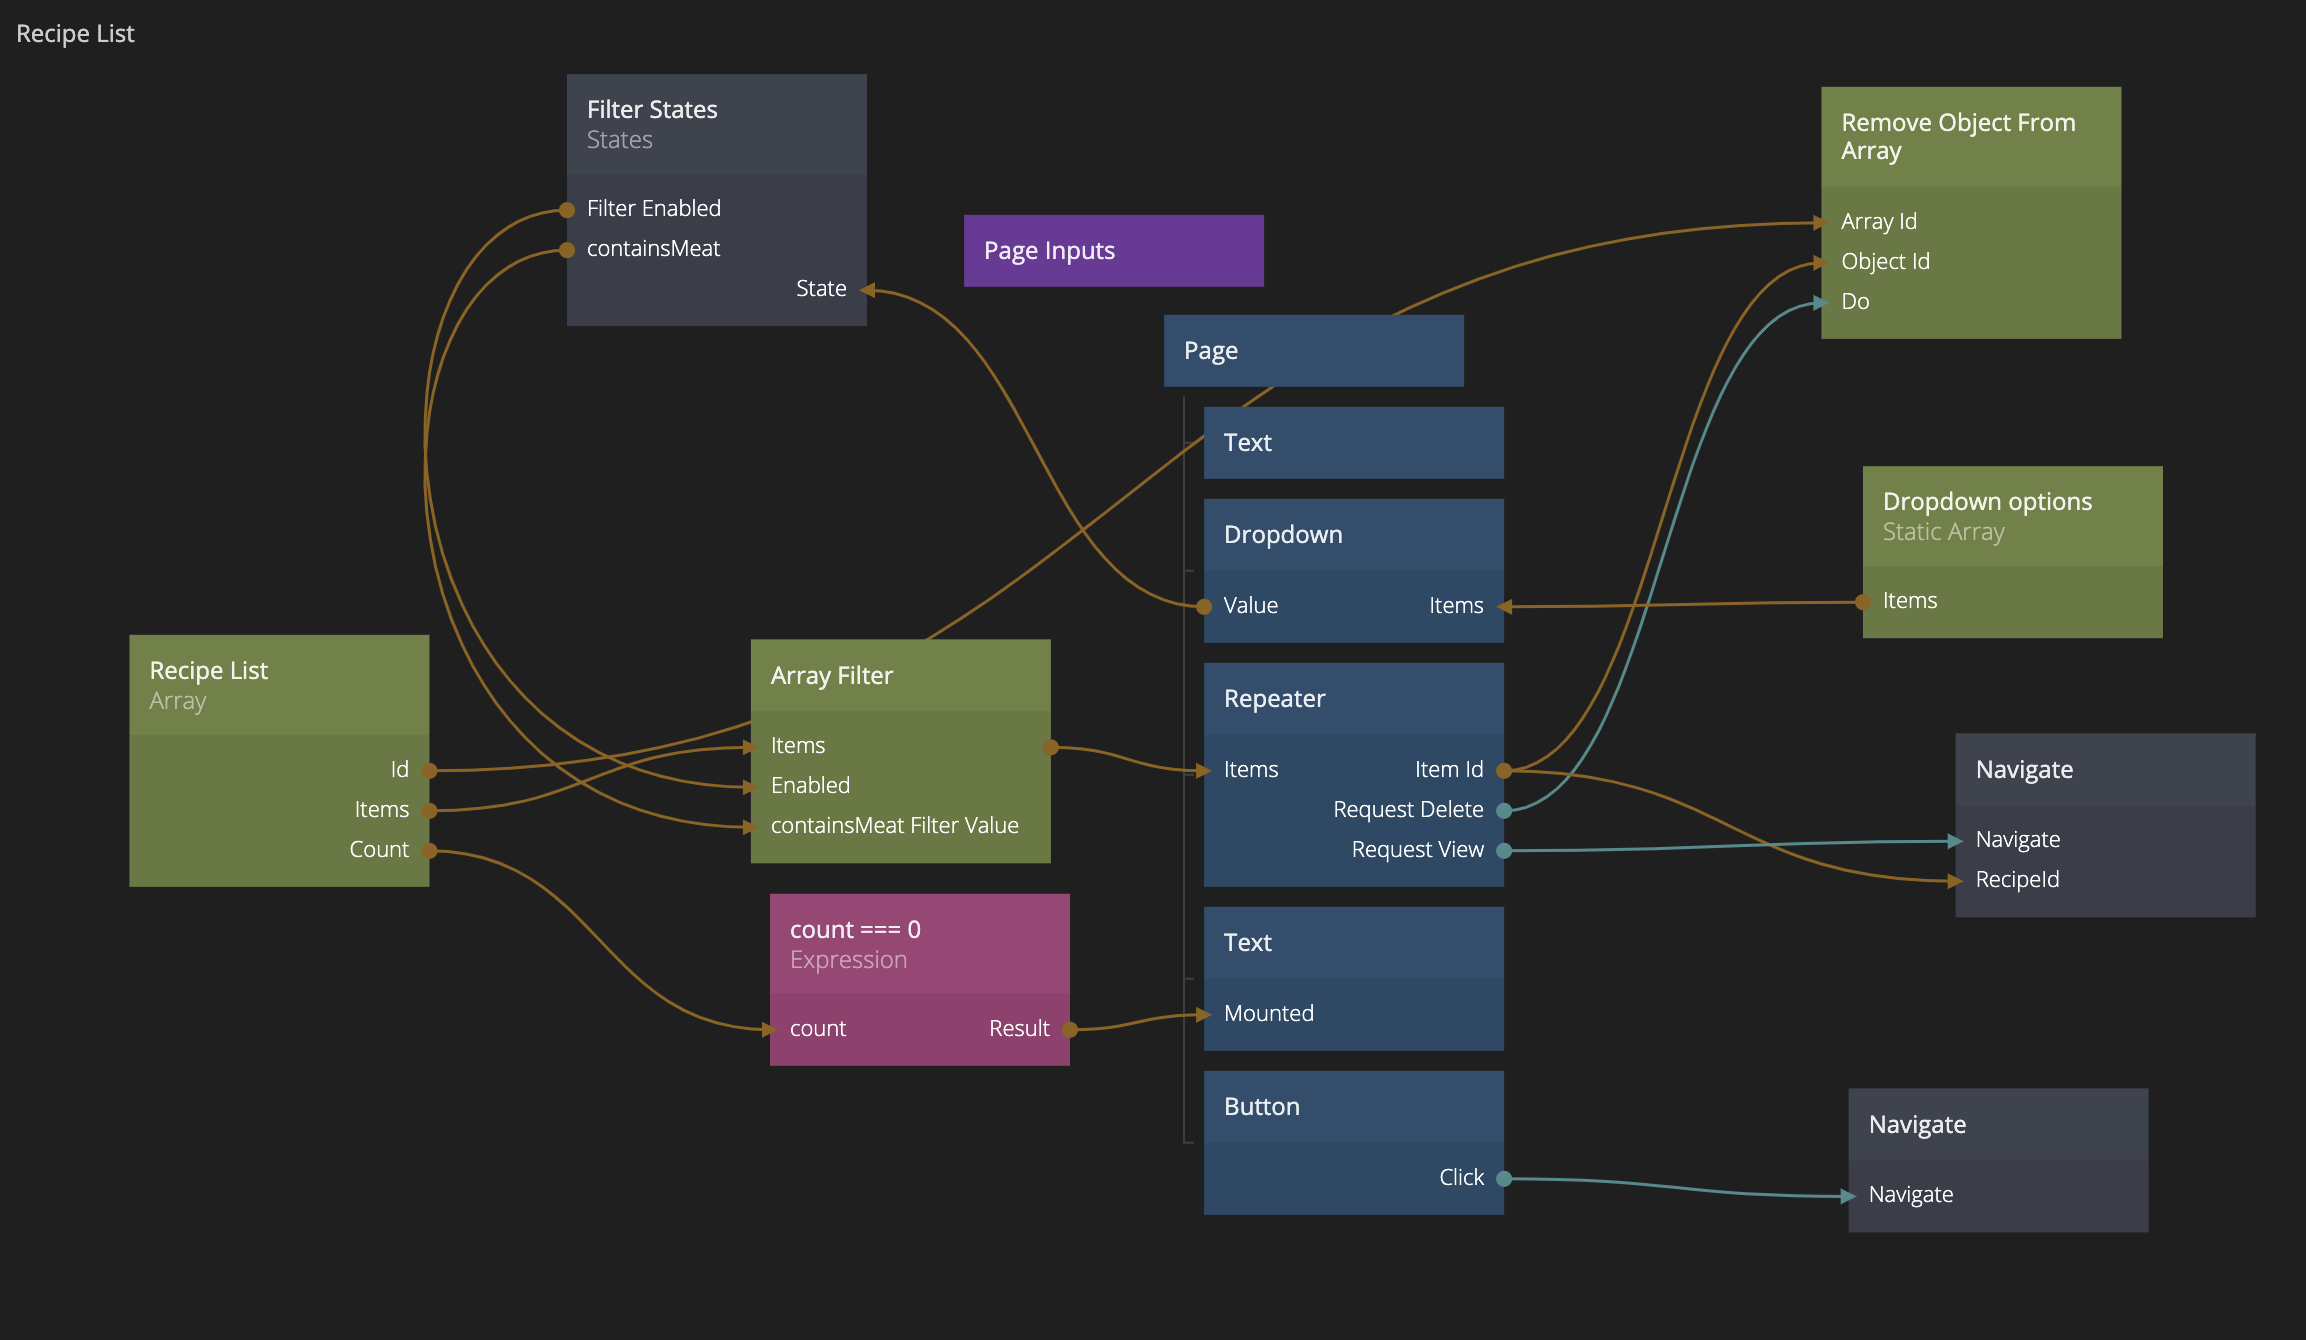
Now add in a Array Filter node. This should be in between the Static Array that contains the recipes and the Recipe List that holds the items to be presented in the list.
Create a new filter for the property containsMeat.
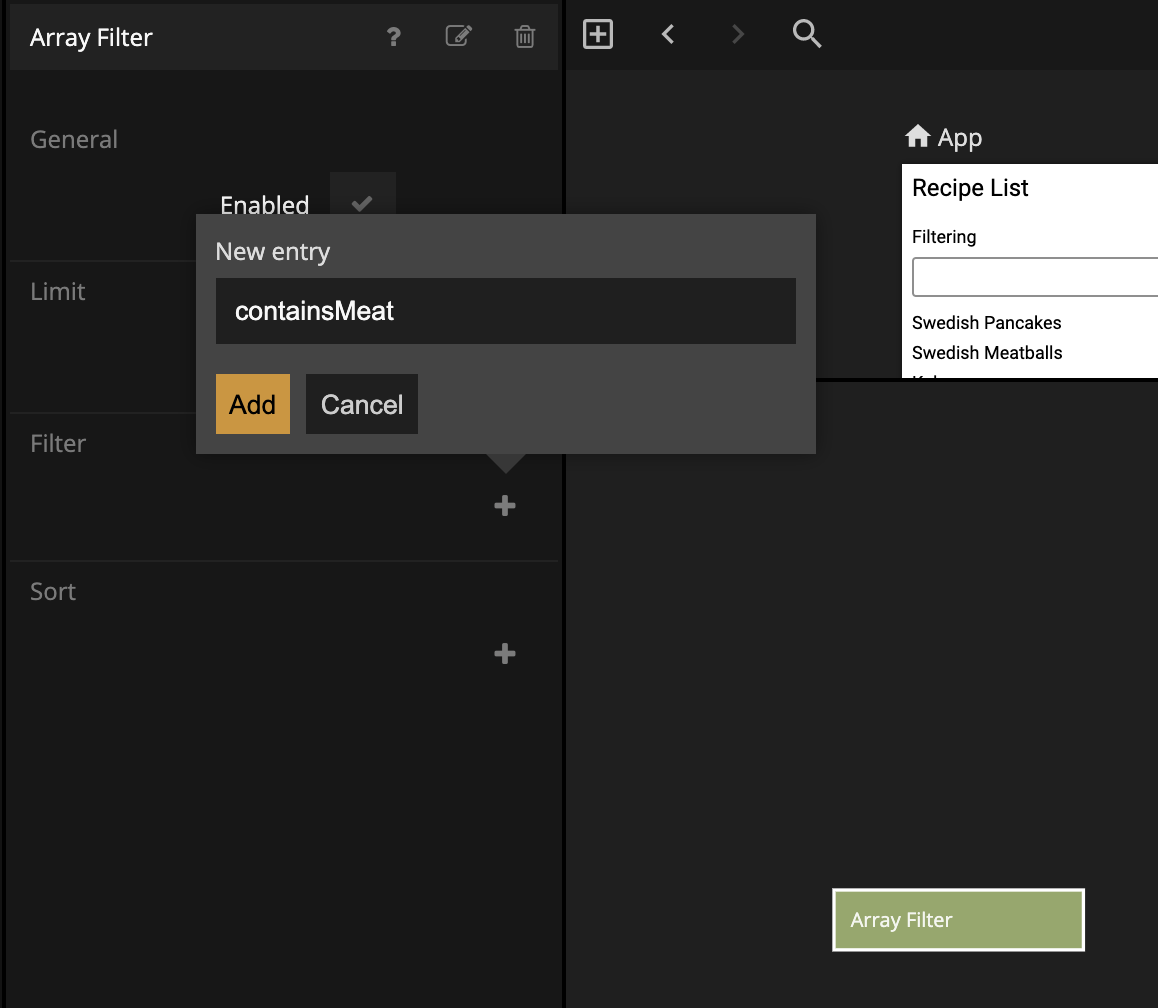
Set the filter to be of Boolean type. We now are able to control this filter through an input, i.e. weather the filter should filter for containsMeat == false or containsMeat == true.

So hook up the Items from the Static Array containing the recipes to the Items of the Array Filter. Then from the Array Filter to the Array.
Now we need to control the filter depending on state. So first connect Value from the Dropdown to our states node. Changing the Dropdown will now change the state of the States node. Then we connect the Values of the States node to the inputs on the Array Filter, Enabled and containsMeat Filter Value.
You can now filter the recipes.
Creating New Recipes
Make a simple form
As a final feature we also want to add in the option to create new recipes. It will involve two things:
- Create a new recipe, including data for the recipe, for example, name and description
- Create a new ingredients array for the new recipe and fill with ingredients
Let's start by creating some UI for this functionality.
Start by adding a Button at the bottom of the Recipe List page. Give it the label Add new recipe. Center it and give it some margin.
Clicking this Button should take us to a new Page where we can add in the information about the recipe. So let's create that page. Find the Page Router in the main App and click Add new page. Call the new Page New Recipe. Open the new Page component. Copy and paste a title Text node from the Recipe List page and change the title to New Recipe.
Add a new Navigate node in the Recipe List Page so we can get to our new Page.
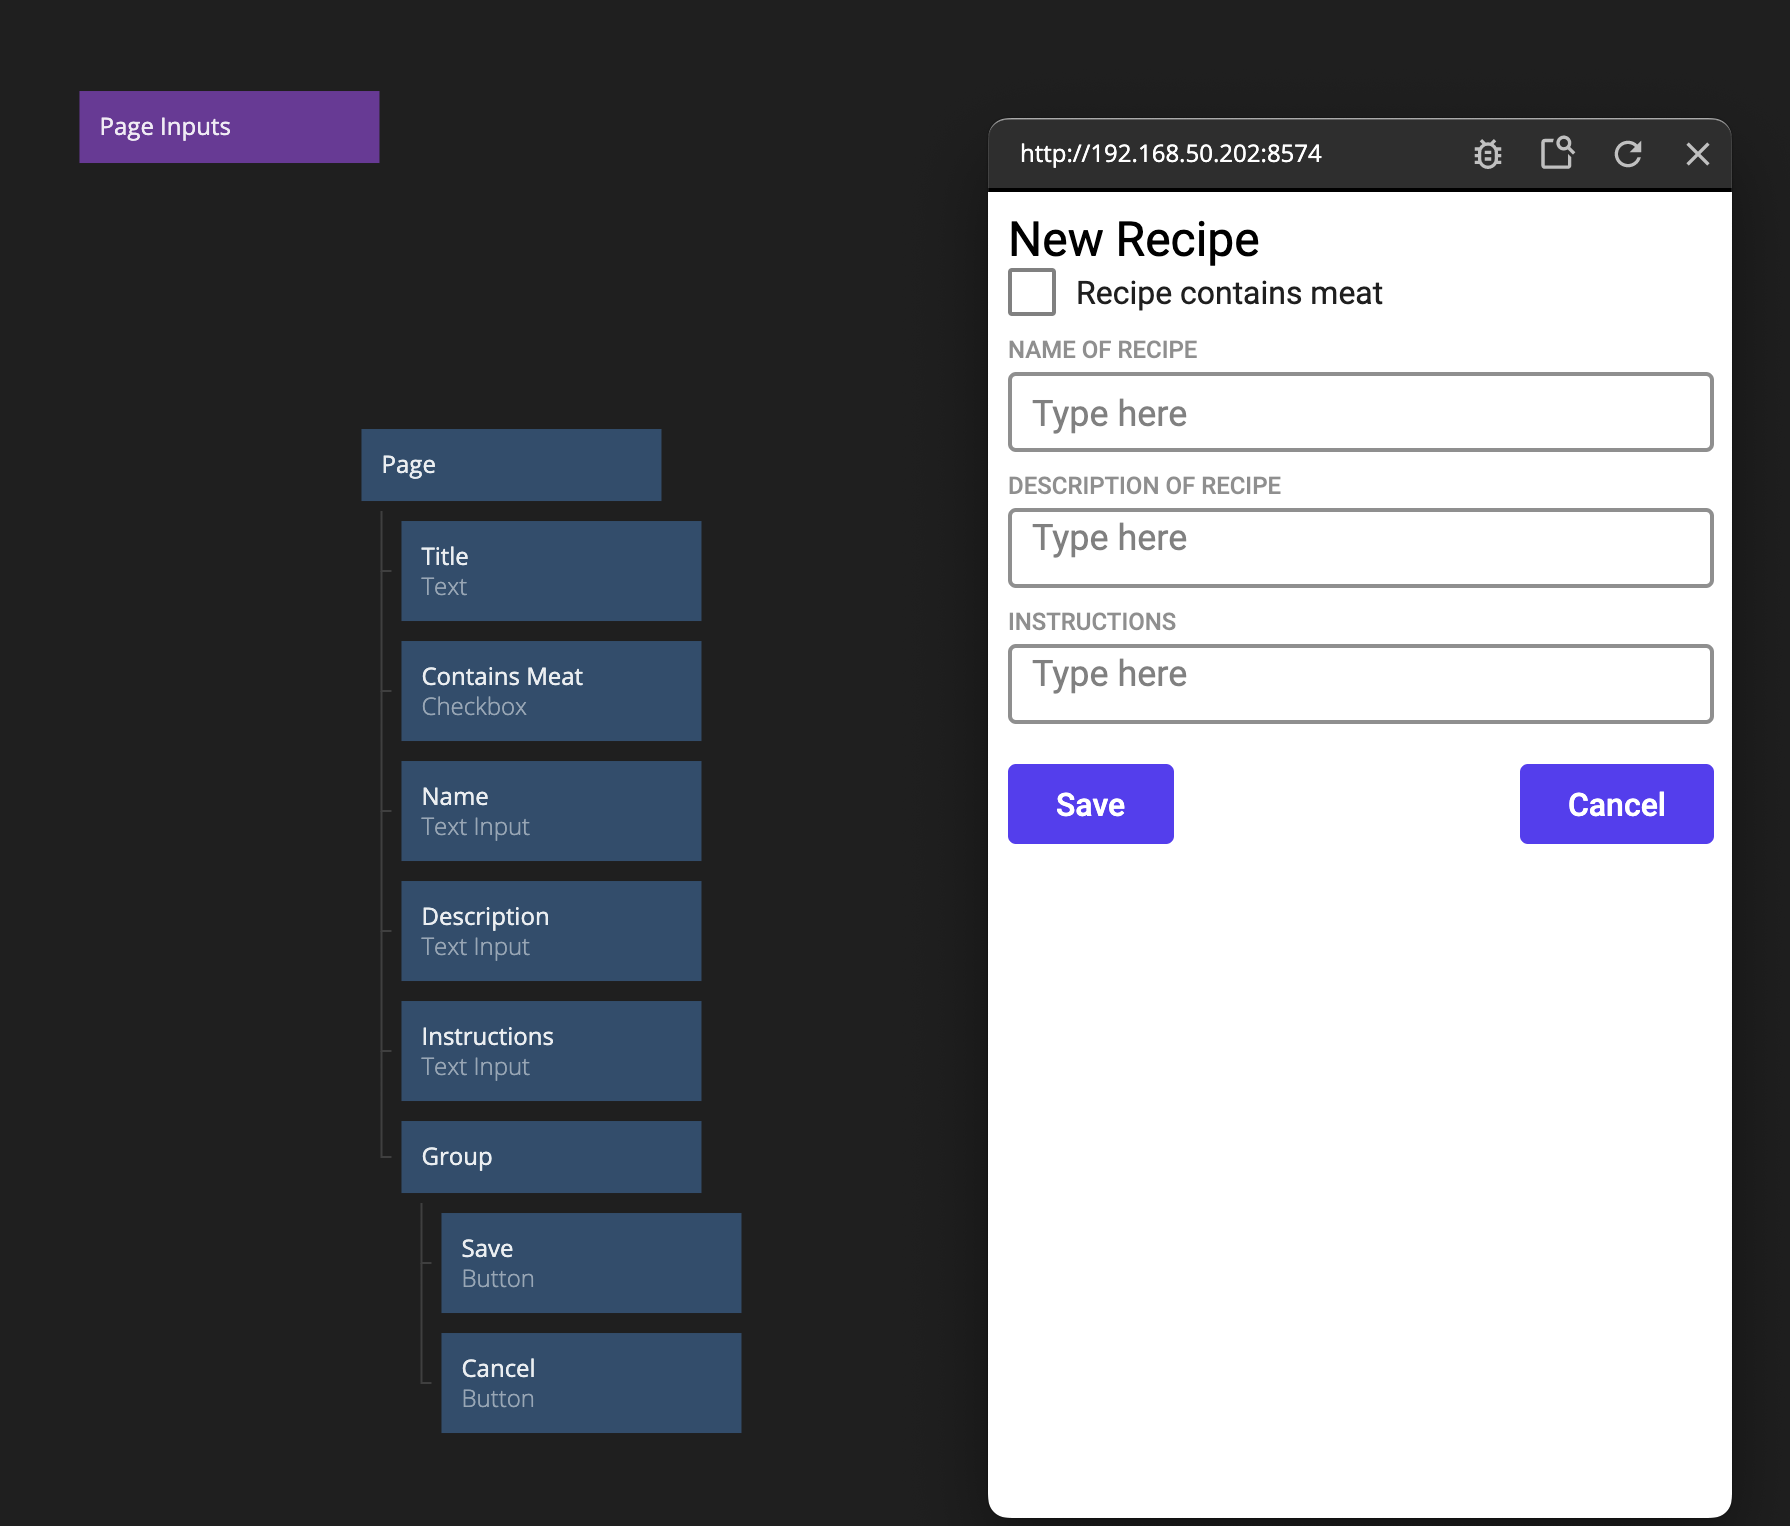
In our new form we need controls to store the following in our new recipe.
- A Checkbox to store the
containsMeatvalue - A Text Input to store the
nameof the recipe - A Text Input to store the
description - A Text Input to store the
instructions - Two Buttons, one for Save and one for Cancel
Add those controls to the new Page and make sure the labels are properly set to describe what the user should fill out in each control. Tweak padding, margins and layout to make it look ok. Set the description and instructions Text Inputs as Text Areas.
Hooking up the data
Looking at the Page from a data perspective, this is what we need to do:
- Once we enter the new page, we should create a new Object that will hold the recipe data.
- After creating the Object we also need to create a new Array that will hold the ingredients. The items of this Array should later be stored in the Object.
- If the user clicks
Savewe should add this Object as a new item in our recipe Array.
Creating an Array dynamically
Let's orchestrate this based on the Did Mount event of the Page.
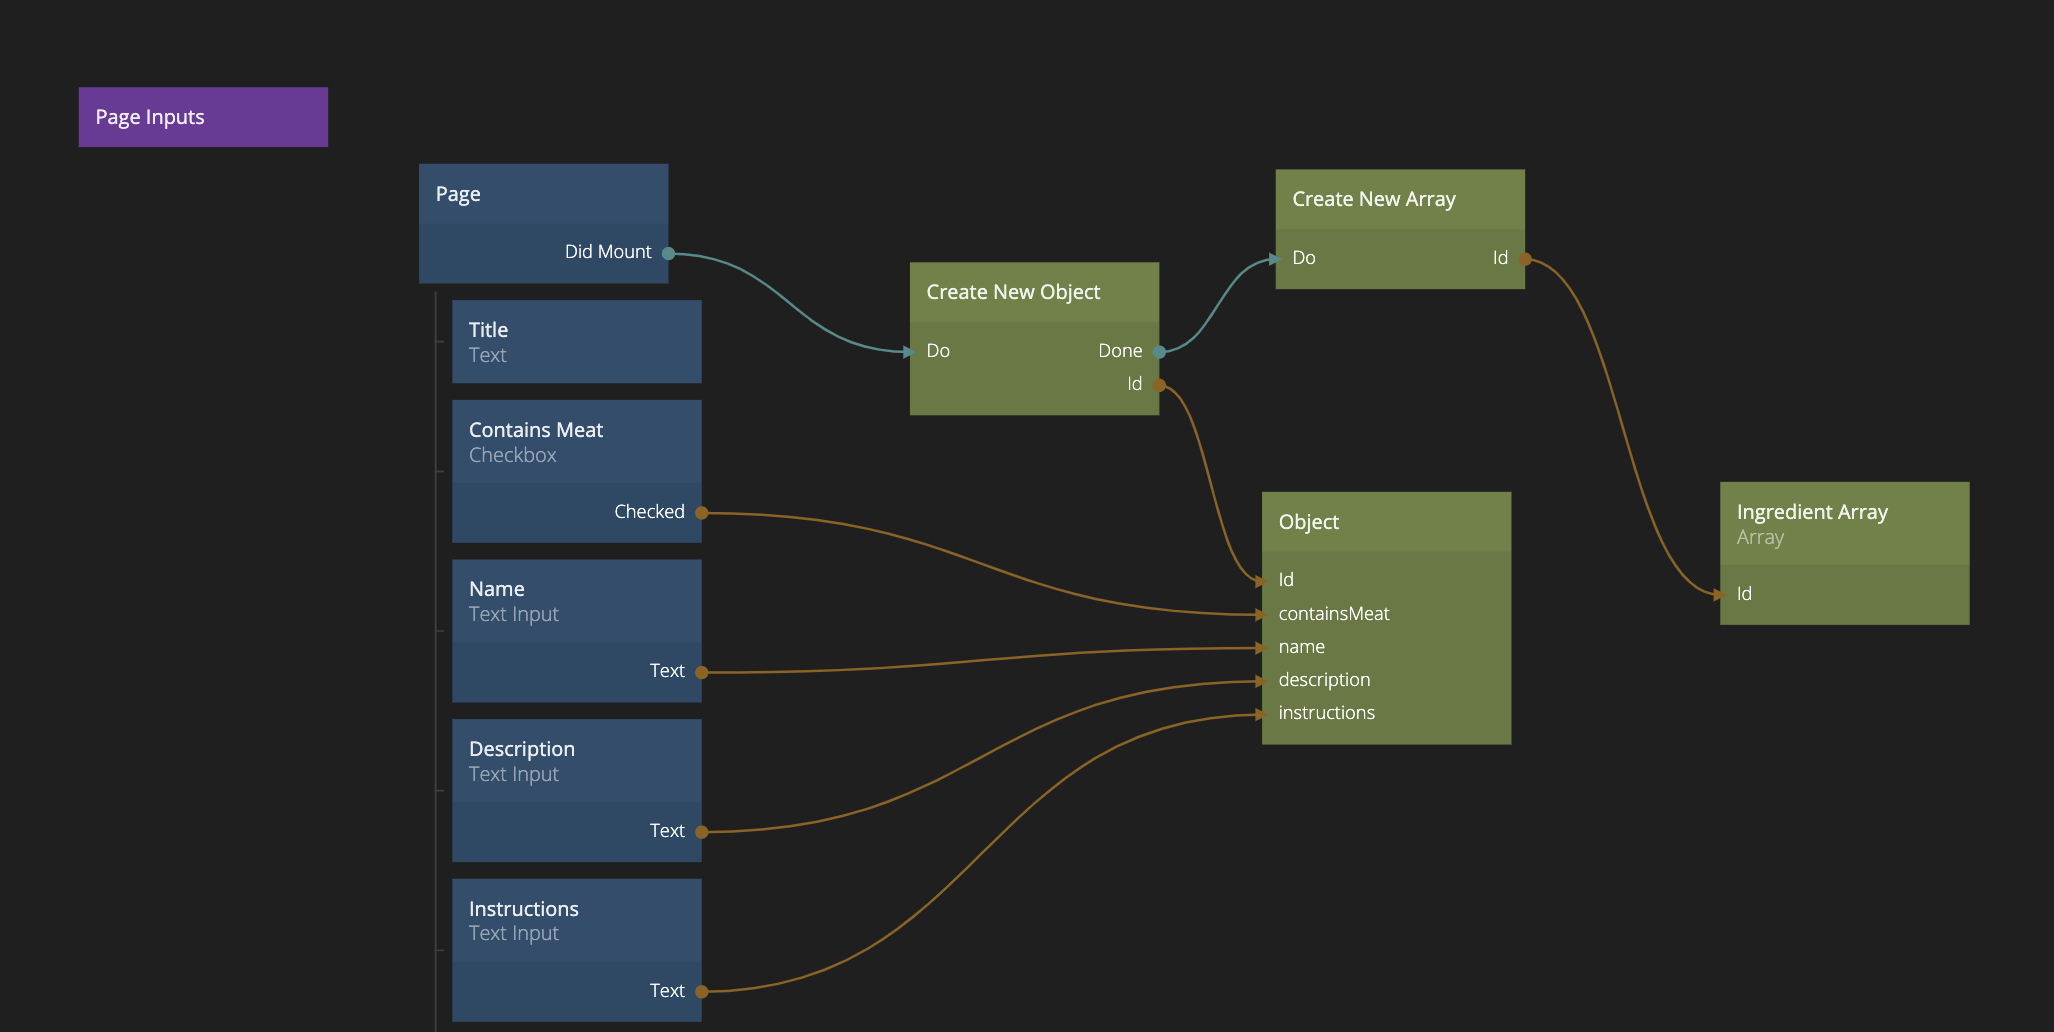
Create a Create New Object node. Add the property containsMeat and make sure it's set to false by default to make sure our filter works. Trigger the Create New Object node on Did Mount. Once the Object is created, we should create the Array for the ingredients. When the user clicks Save we will store the items in the ingredients Array in the Object representing the recipe.
Then create an Object and hook up the controls (Checkbox and Text Inputs) to the properties they are associated with. Note that we are not using a Set Object Properties because we want the Object to be updated at any change on the inputs, i.e. not at a specific time.
Here's how the flow looks. Note that it's important to use the Done signals to make things happen sequentially, as well as passing on the Id of the newly created Object to the Object node to make it act on the correct Object.
Add ingredients to the Array
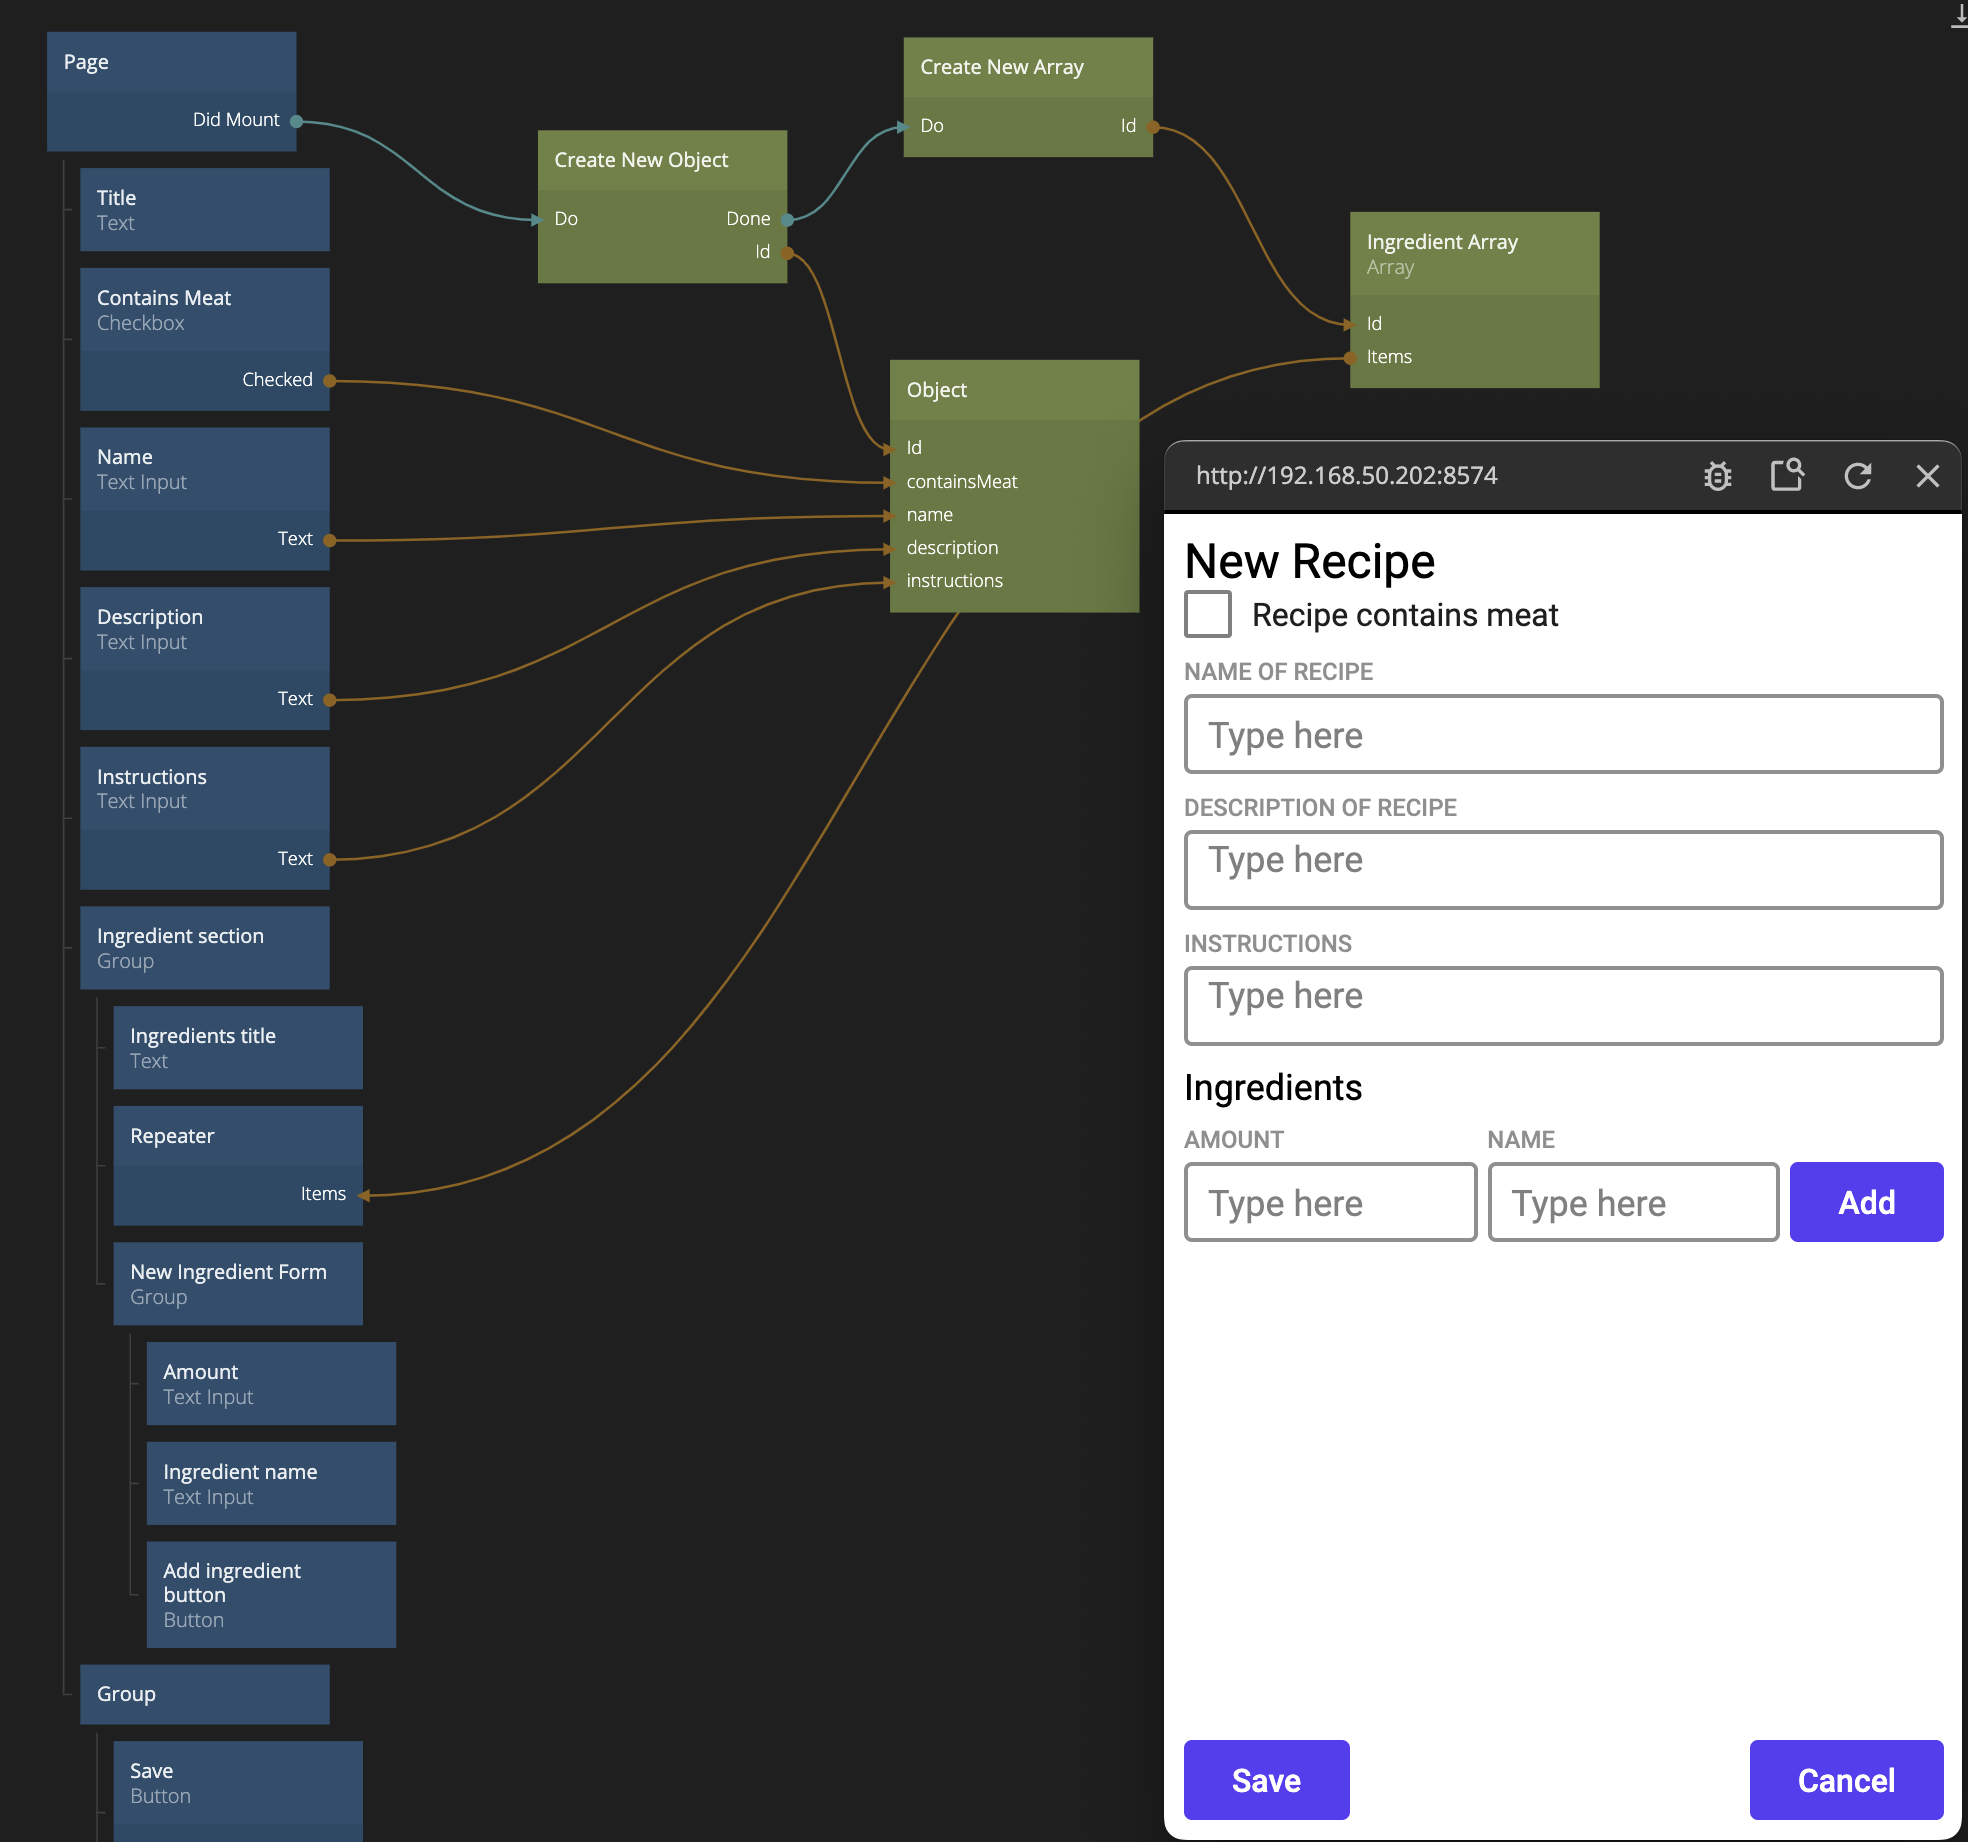
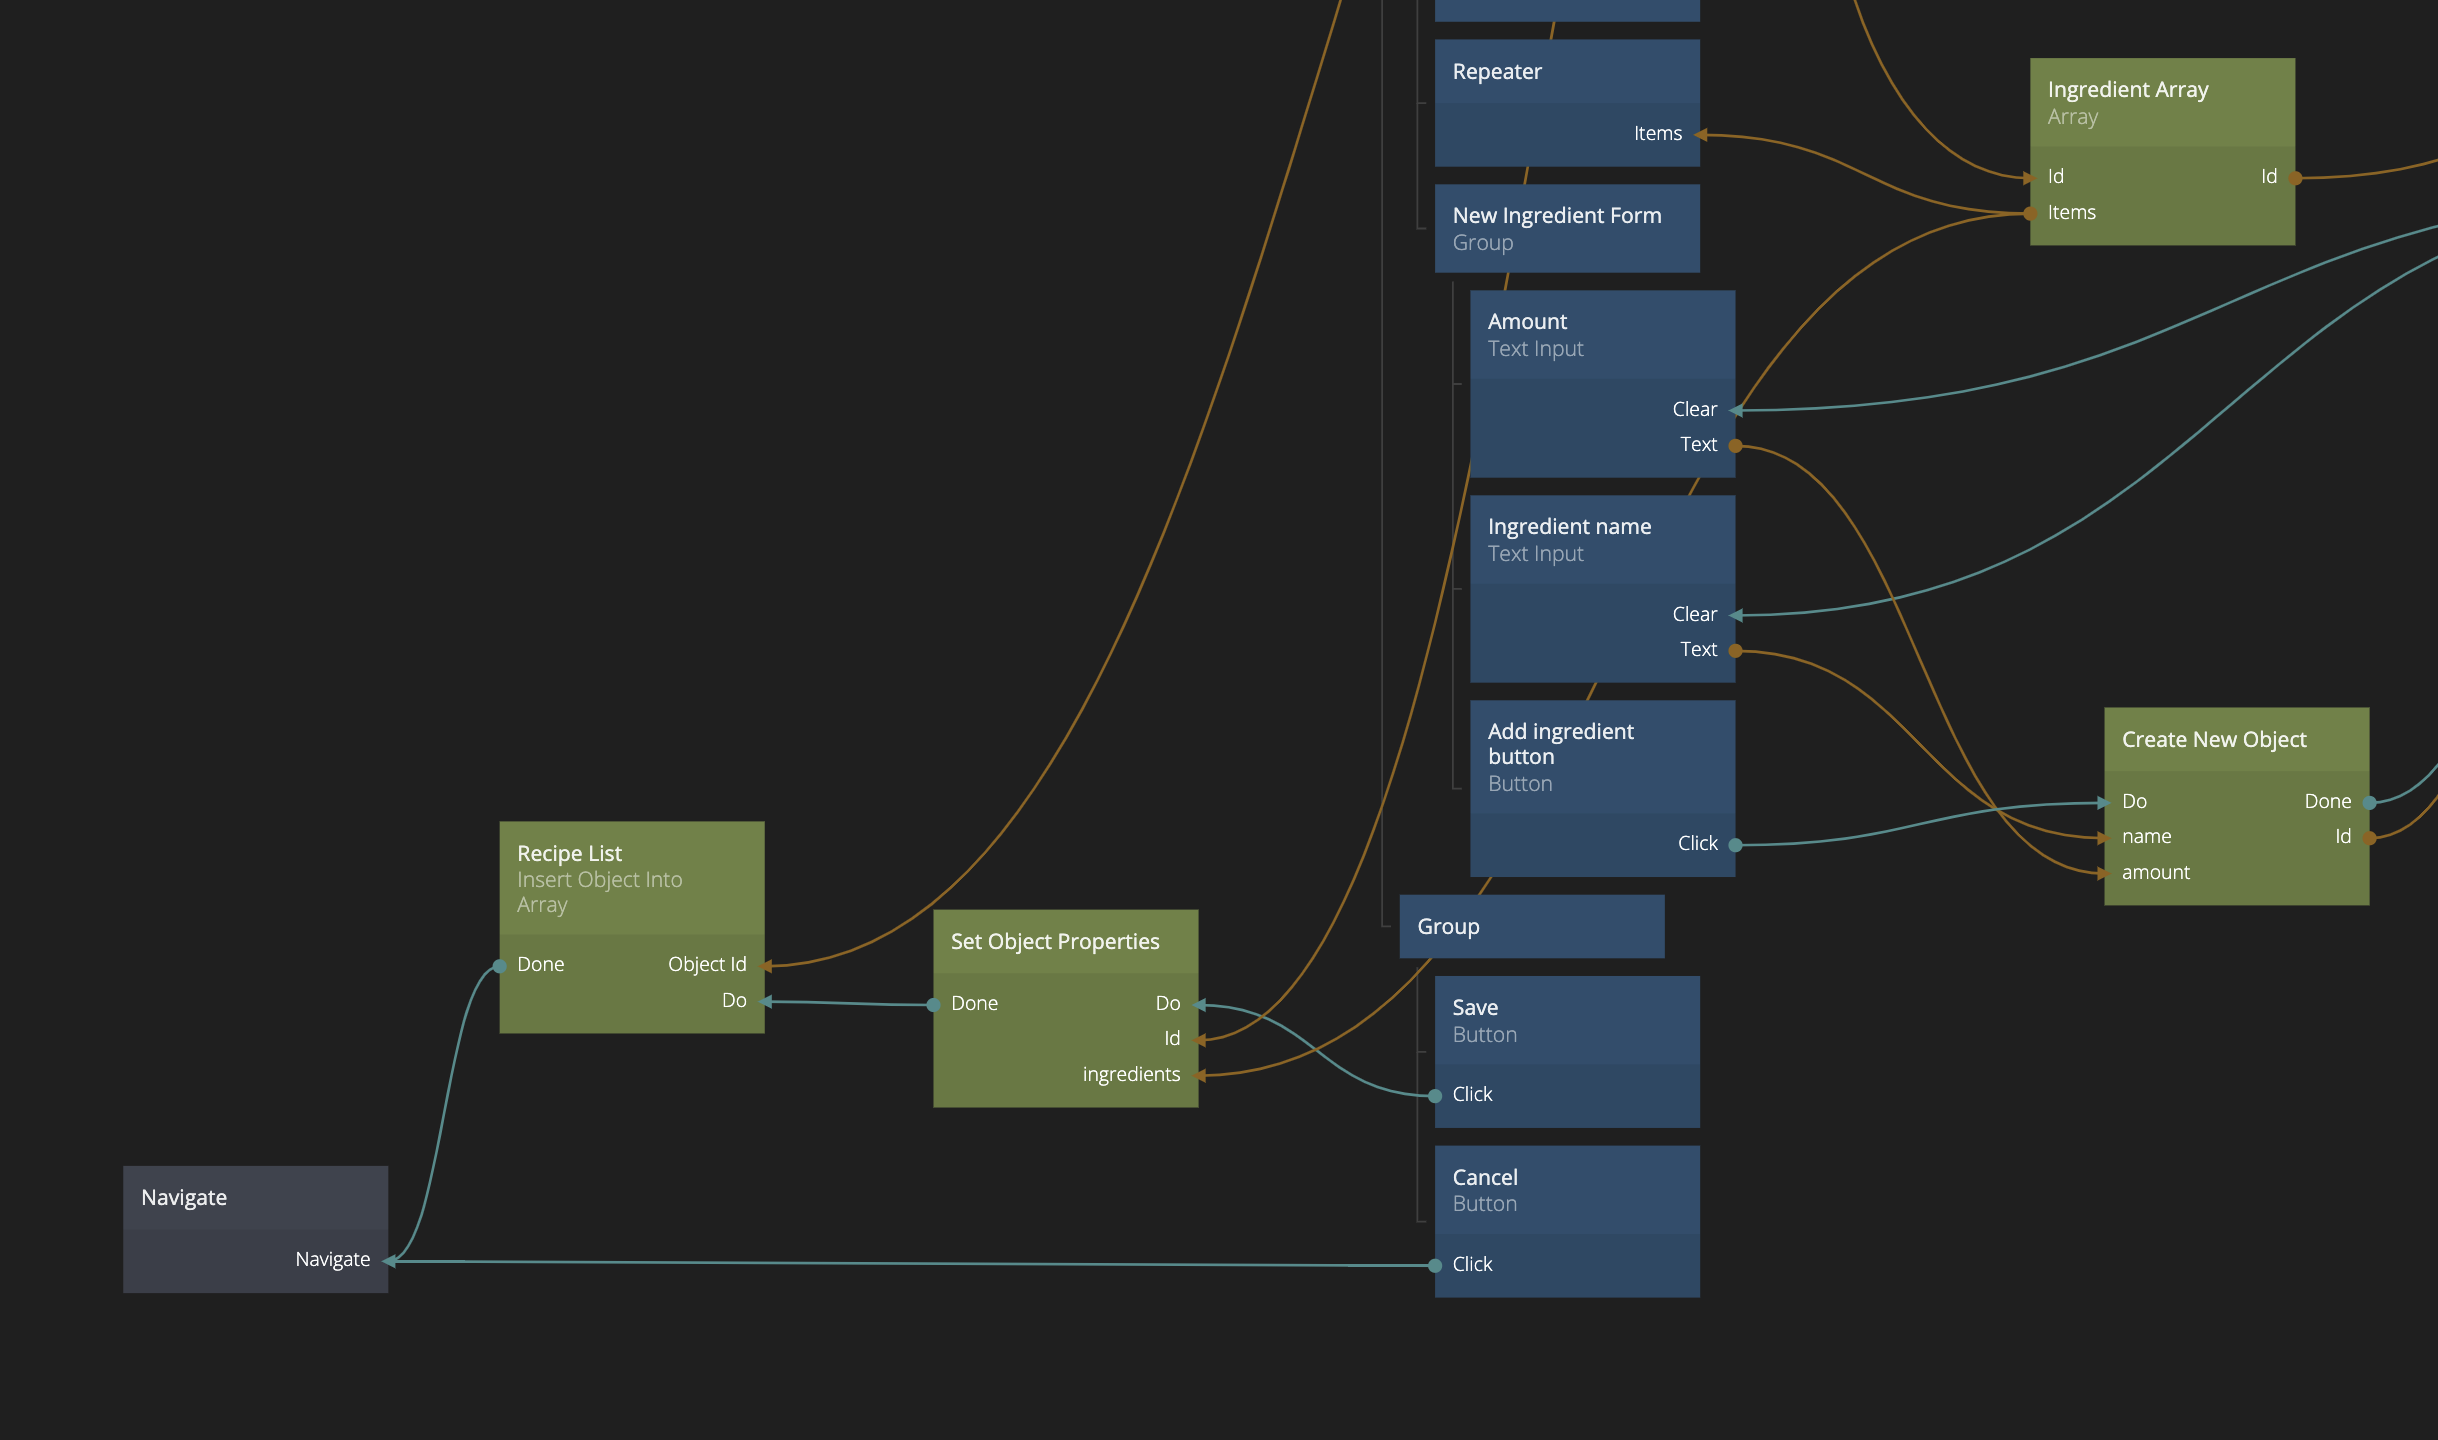
Now we need to add some UI to make it possible to add ingredients. The idea is to have two Text Inputs (one for amount and one for the name of the ingredient) and a Button that adds the ingredient. We also need a Repeater that shows the ingredients as you add them. That repeater can reuse our previous Ingredient List Item component. Of course, the Repeater gets its items from the Array we created that holds the ingredients. Let's also add in a Text as a title for the ingredients section to make it easier to understand the form.
All the components are put in a Group called Ingredient Section to make them easy to handle as a compound.
Adding Objects to an Array
Now we need to create a new Object (representing the ingredient) when the user clicks Add and then add that new Object to the Array of ingredients. We use the node Insert Object Into Array for the latter. It takes one Id for the Array to add to and one Id for the Object to add. We hook everything up as below.
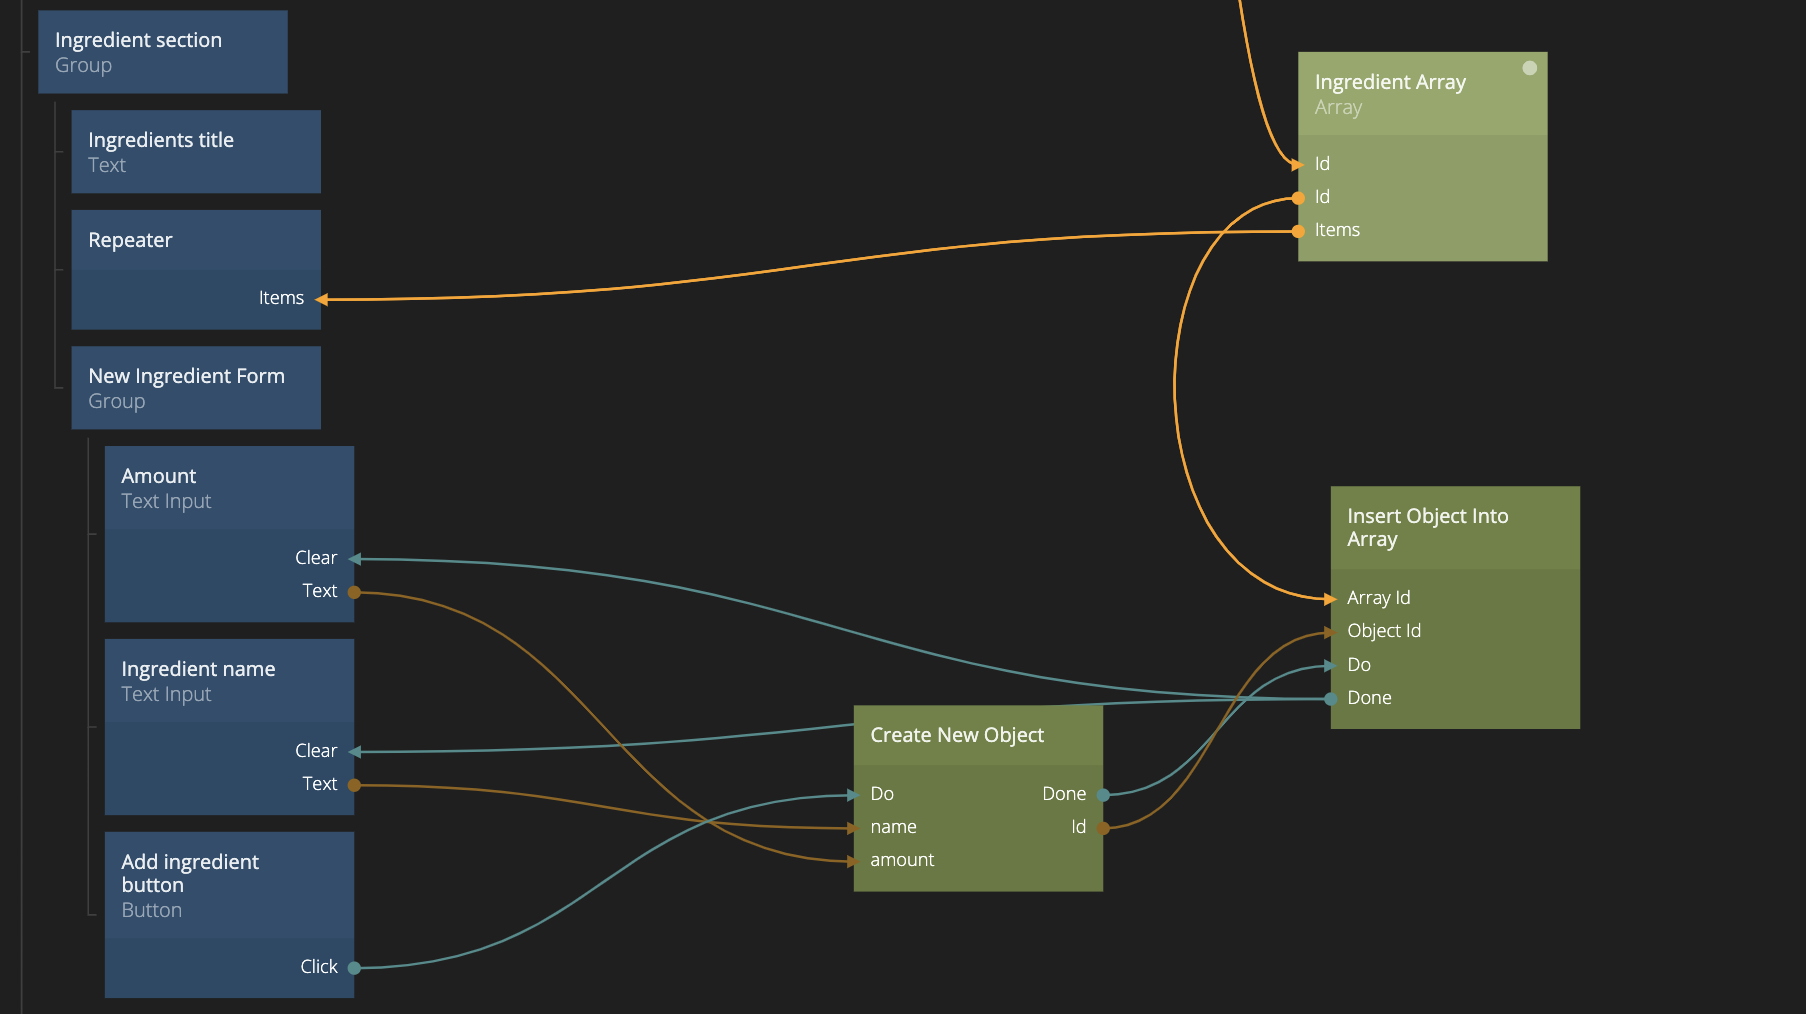
Try adding a few ingredients. They should show up in the ingredient list.
Adding the new recipe to the Recipe Array
Finally, when the user presses Save we want to add the ingredients to the recipe and then add the new recipe to our main recipe Array - the one we create in the Recipe List Page that has an Id Recipe List.
First we store the Items of our ingredients in the ingredients property using the Set Object Properties. Then, once again we use the Insert Object Into Array node to save our recipe in the recipe list. This time we hardcode the Id to Recipe List and make sure our recipe Object is the object to add.
note
Another option would have been to store the Id of the Array instead of its items and then use the Id to identify the Array when showing the recipe. However, since the Static Array don't have an internal Array holding its ingredients, this would not work in this case. That's why we store the Items rather than the Id.
We also make sure the user navigates back to the Recipe List once the recipe is added. Same goes for if the user presses Cancel, but of course in that case, nothing is saved.
This is how that part is done.
A minor refactoring
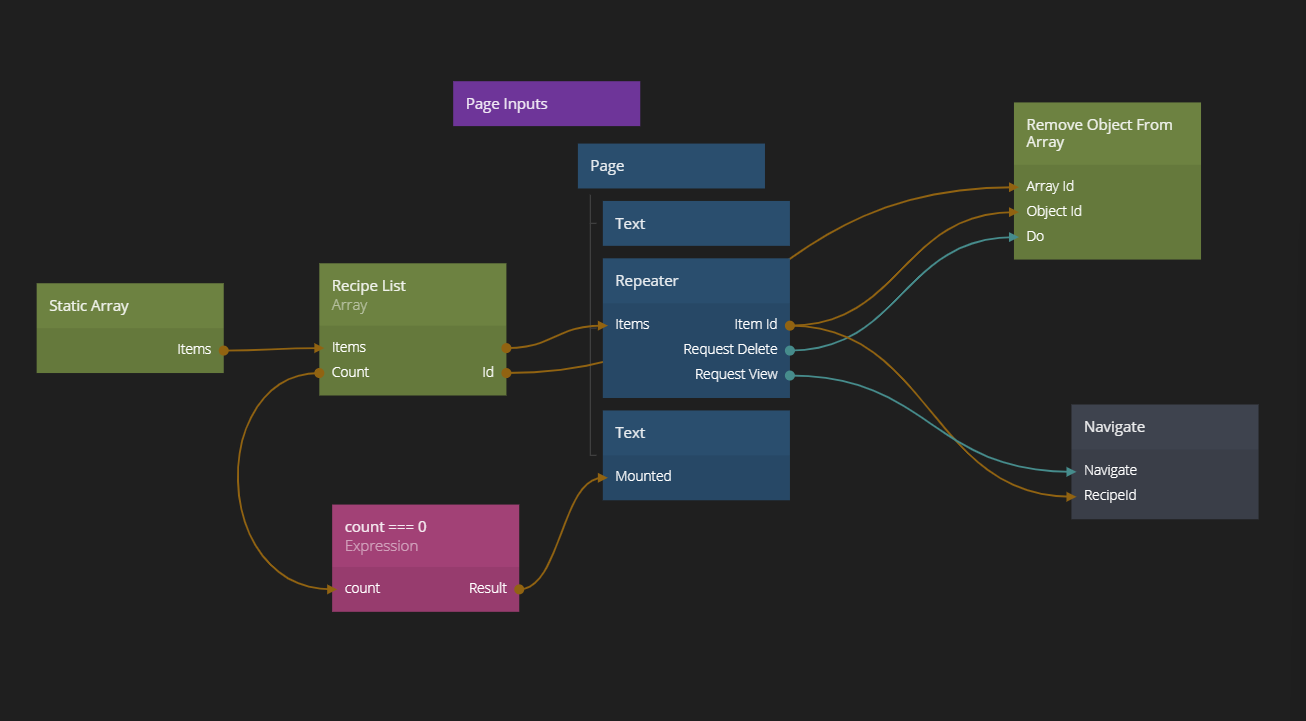
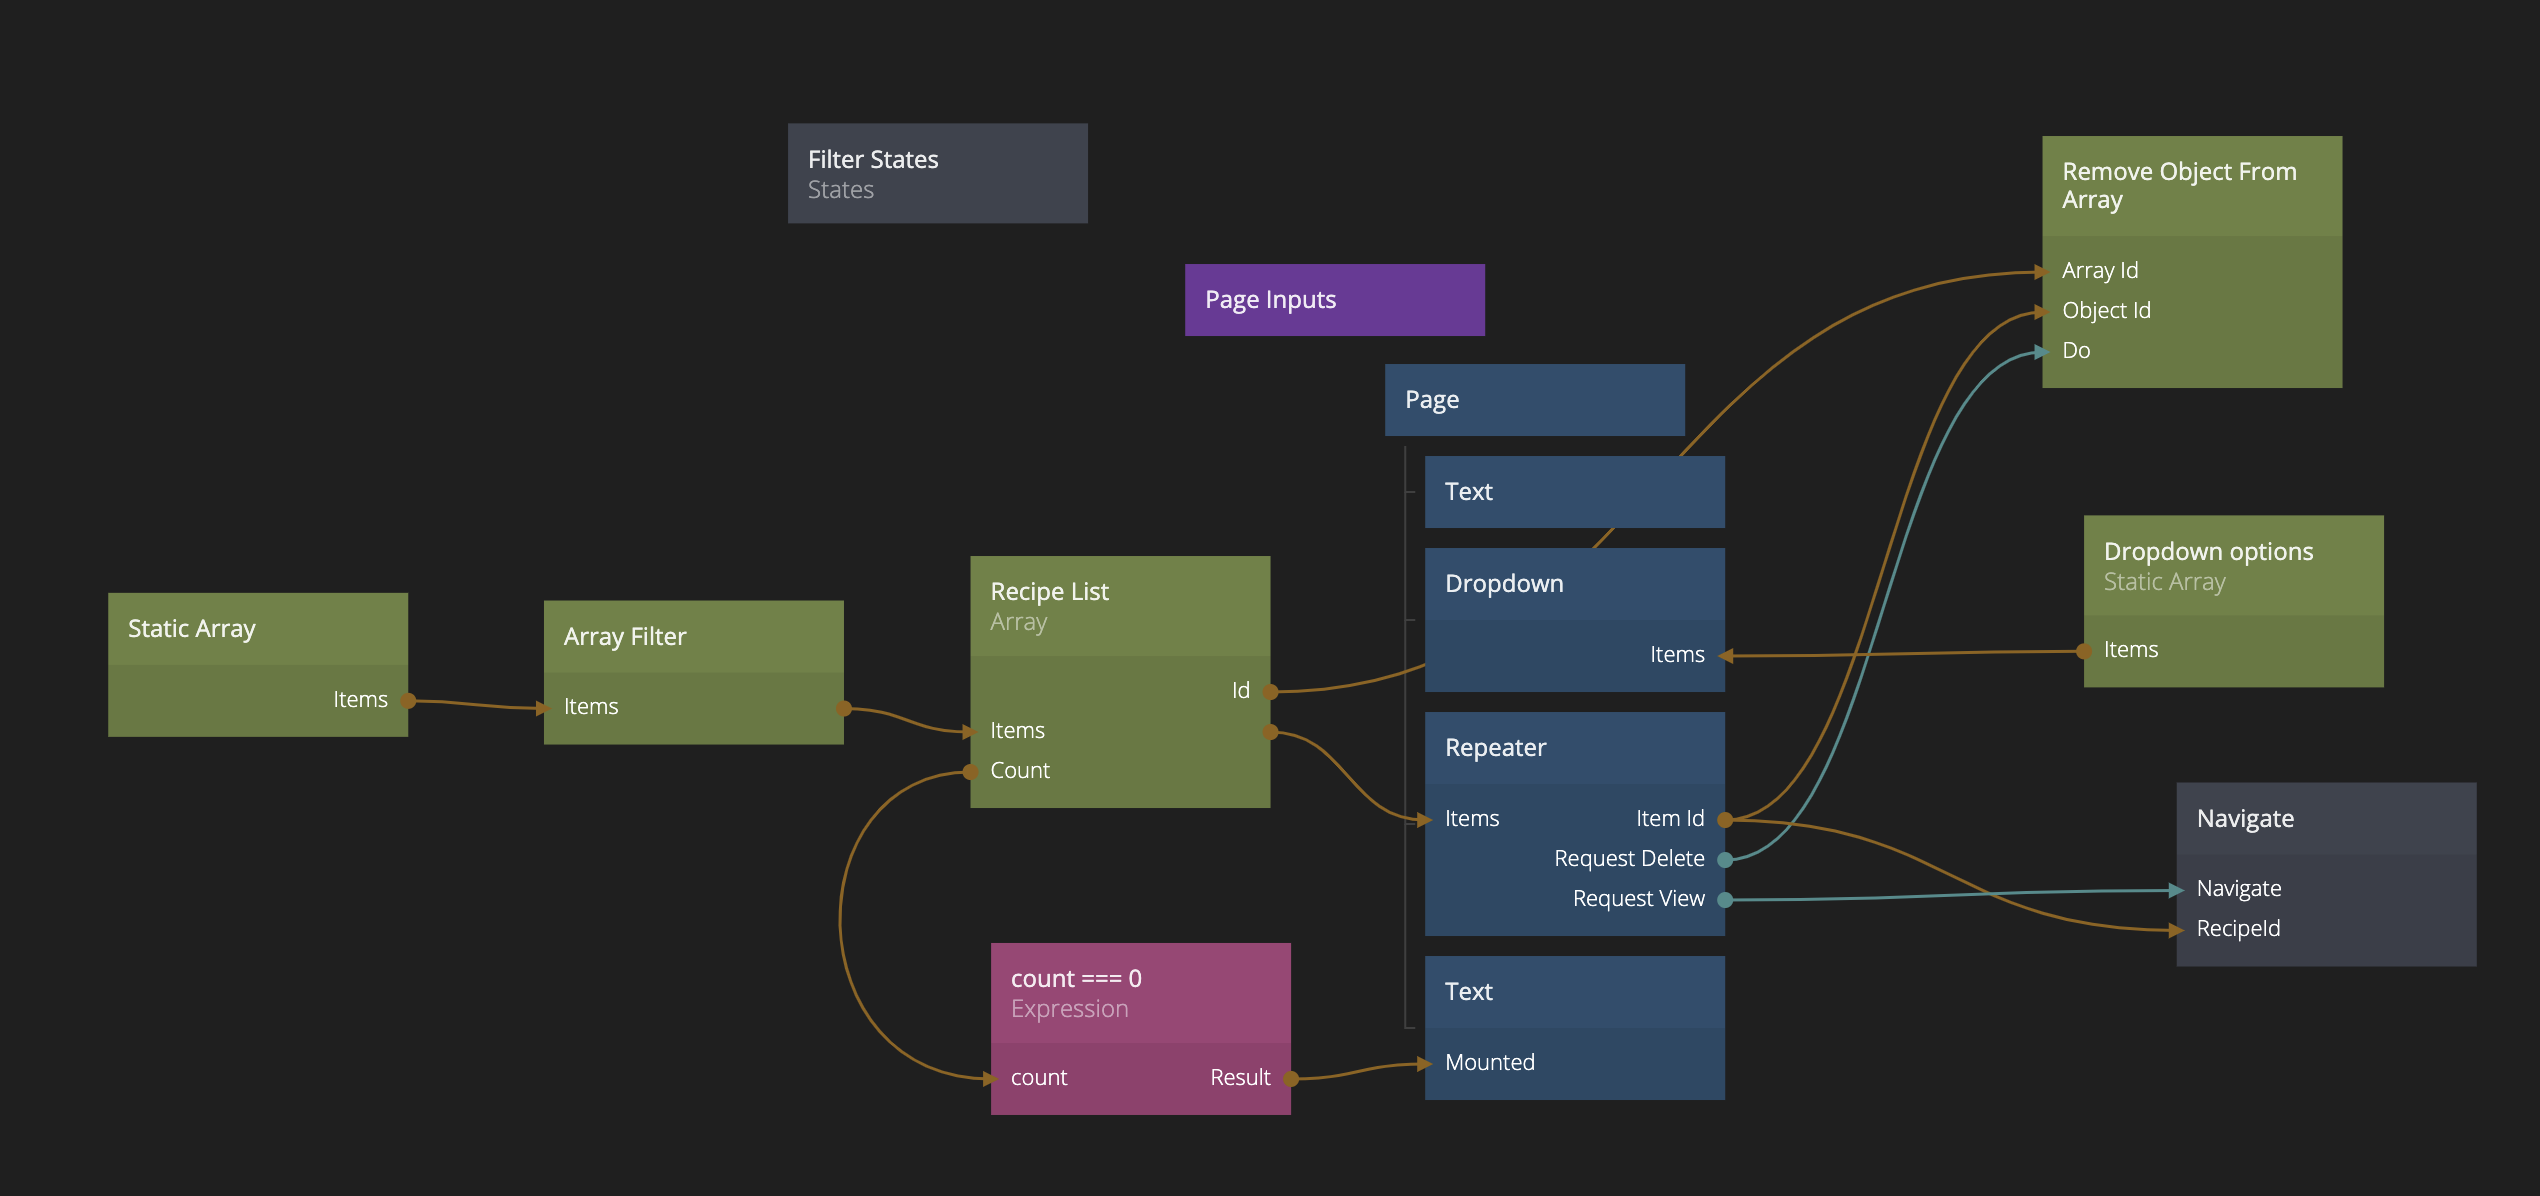
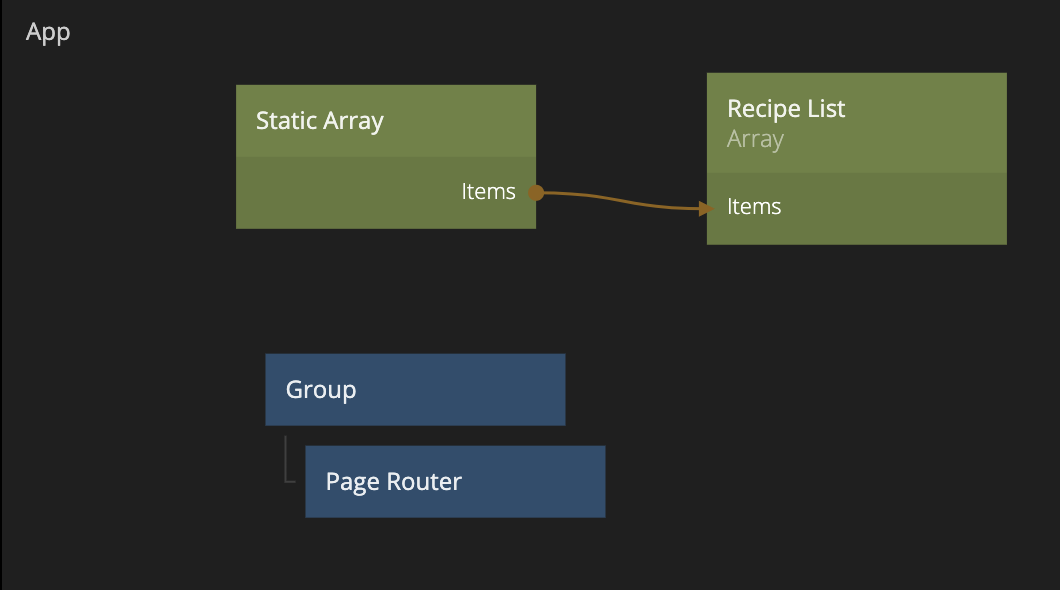
We now expect our newly created recipes to be visible in the Recipe List. However, we can see that's not the case. It's the same old list. What's going on? The reason is that since the Recipe List Page is created as we nevigate, the items are overwritten with the items of our Static Array. See image below.
We also see that the filtering happens at the wrong place - we are only filtering what's coming out of the Static Array.
To solve this we need to move the assignments of items out, outside the Page (that is being re-created) to the main App that's not being recreated when a navigation happens. This is easy since the Array can easily be referred to globally through its Id.
We simply reorganize our Arrays and filters according to the following. We move the Static Array and assignment out to the App as below.
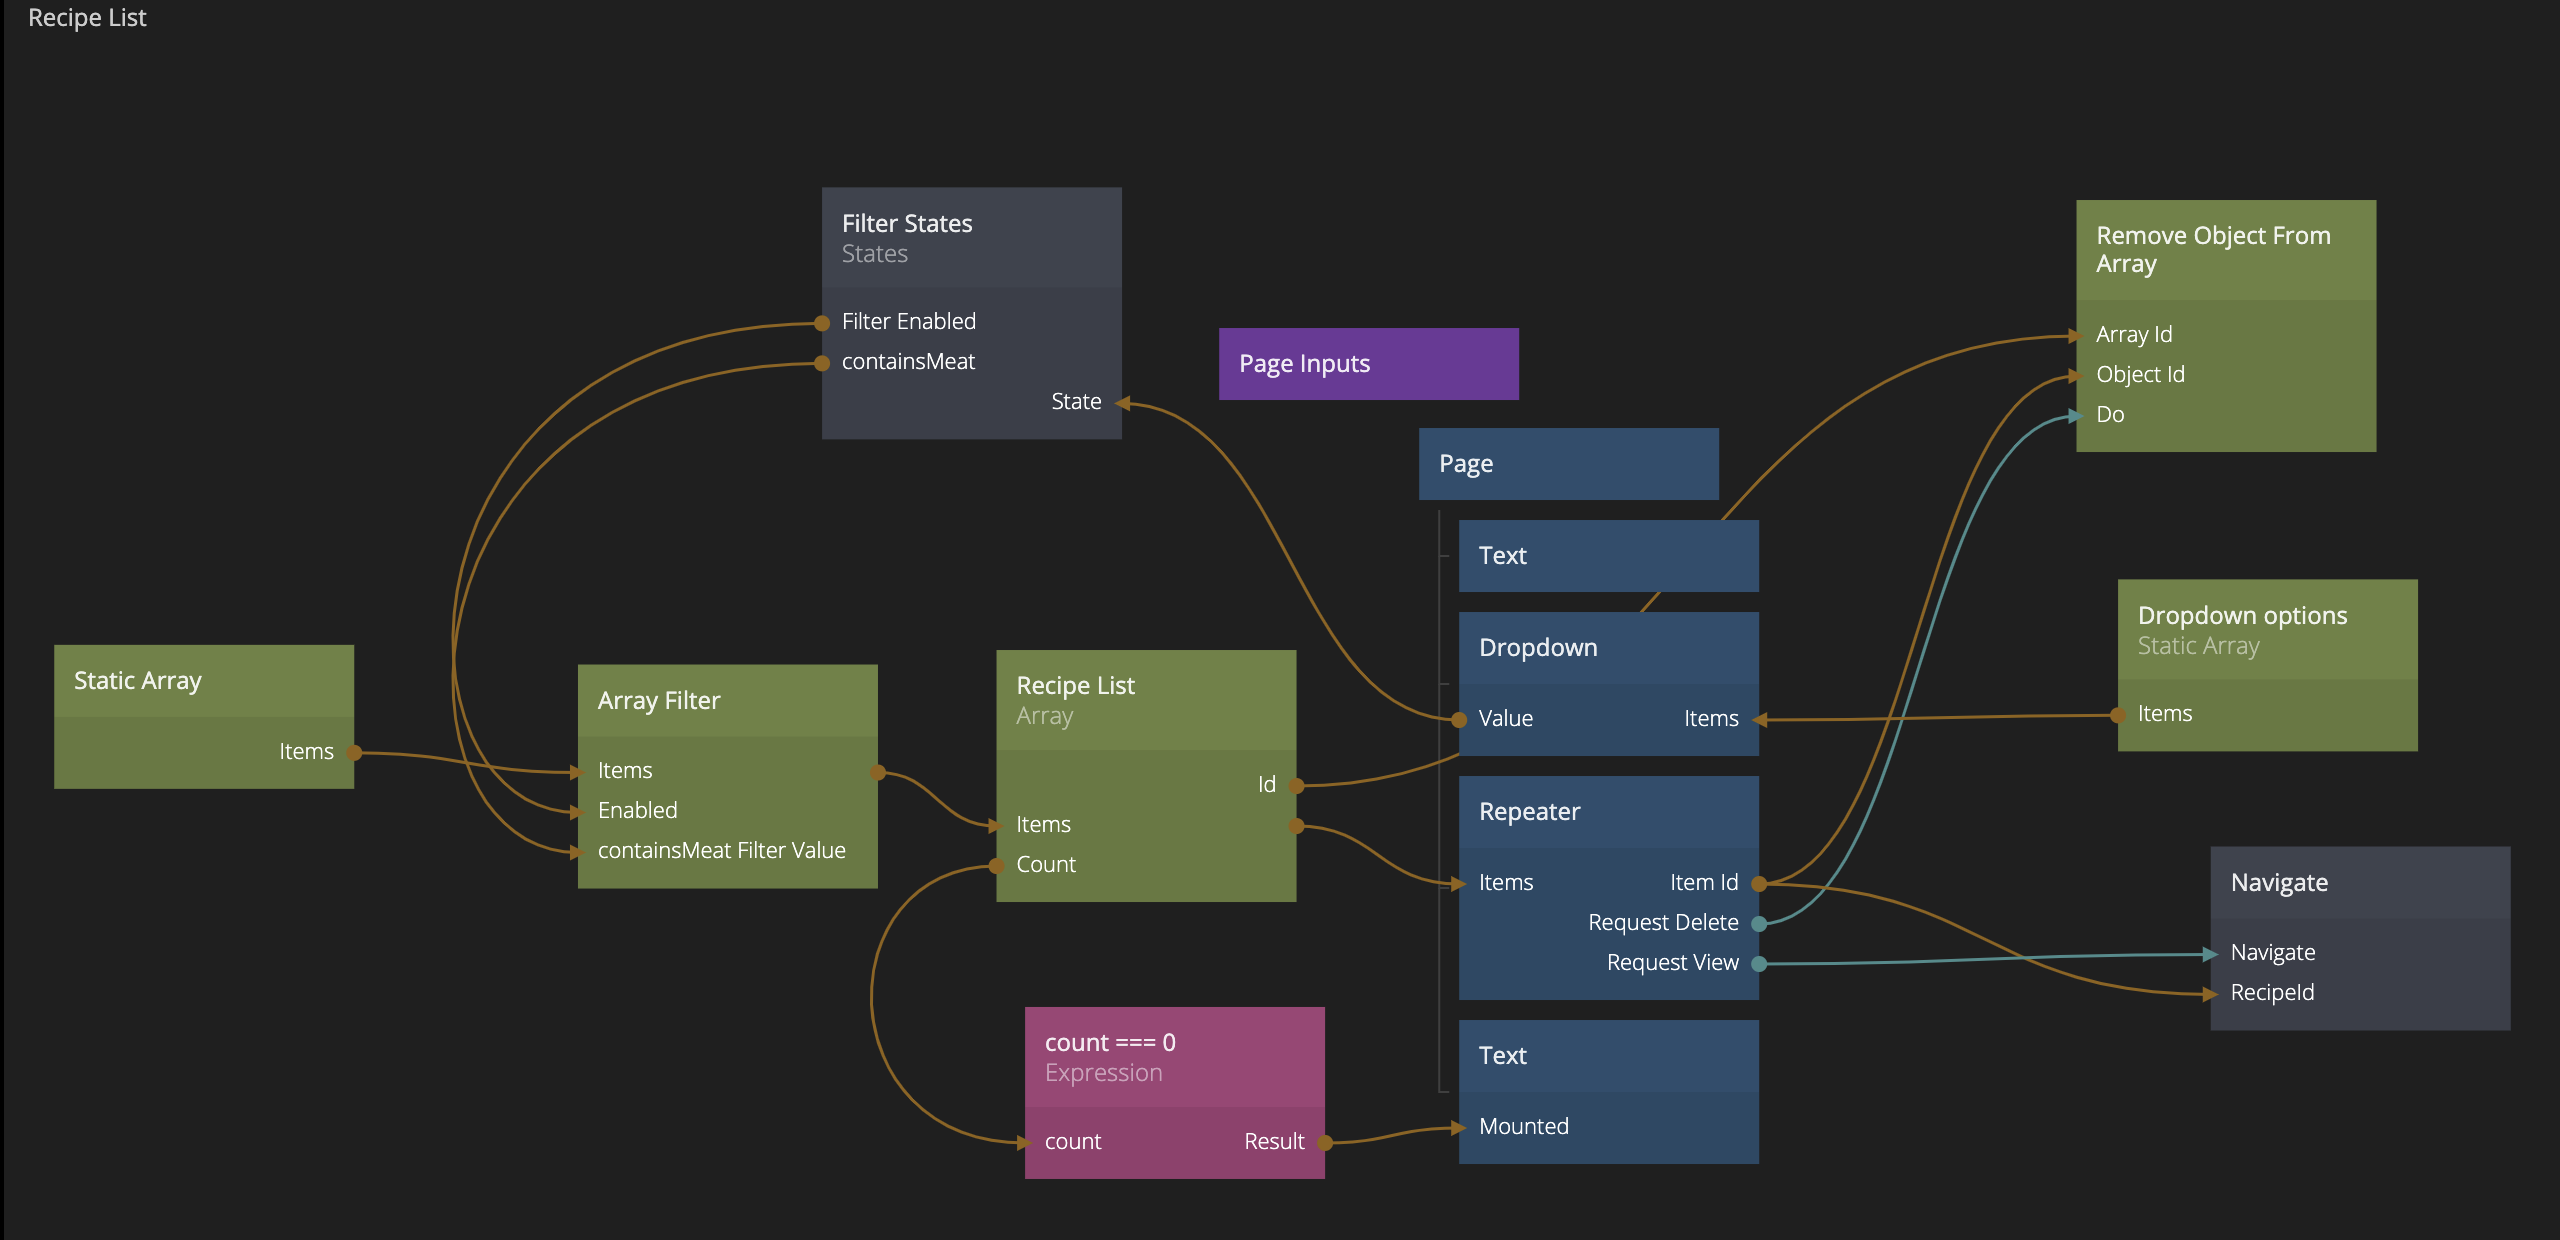
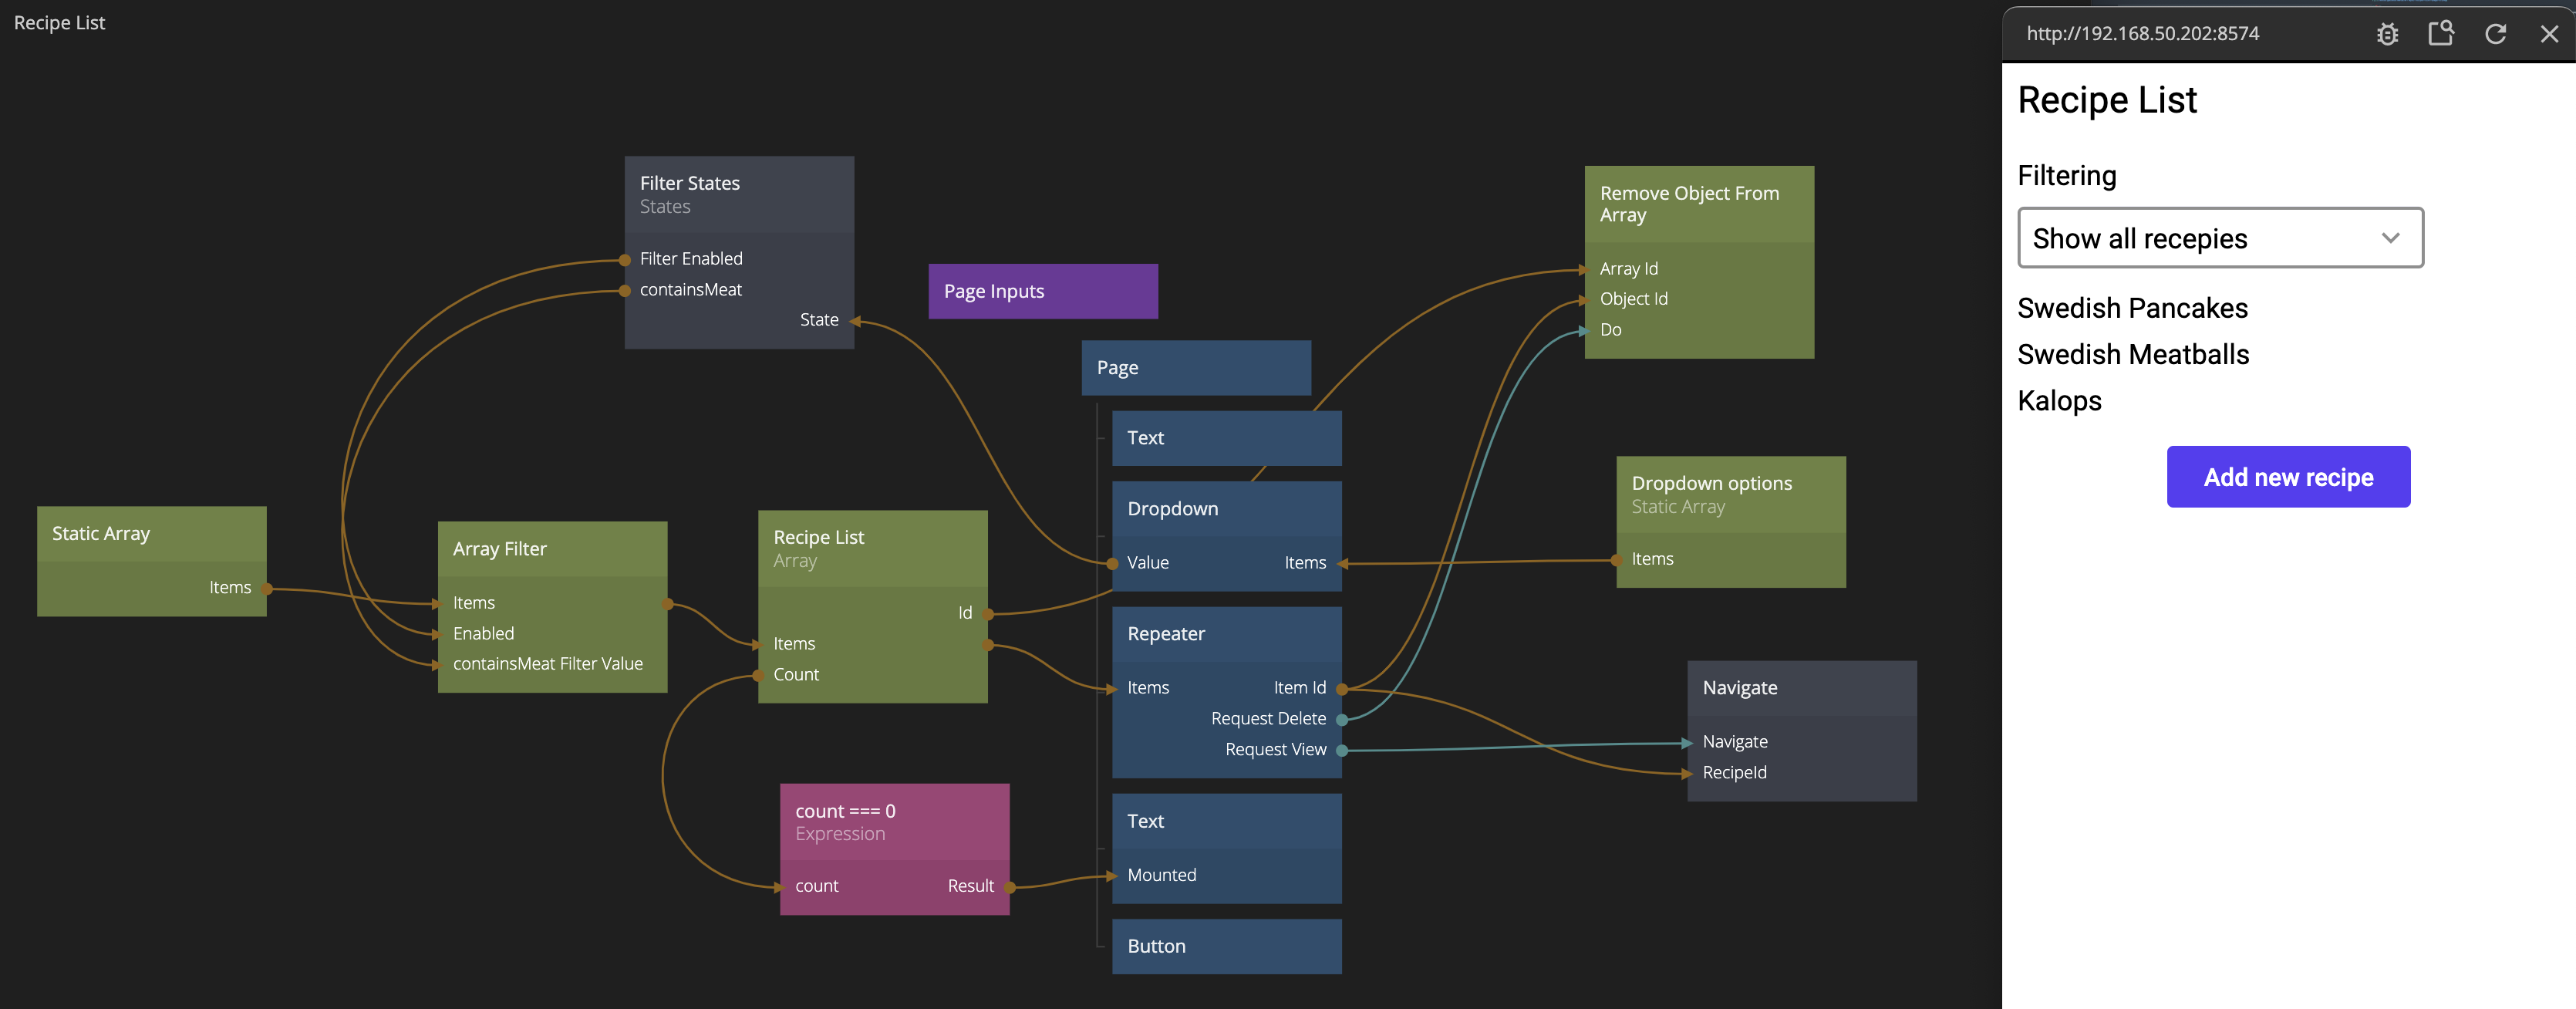
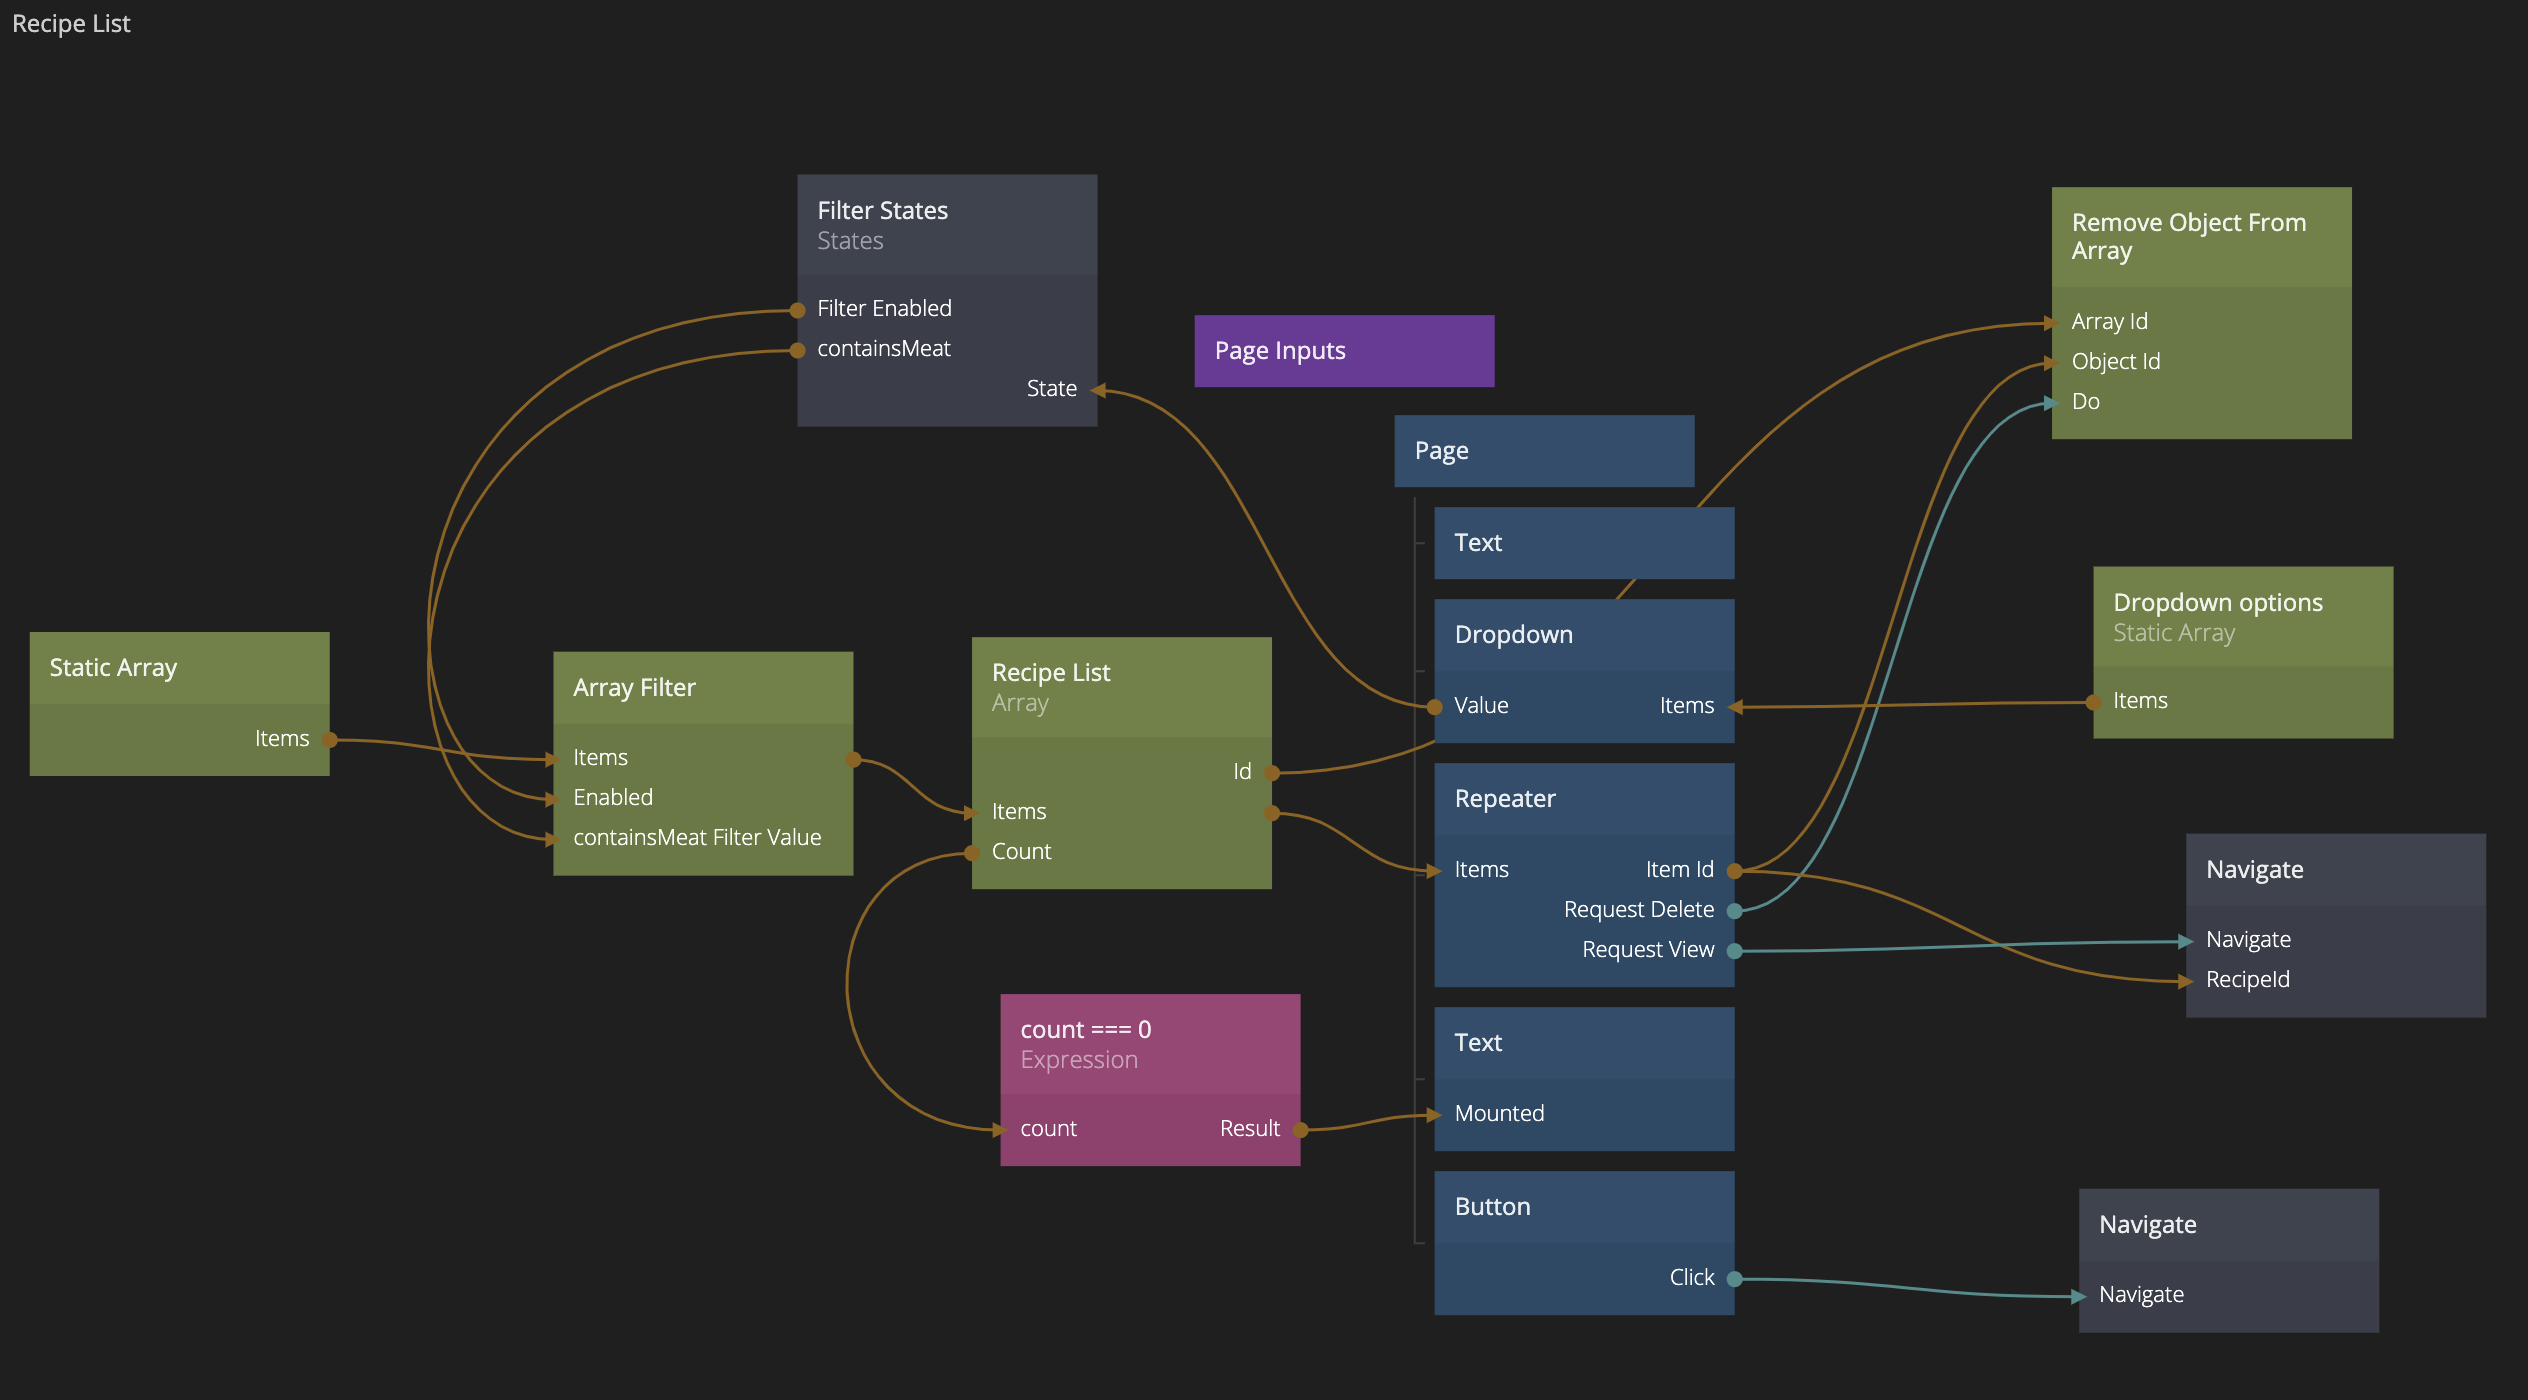
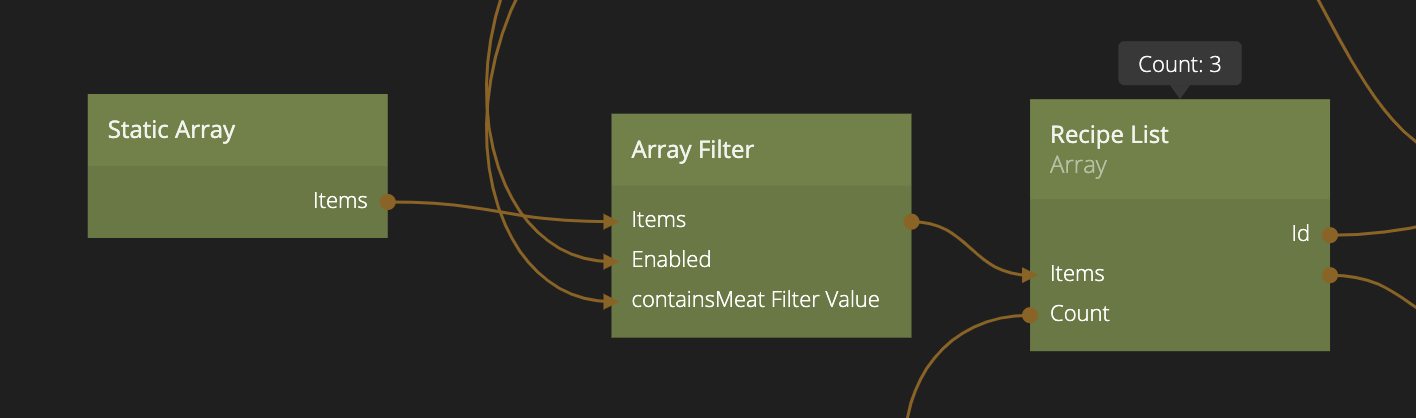
And we use the same Array (identified by the Id) and make sure to filter the items before we feed them into our Repeater
Try it out, now it should work!