Client Side Business Logic Using Nodes
What you will learn in this guide
This guide will show some examples on how to use different logical nodes in Noodl to build simple business logic. The guide will use a conditional form (i.e. a form where different fields need to be filled out based on other fields are filled out) but the concepts are general. In this guide we will not use any Javascript but rely only on existing nodes in Noodl.
We will use the nodes Expression, Condition, Switch and States as well as the boolean nodes And and Or to implement the logic.
Overview
The guide will show the following ways to implement logic
- Using a Switch and States node with Mounted attribute to control what's visible on the screen
- Using Expression and Condition to validate the content of a text input
- Using boolean operators to build logic
Another way to build logic is to use the Javascript nodes Function and Script this is covered in this guide.
Building a conditional form
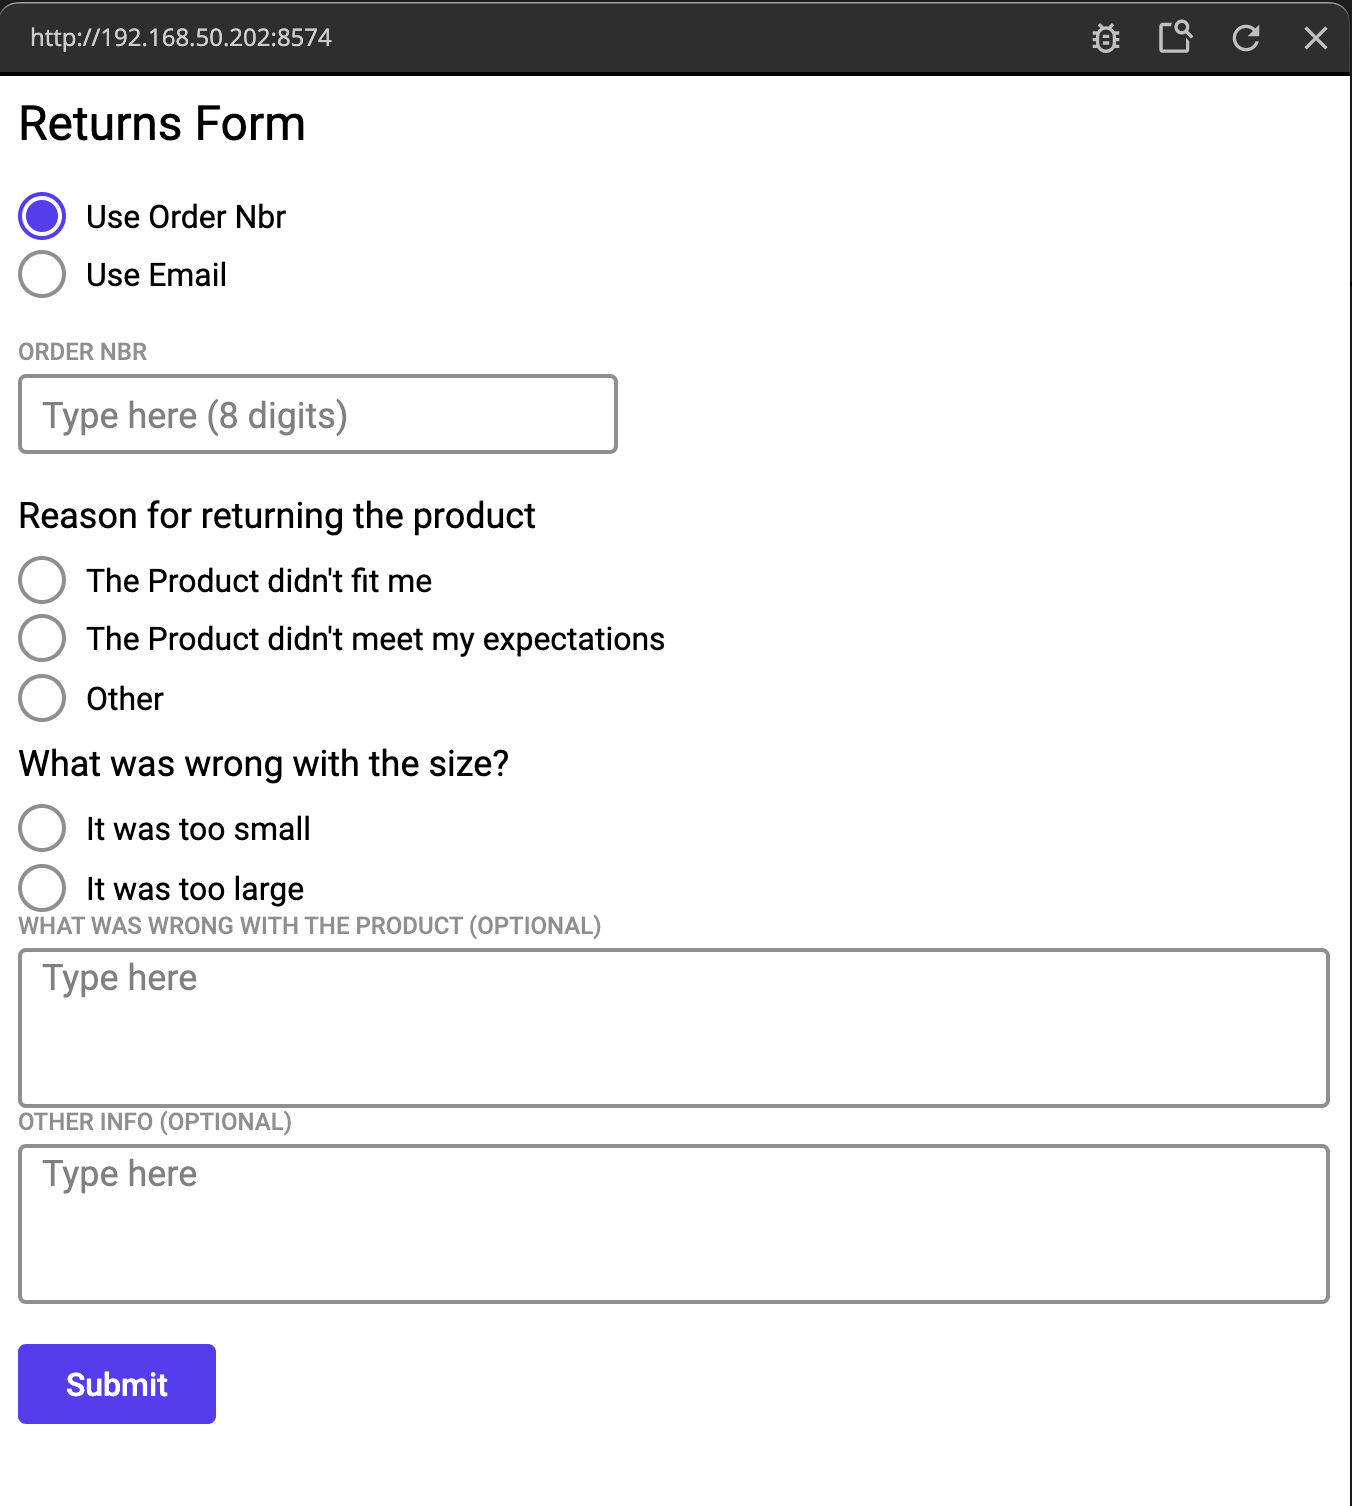
Let's build one of those complicated forms that changes progressively depending on what you enter in the form. In our case, it will be a form for registering returns, for example clothes that your ordered online.
The form logic
In words, we want to build a form that works like this:
- You start the form by either entering a order number or an email address.
- If you entered a order number, the order number need to be exactly 8 digits, otherwise the form should warn the user.
- You also have to give a reason for the return. The options are The product did not fit, The product did not meet my expectations, or Other.
- If you selected The product did not fit you have to select whether the product was too large or too small.
- If you selected The product did not meet my expectations you will ge a given an optional text field to fill out with more details.
- If you selected Other you will also be given an optional text field to fill out with more details.
There is a "Submit" button at the end of the form. It will only be available if all necessary information has been given, otherwise it will be disabled.
All the data should be stored in an Object with the following properties:
 {
    "email":<the user email>,
    "order_nbr":<the order_nbr>,
    "reason":<either "bad_fit","did_not_meet_exp" or "other">,
    "bad_fit_reason":<"too_small" or "too_large">,
    "did_not_meet_exp_reason":<any text>,
    "other_reason":<any text>
 }
Naturally, you have to have either and email or an order_nbr. Also, if you have selected bad_fit as reason you also need a bad_fit_reason to be able to submit.
Ok, lets go!
The static content of the form
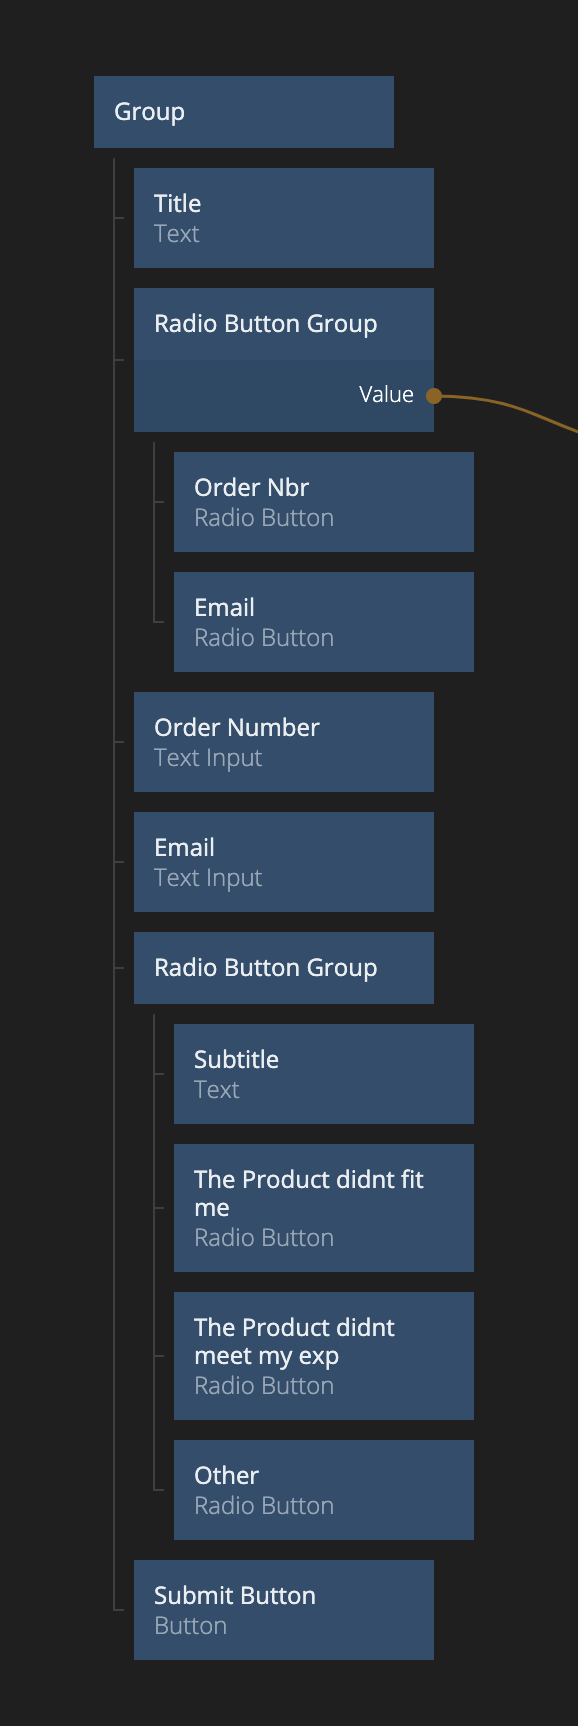
We will start with the content of the form that are unconditional. These are
- A Radio Button Group with the options
order_nbroremail. - Another Radio Button Group with the label
Reason of returnand the optionsThe product did not fit,The product did not meet my expectationsandOther - A submit Button
- A few titles to seperate the different sections
With the labels filled out and some padding and margins the form will look something like below. You can copy the nodes using the Copy/Paste button below and paste into a new Project if you don't want to create the nodes yourself.

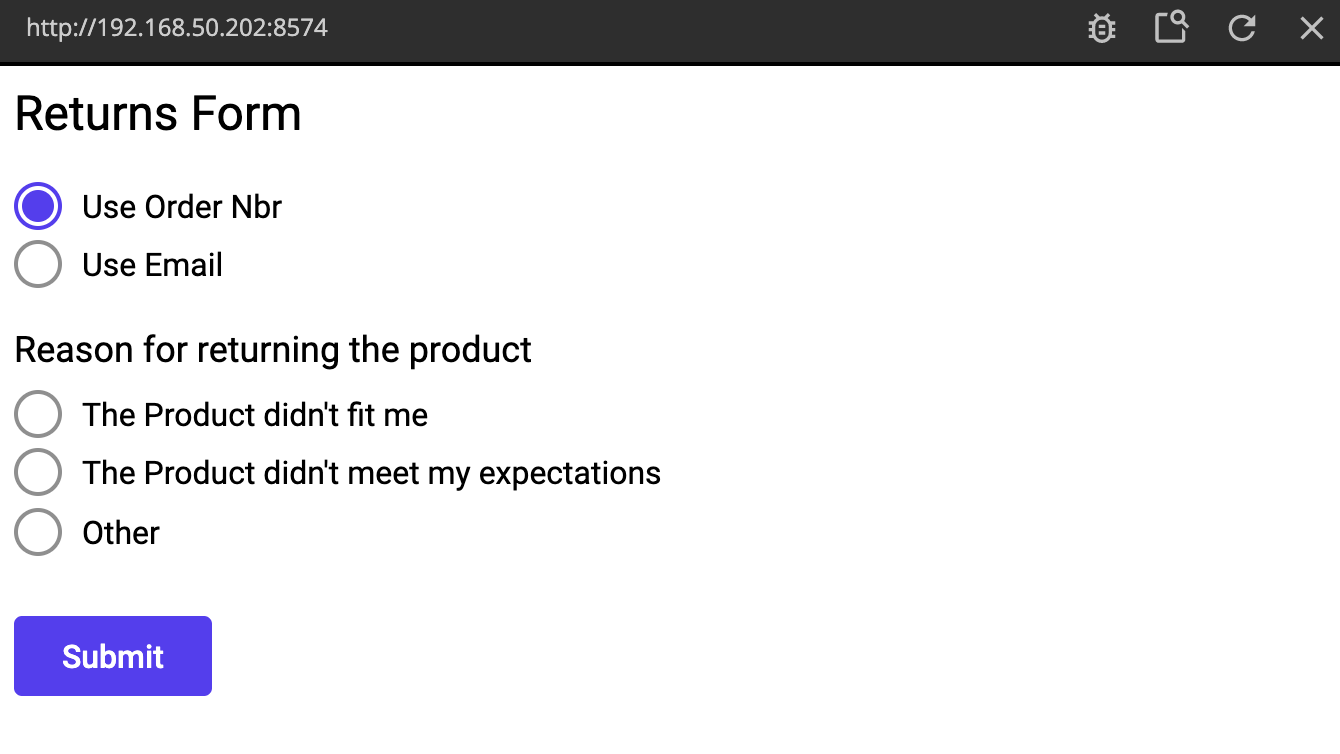
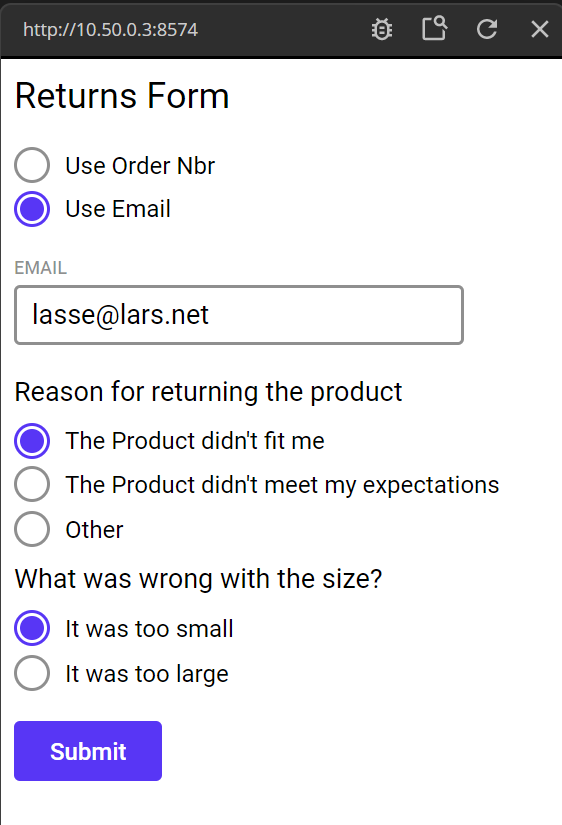
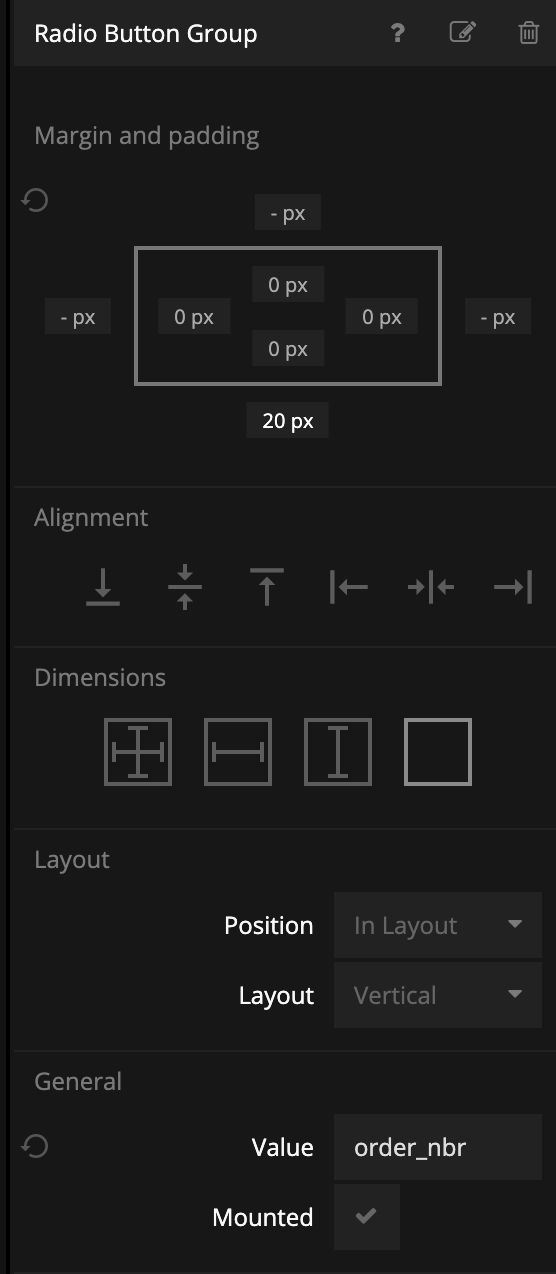
Note that the value of the Radio Buttons was also filled out (email/order_nbr and bad_fit/did_not_meet_exp/other). We will use these values to determine our logic later. We've also set the initial value of the first Radio Button group to order_nbr as we want this to be the default option.
Conditional UI using a Switch
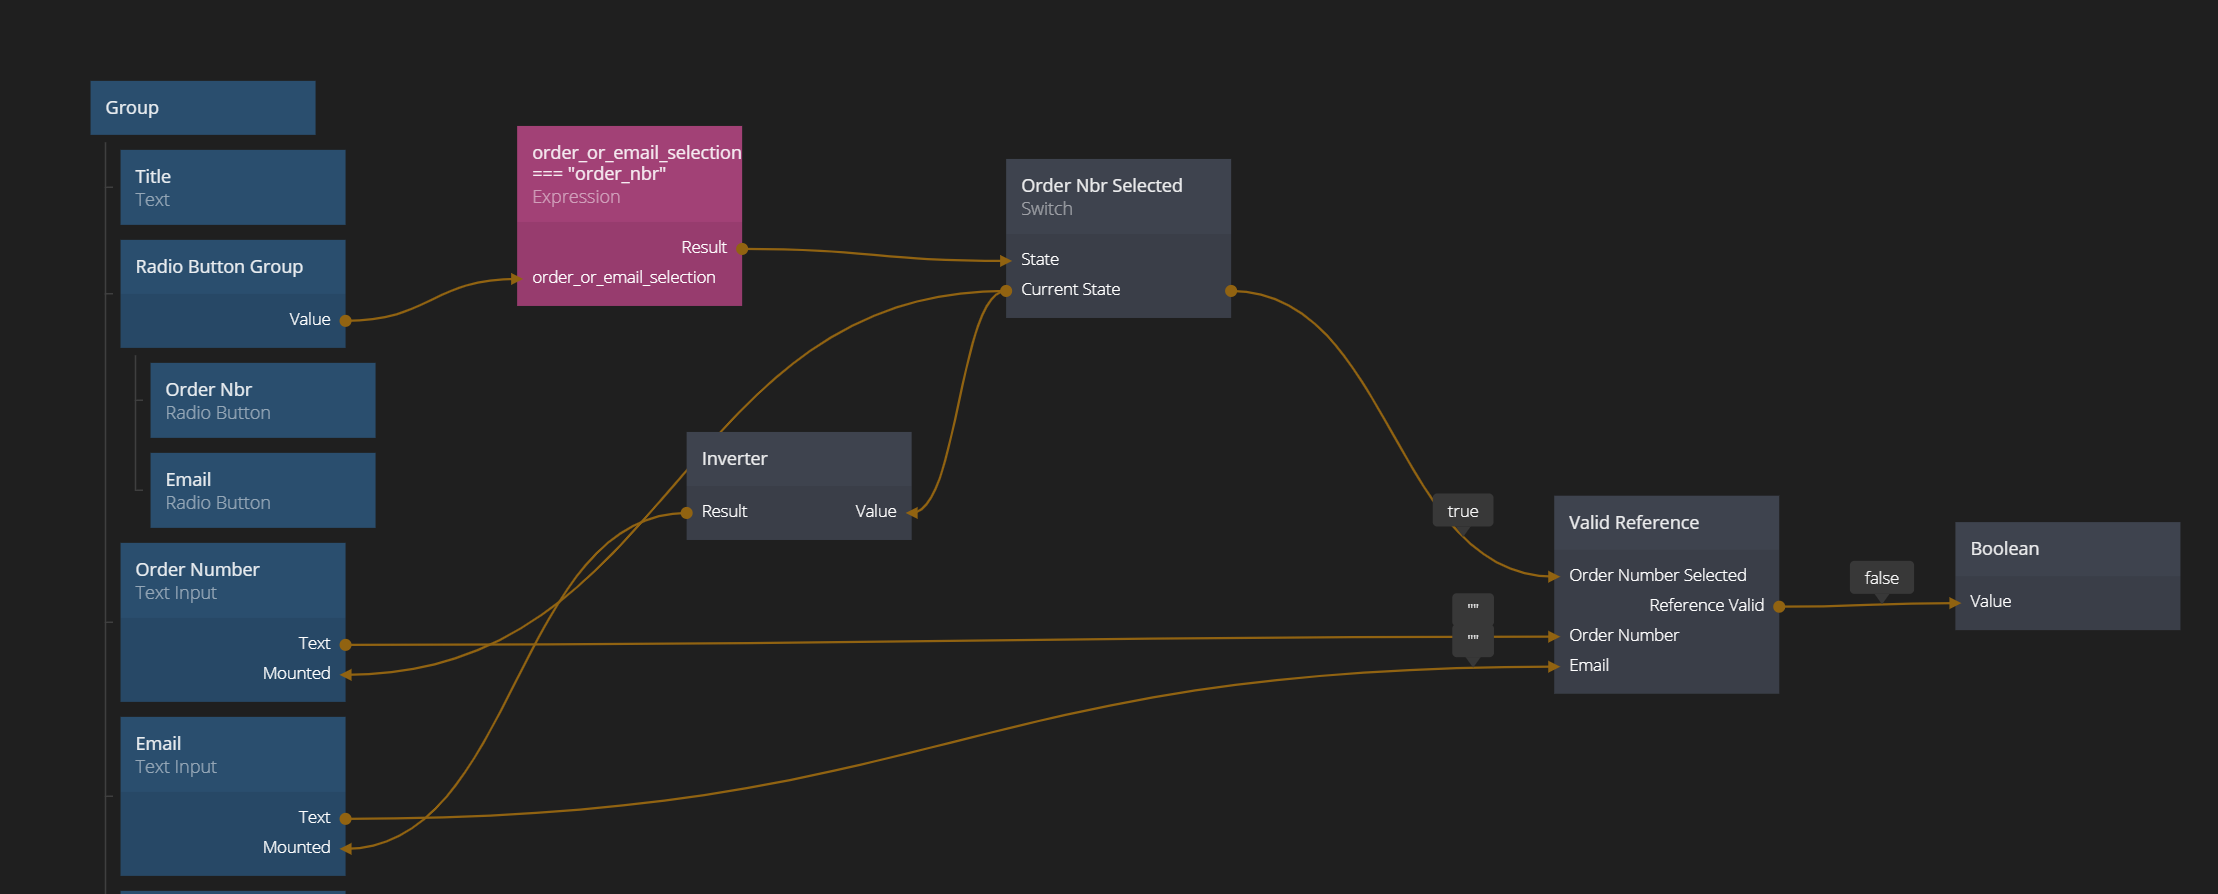
The first conditional part of the form is whether the user fills out an order nr or an email. Let's create that. Often a good way to handle this type of conditional UI is to create both cases and add then into the node tree and then use the Mounted property on the root group for each case to pick which one that should be shown.
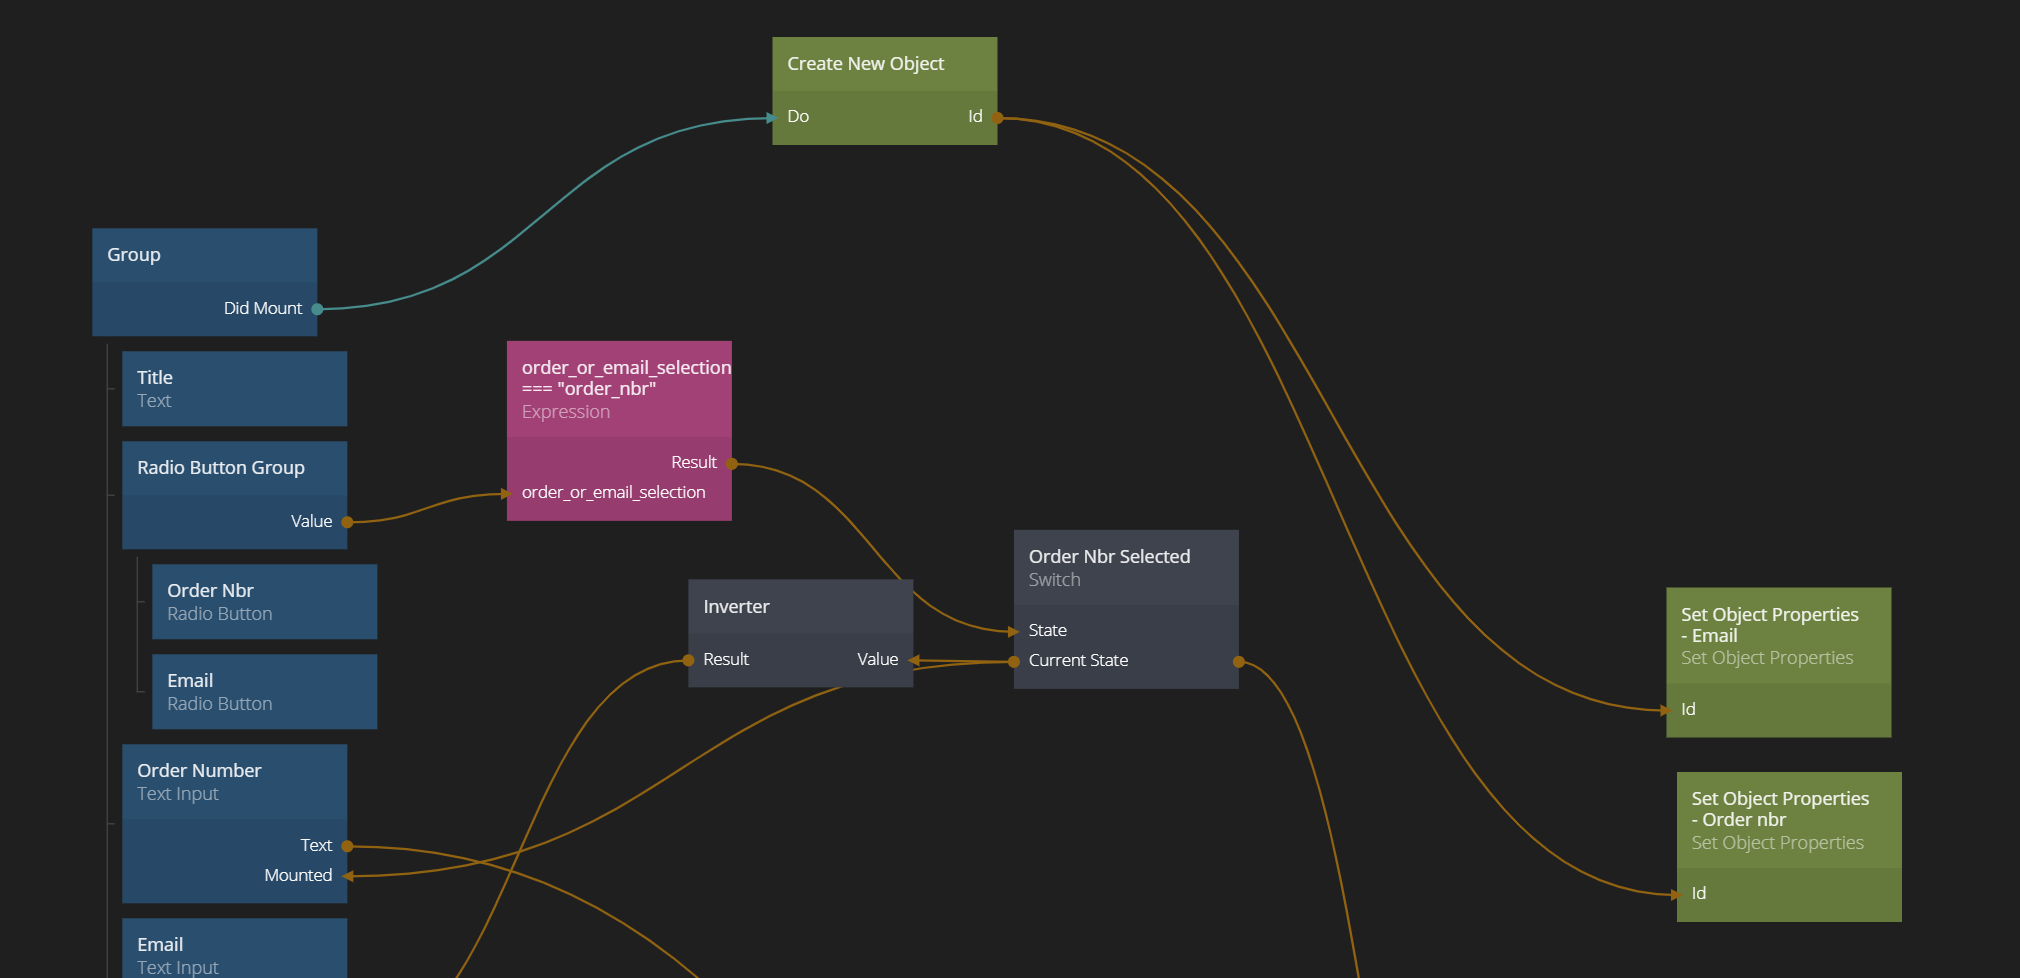
We need a Switch that can encode the state, for example the Switch could be true if the order number is active, otherwise false. To do the actual check of the Value of the Radio Button Group we will use an Expression node. This is a simple way to write logical statements. It uses a Javascript format. We will check if the Value of the Radio Button Group equals the string order_nbr and in that case return true, otherwise false. We write this in the expression node as below:
order_or_email_selection === "order_nbr"
This will create a new input on the Expression node called order_or_email_selection. We connect the output Value of the Radio Button Group to that input. Our output Result on the Expression node will now be either true or false. This value will control the state of a Switch. So create a Switch, call it Order Nbr selected and connect it to the State input of the Switch.
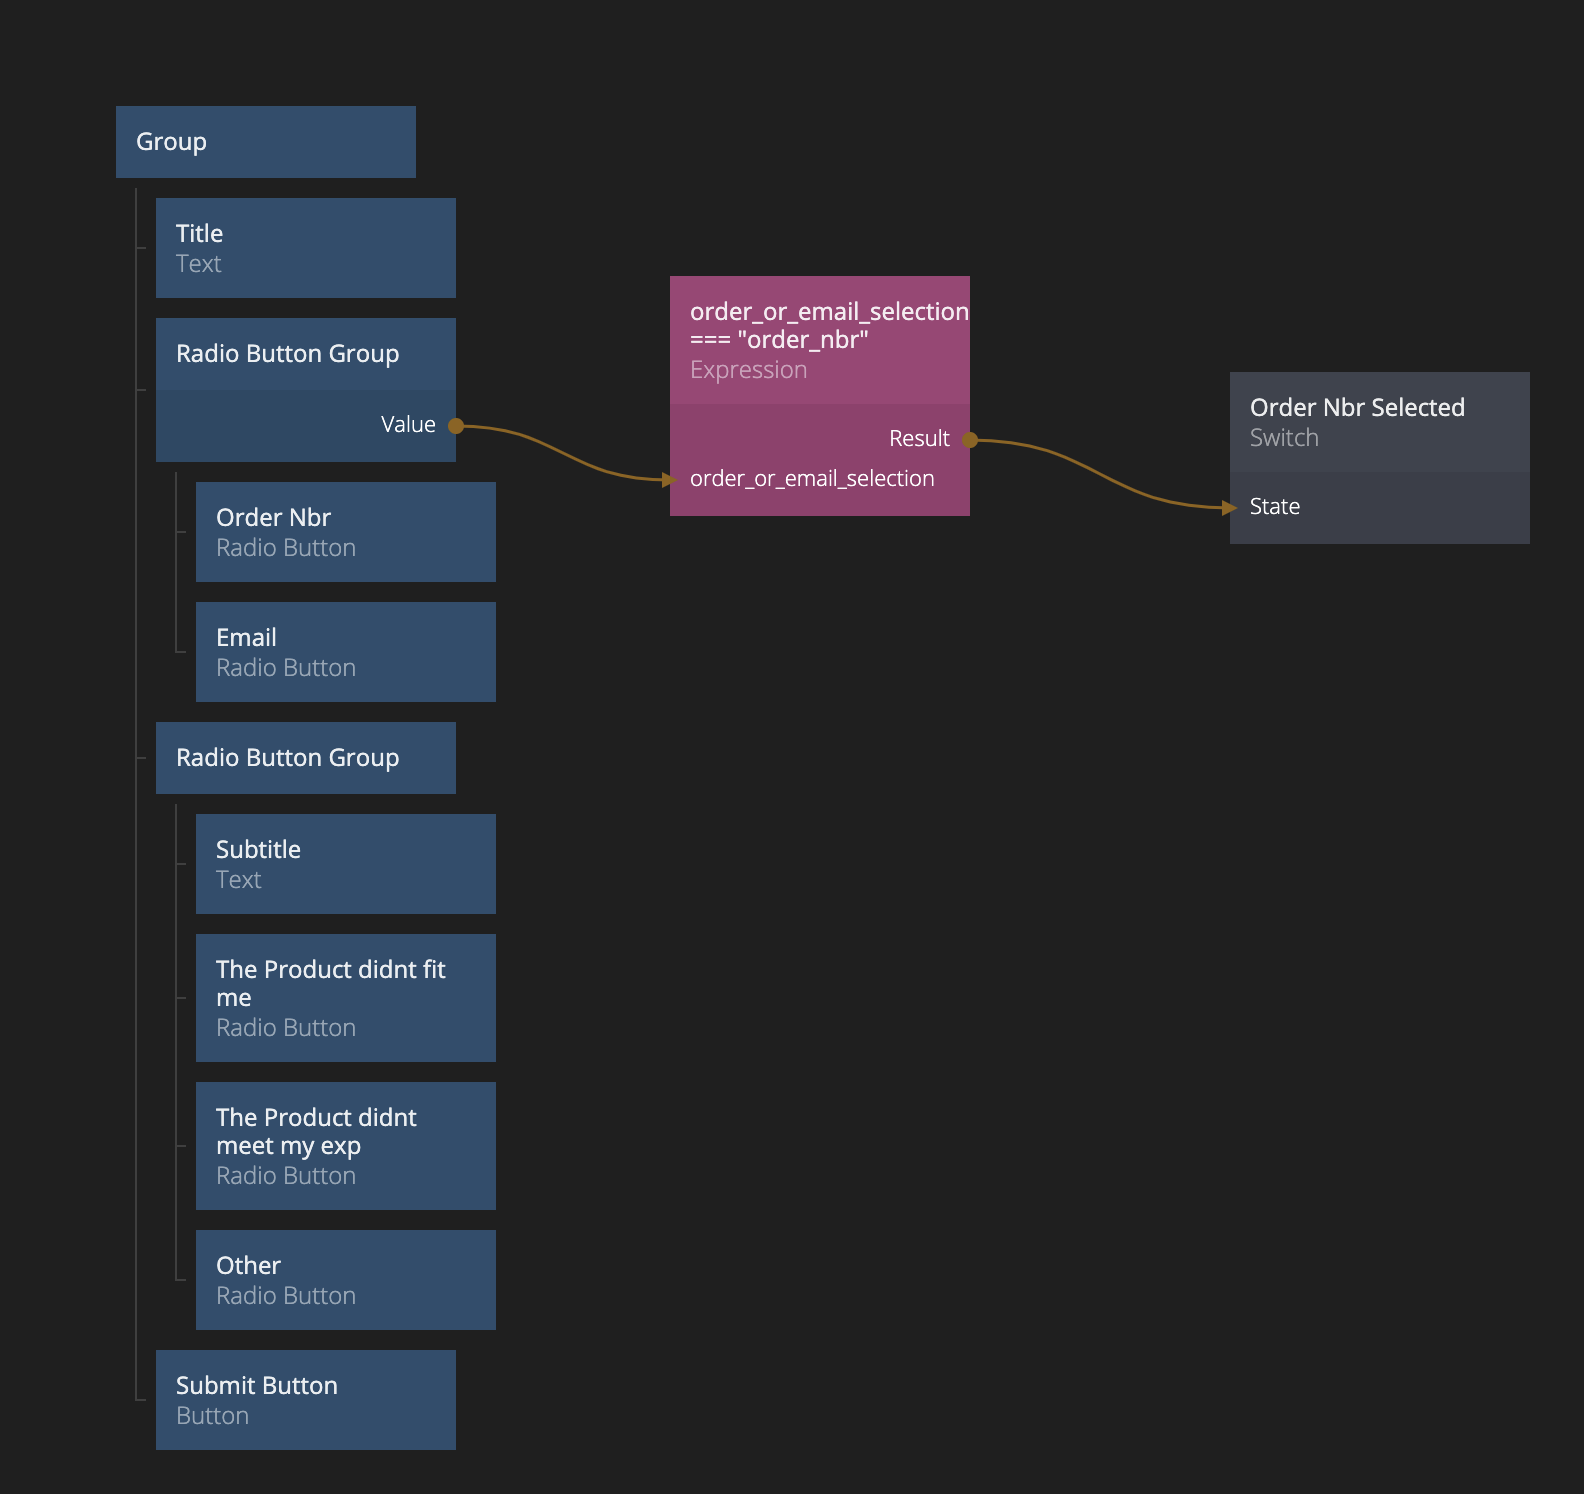
Now the Switch will be either On or Off based on what the user picks in the first Radio Button Group. Now we want to use this to control the conditional UI. Add two Text Input nodes below the first Radio Button Group. One is for the order number, make that one type Number, and one for email. That one shold be of type Email. Give them a good label. Also make the width 300 px. For the order number, we also add an addtional tip in the place holder text, that it should be 8 digits.

We want these text field to be mutual exclusive, that is, only one to be visible at a time. For the order number one it's super straight forward. Just connect the Current State of the Switch to Mounted input of the Text Input. We need to invert the state (true=>false and false=>true) for the other Text Input. So add in an Inverter node and connect it in-between the Switch and the Text Input for the email.
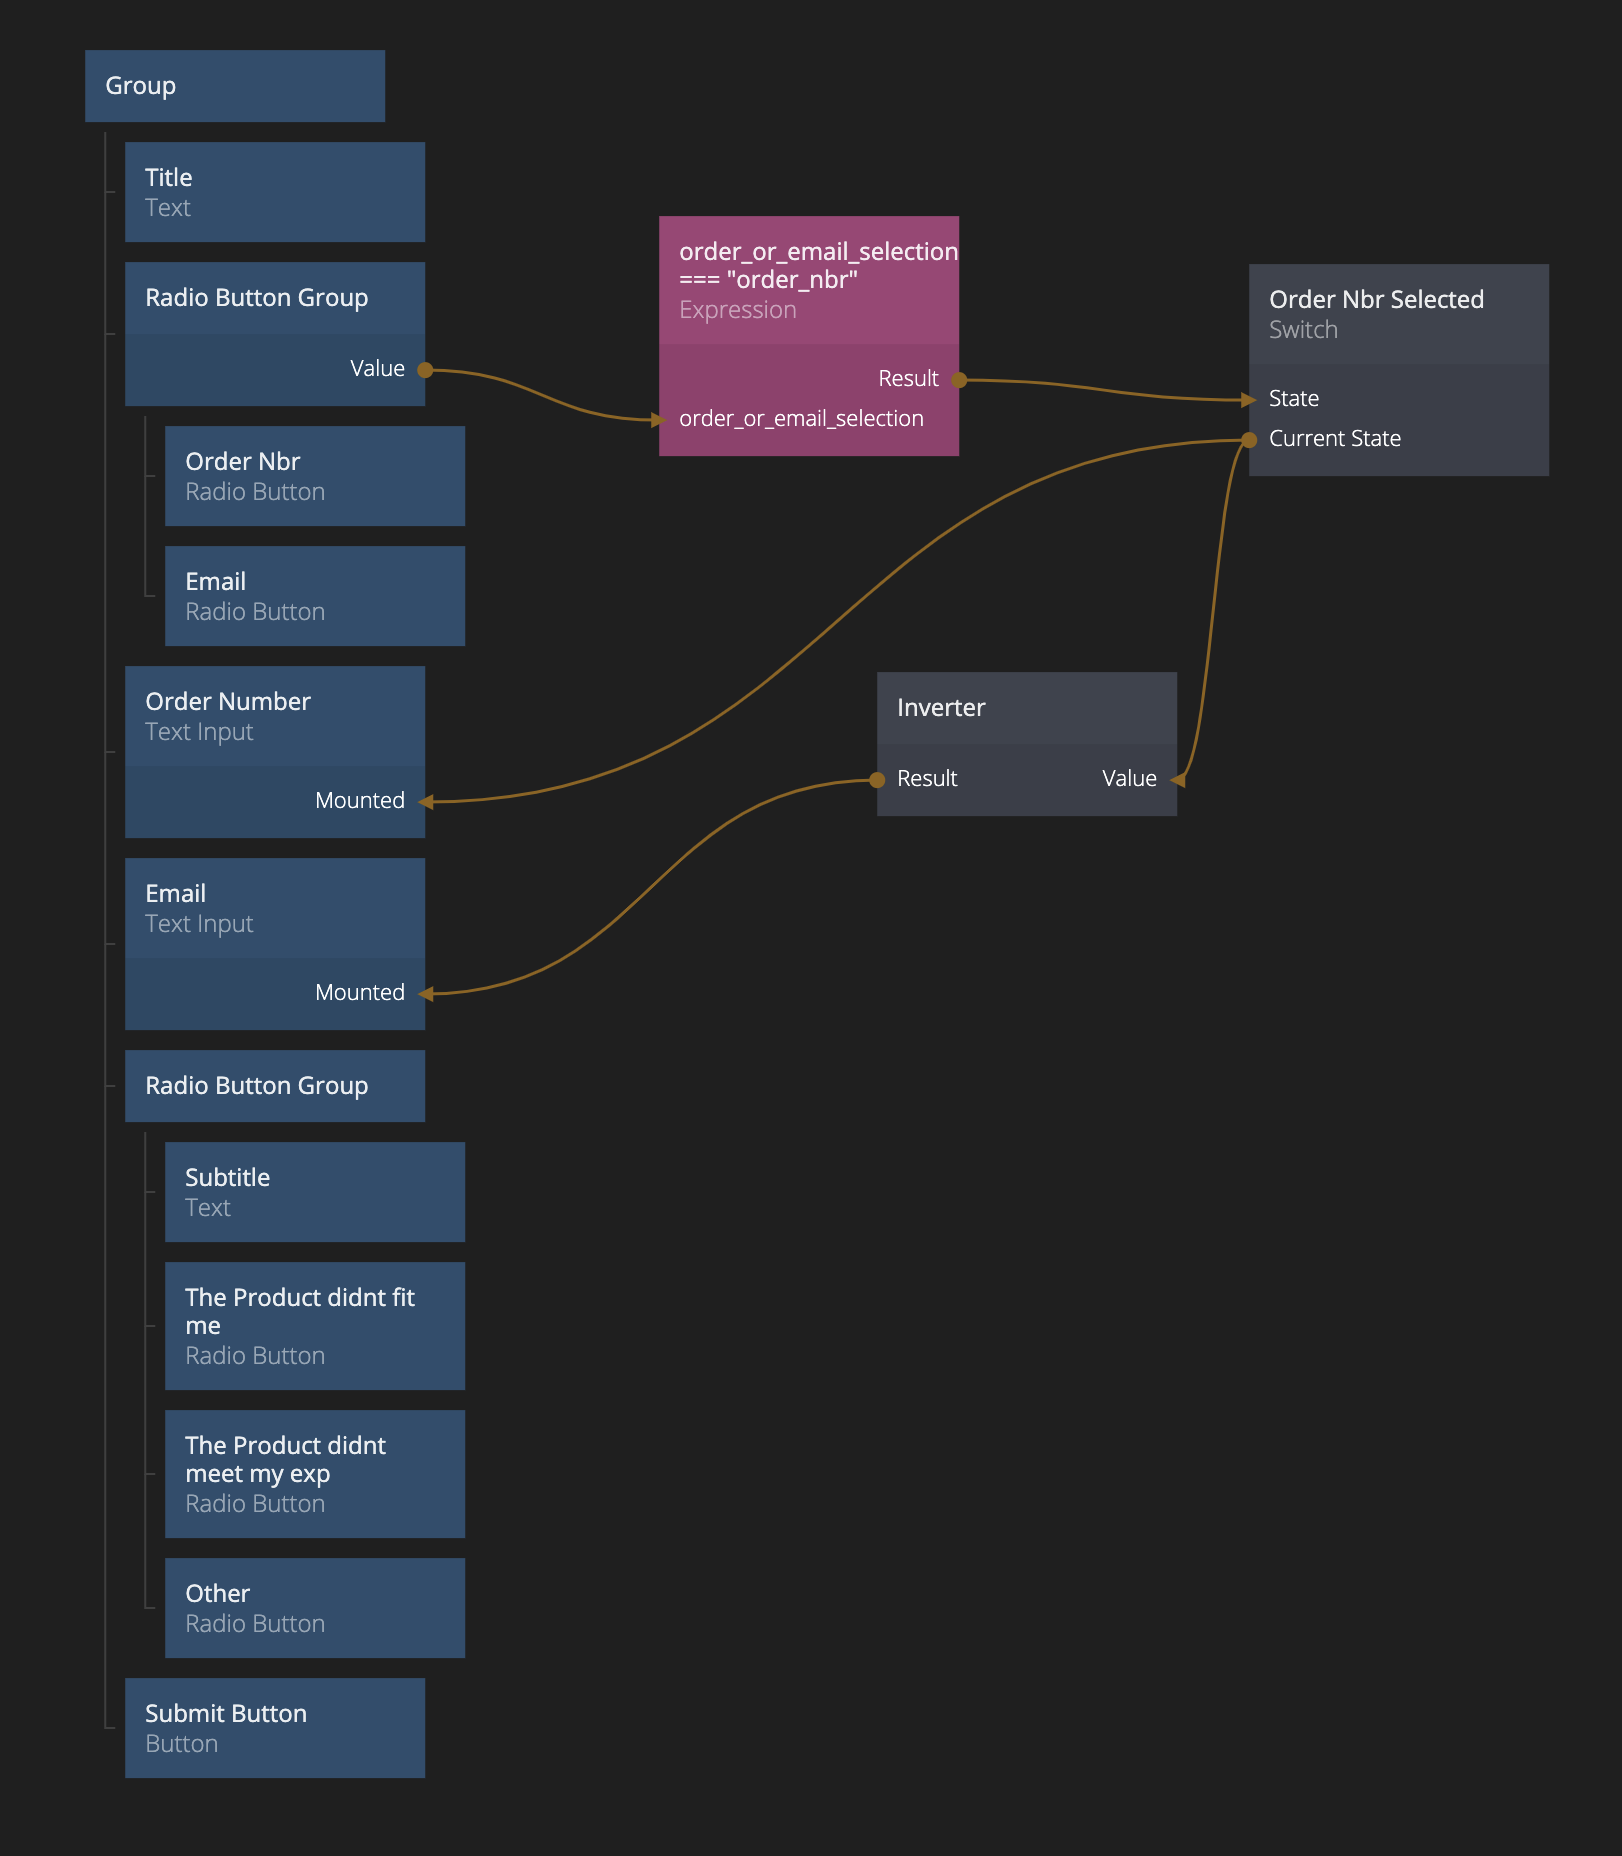
As you can see, the two different Text Inputs are now visible depending on the selection in the first Radio Button Group.
Conditional UI using a States node
Now let's build the logic for the second part, the "Reason for returning the product" Radio Button Group. Here we actually have four different states we need to keep track of so a Switch won't do. The four states are:
- No selection
The product did not fitThe product did not meet my expectationsOther
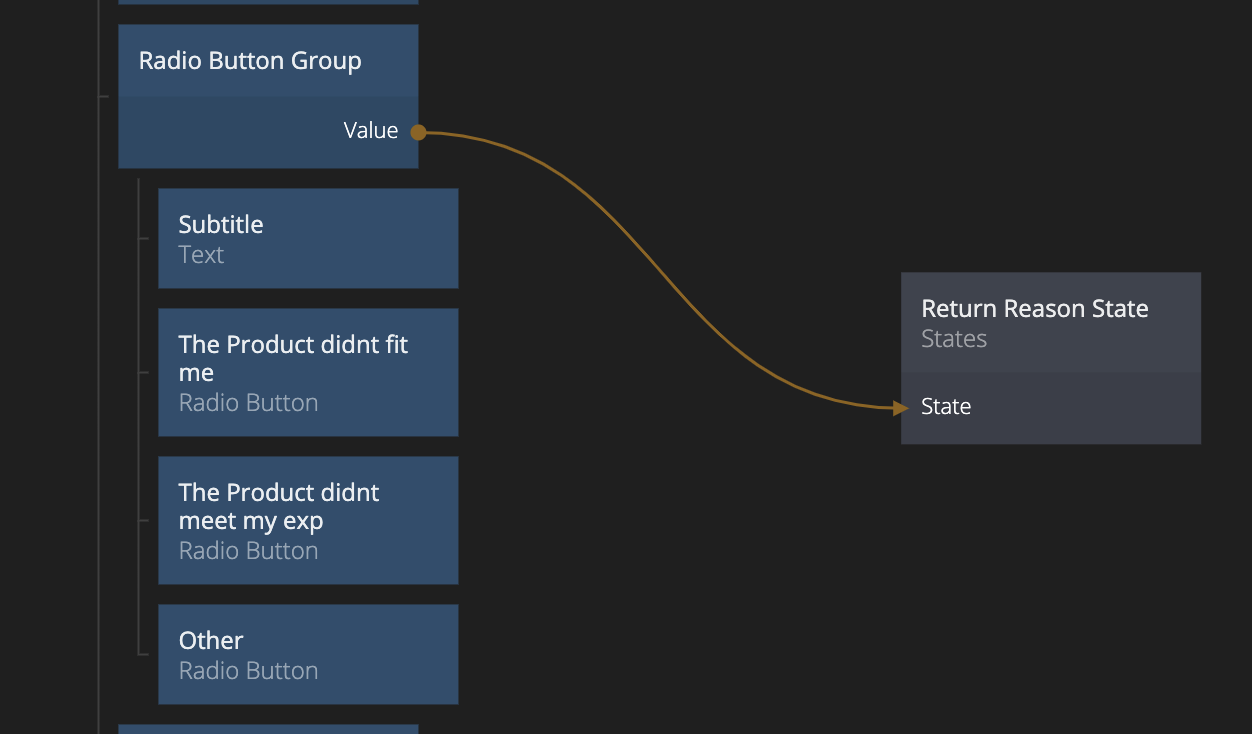
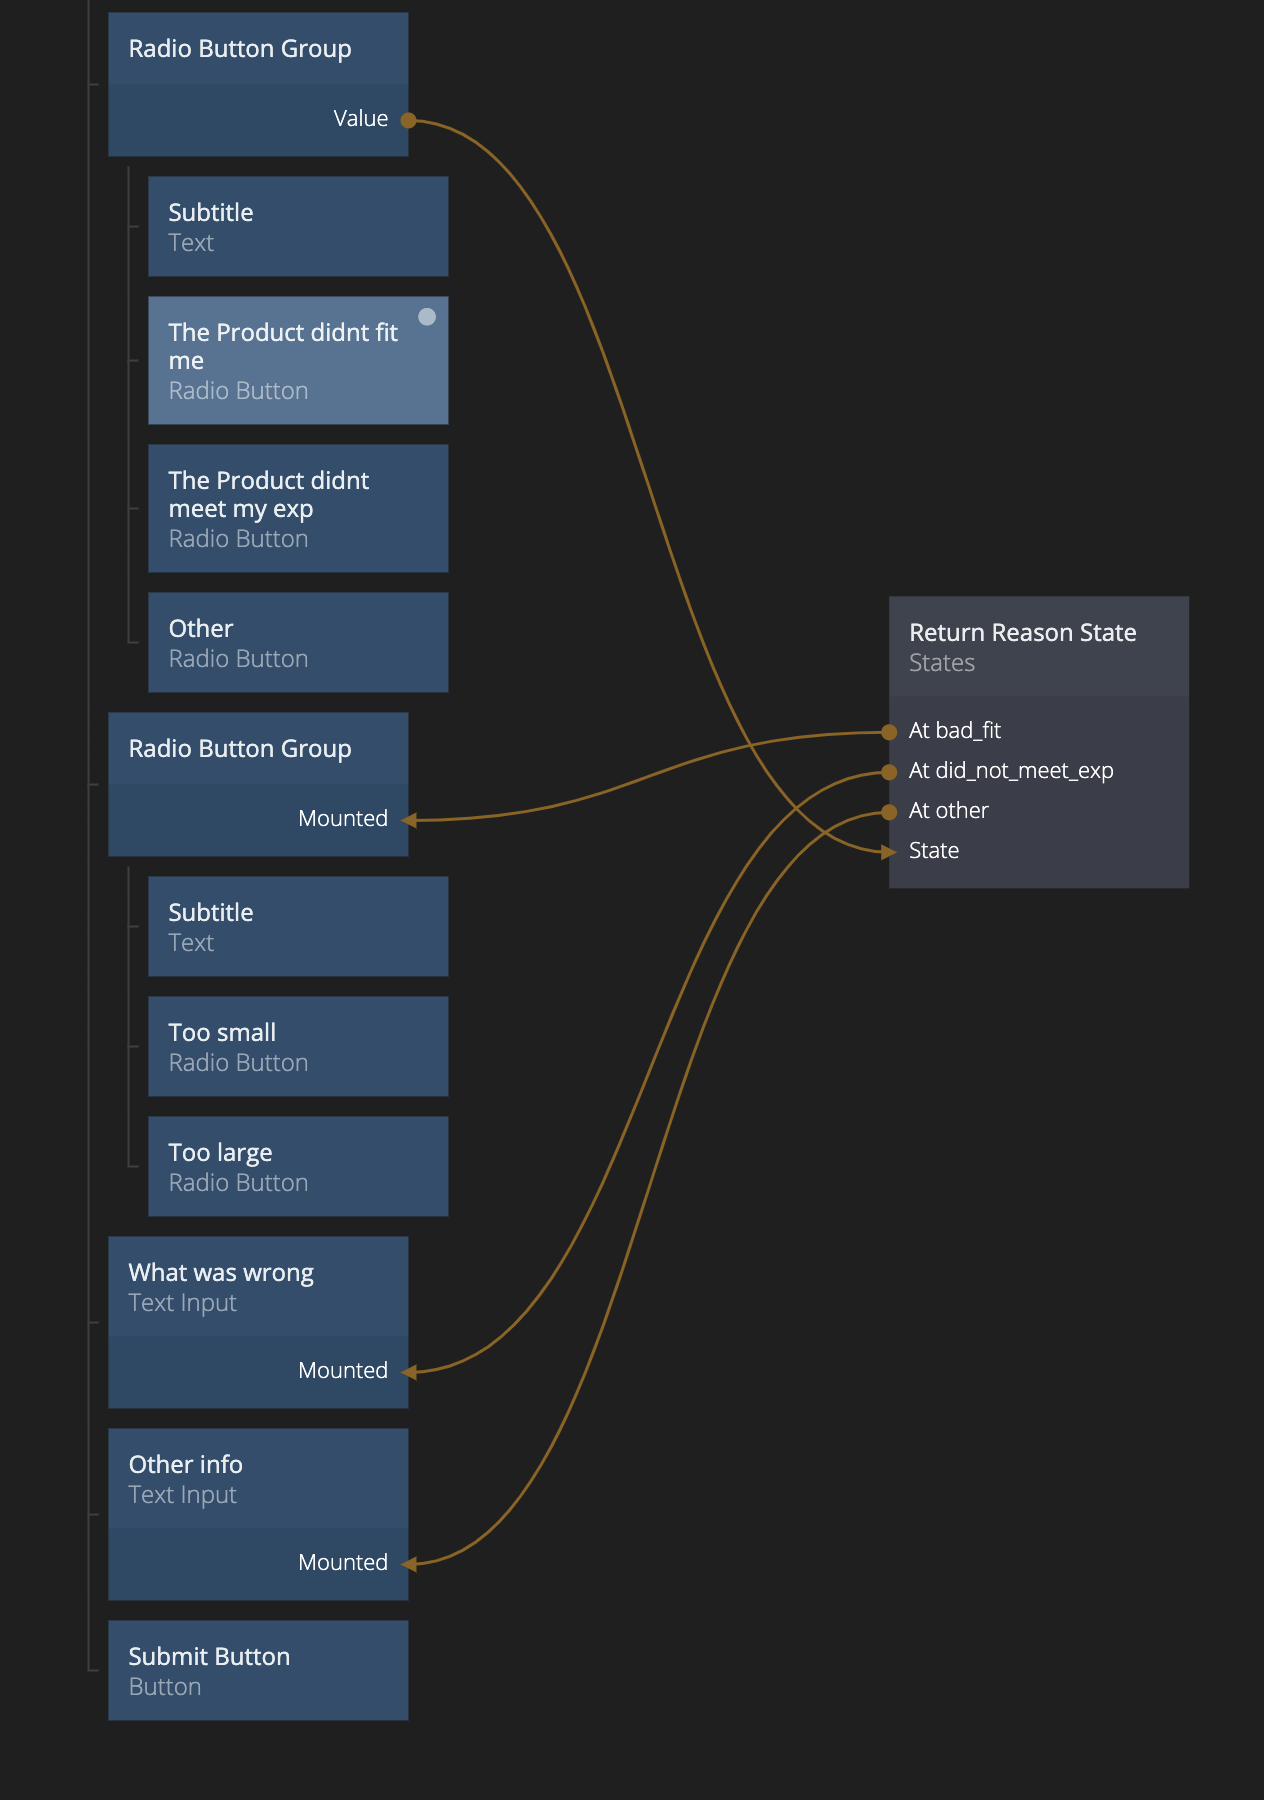
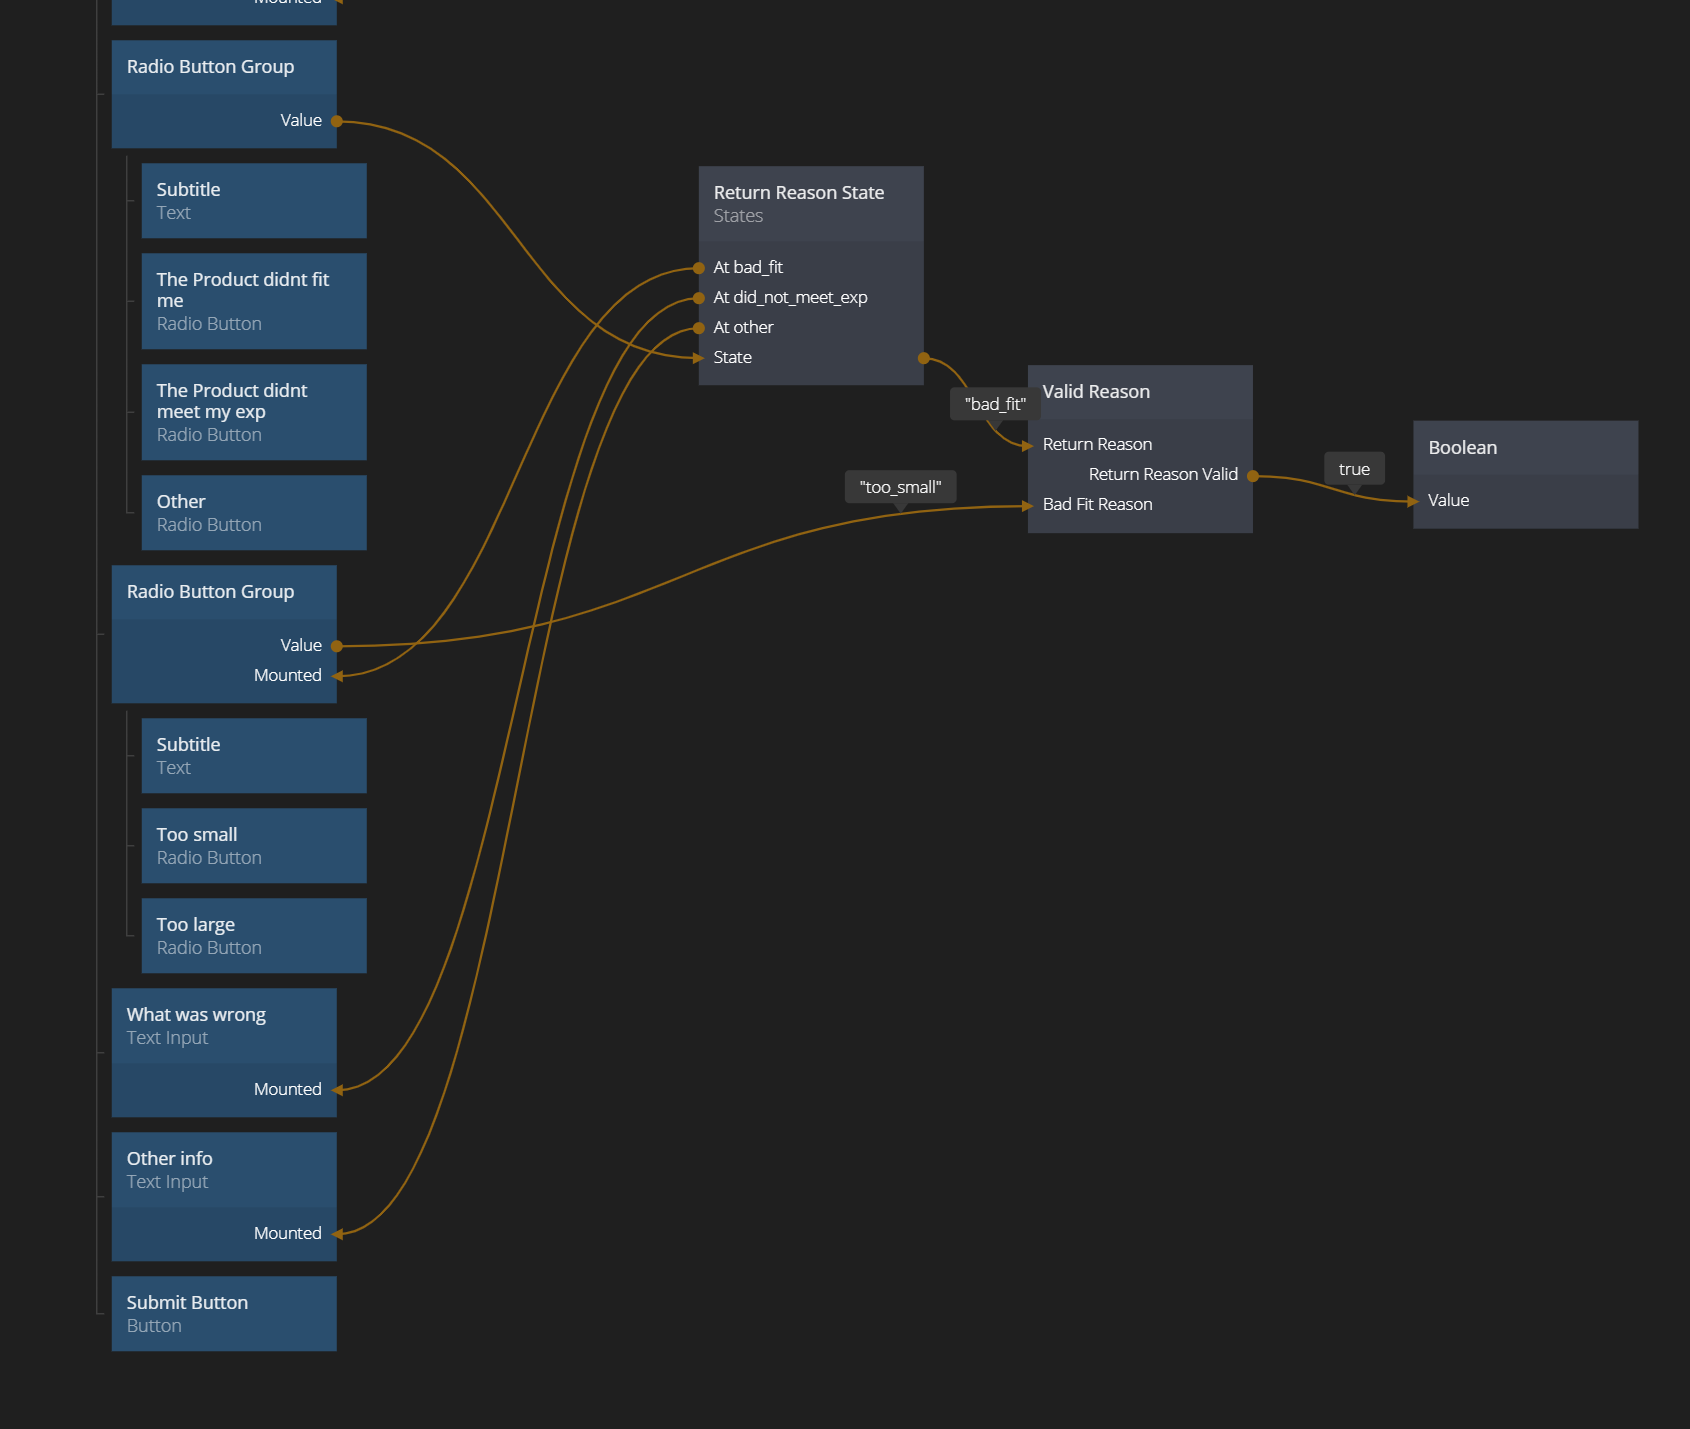
We can easily encode these states in a States node. Add one to your App. Then create the four states. We will use the names so they match the value in our property reason in our data Object above, hence the states will be called no_selection, bad_fit, did_not_meet_exp and other.
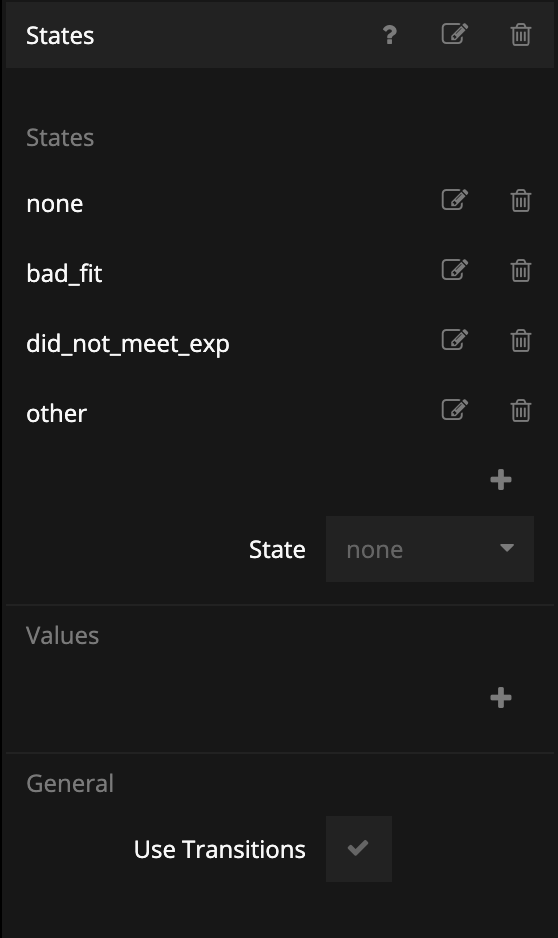
We will not add any values to this States node. If you used the States node before, for example to animate different values, you might find this strange - why don't we need any values that changes when we change states? Well, we are only interested in the state properties of the States node, more specifically At bad_fit, At did_not_meet_exp and At other. Again we will use the trick where we add all UI states in the tree and use the Mounted signal to control which one is visible.
Hence we add our different UI components to the tree. Another Radio Button Group to select whether the product was too small or too large, and two Text Input nodes that we set as type Text Areas. This is how the bottom of the tree looks, with some additional titles and small tweaks on margins. If you want you can copy the nodes to get the exact layuot.
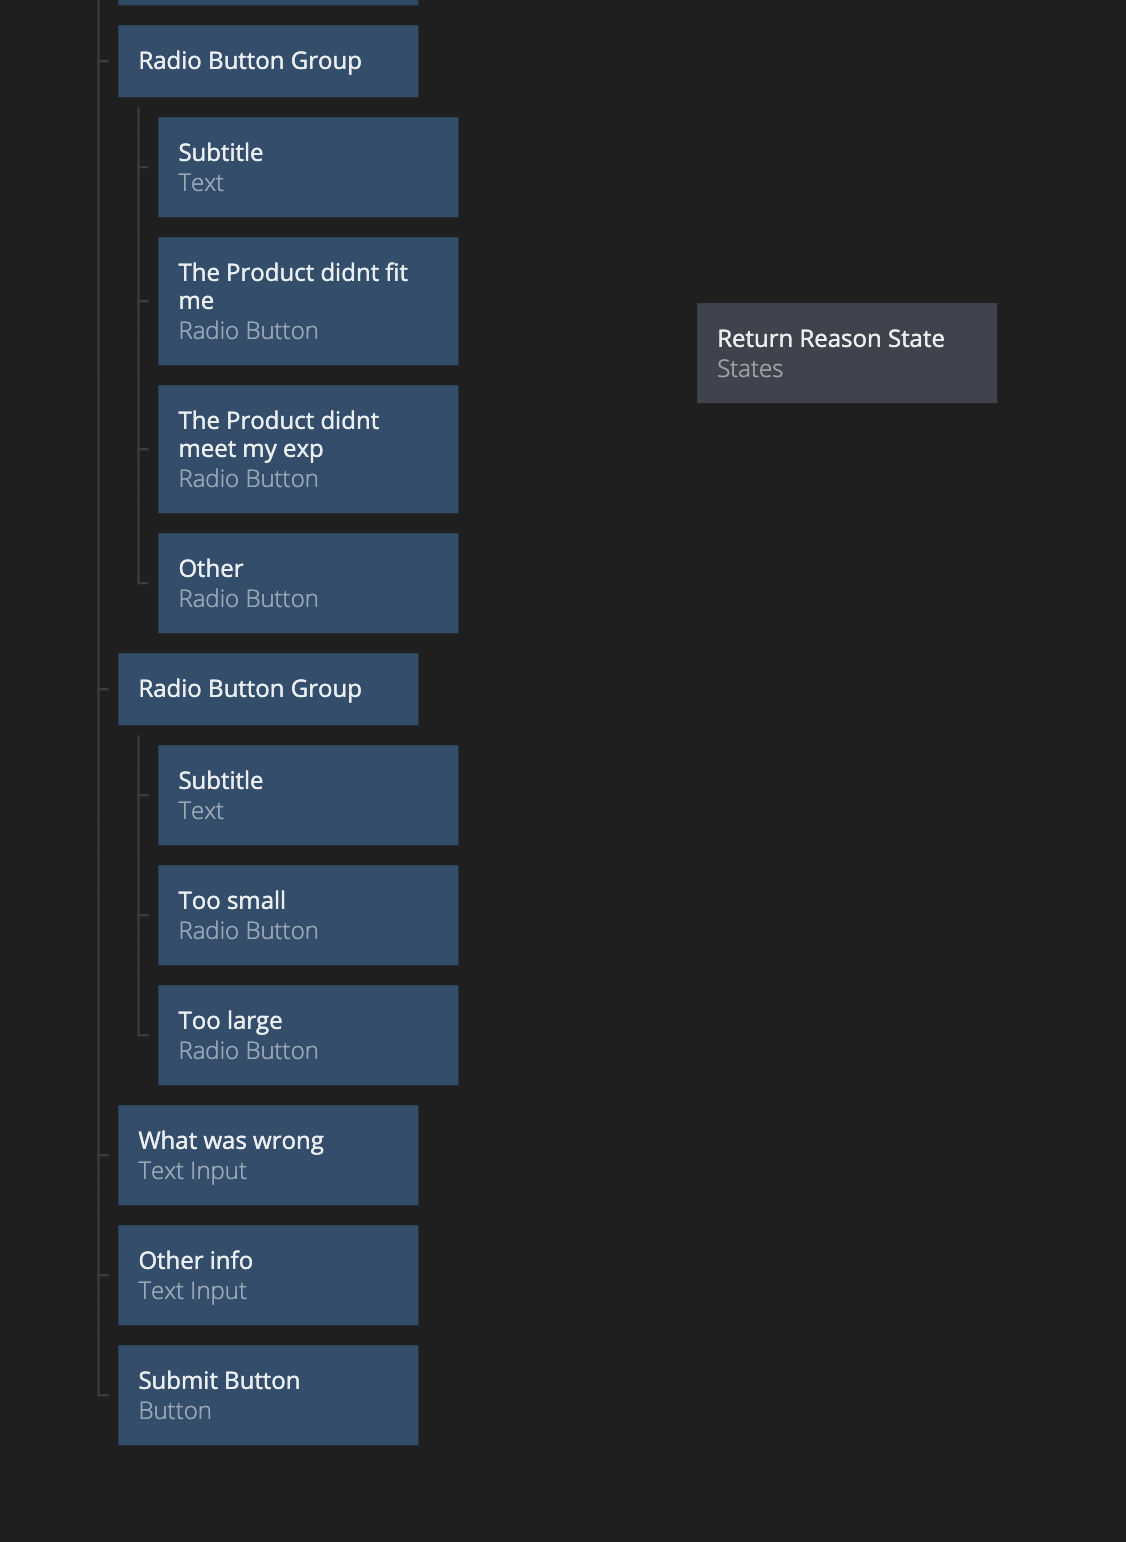
We now need to let the Radio Button Group for the reason to do the return control the state of the States node. Since we named the states the same as the Value coming out of the Radio Button Group we can connect the Value directly to the State.
We then use the At <state> outputs of the States node to control when the respective controls are mounted. Note that only on of the At <state> outputs can be true at any given moment, so we don't need to use an Inverter here.
If you click around now, you should see the different controls being mounted depending on the settings of the radio buttons.
Validating the form contents using Conditions and boolean logic nodes
Ok, next step is to do some simple validation that the input in the form is coherent, for example that if you said that the product didn't fit you, that you also filled out whether the goods was too small or too large. If you haven't filled out the form properly the "Submit" button should be greyed out. Of course the rules will be different for different scenarios. If you use your email, you won't be forced to fill out an 8 digit order number, etc.
Let's first summarize the validation rules:
For the order reference:
- If you fill out a order number, it has to be exactly 8 digits.
- If you fill out an email it cannot be empty.
For the reason of return:
- You have to pick a reason for the return.
- If you picked "Product didn't fit" as a reason, you also have to state whether the product was too small or too large.
We need to encode this logic in nodes and then let that control whether the Button is Enabled or not.
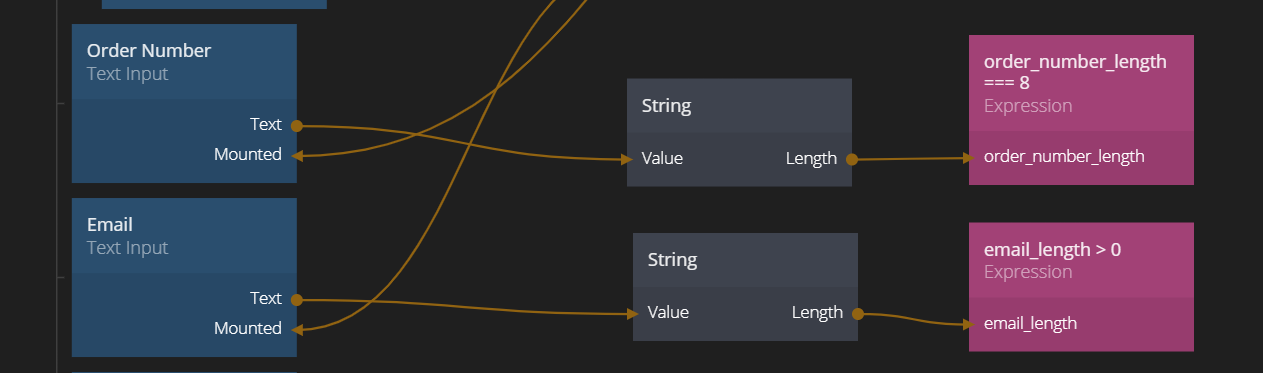
Let's start with the two first ones regarding the order reference. We already know if order number was selected in our previously added Switch. We also need to check whether the order number is 8 digits. We do this by passing the content to a String node. We can then extract the length of the String and see if it's exactly 8.

We also check the length of the email string in the same way. Of course, we could also check the email address if valid, but we will leave this for now. Actually, if you do many of these string validations it's probably a good idea to use a specialized module for it like the Form Validation Module. In this example we will not focus on the string validation but rather the logic to control the state of the button.
Ok, now we are ready to build our logic namely the order reference is valid IF (the email is selected AND the email has more than 0 characters) OR (the order number is selected AND the order number is exactly 8 digits). Note the parenthesises to clarify in what order the different expressions should be evaluated (it makes a difference!). We encode this using And and Or nodes.
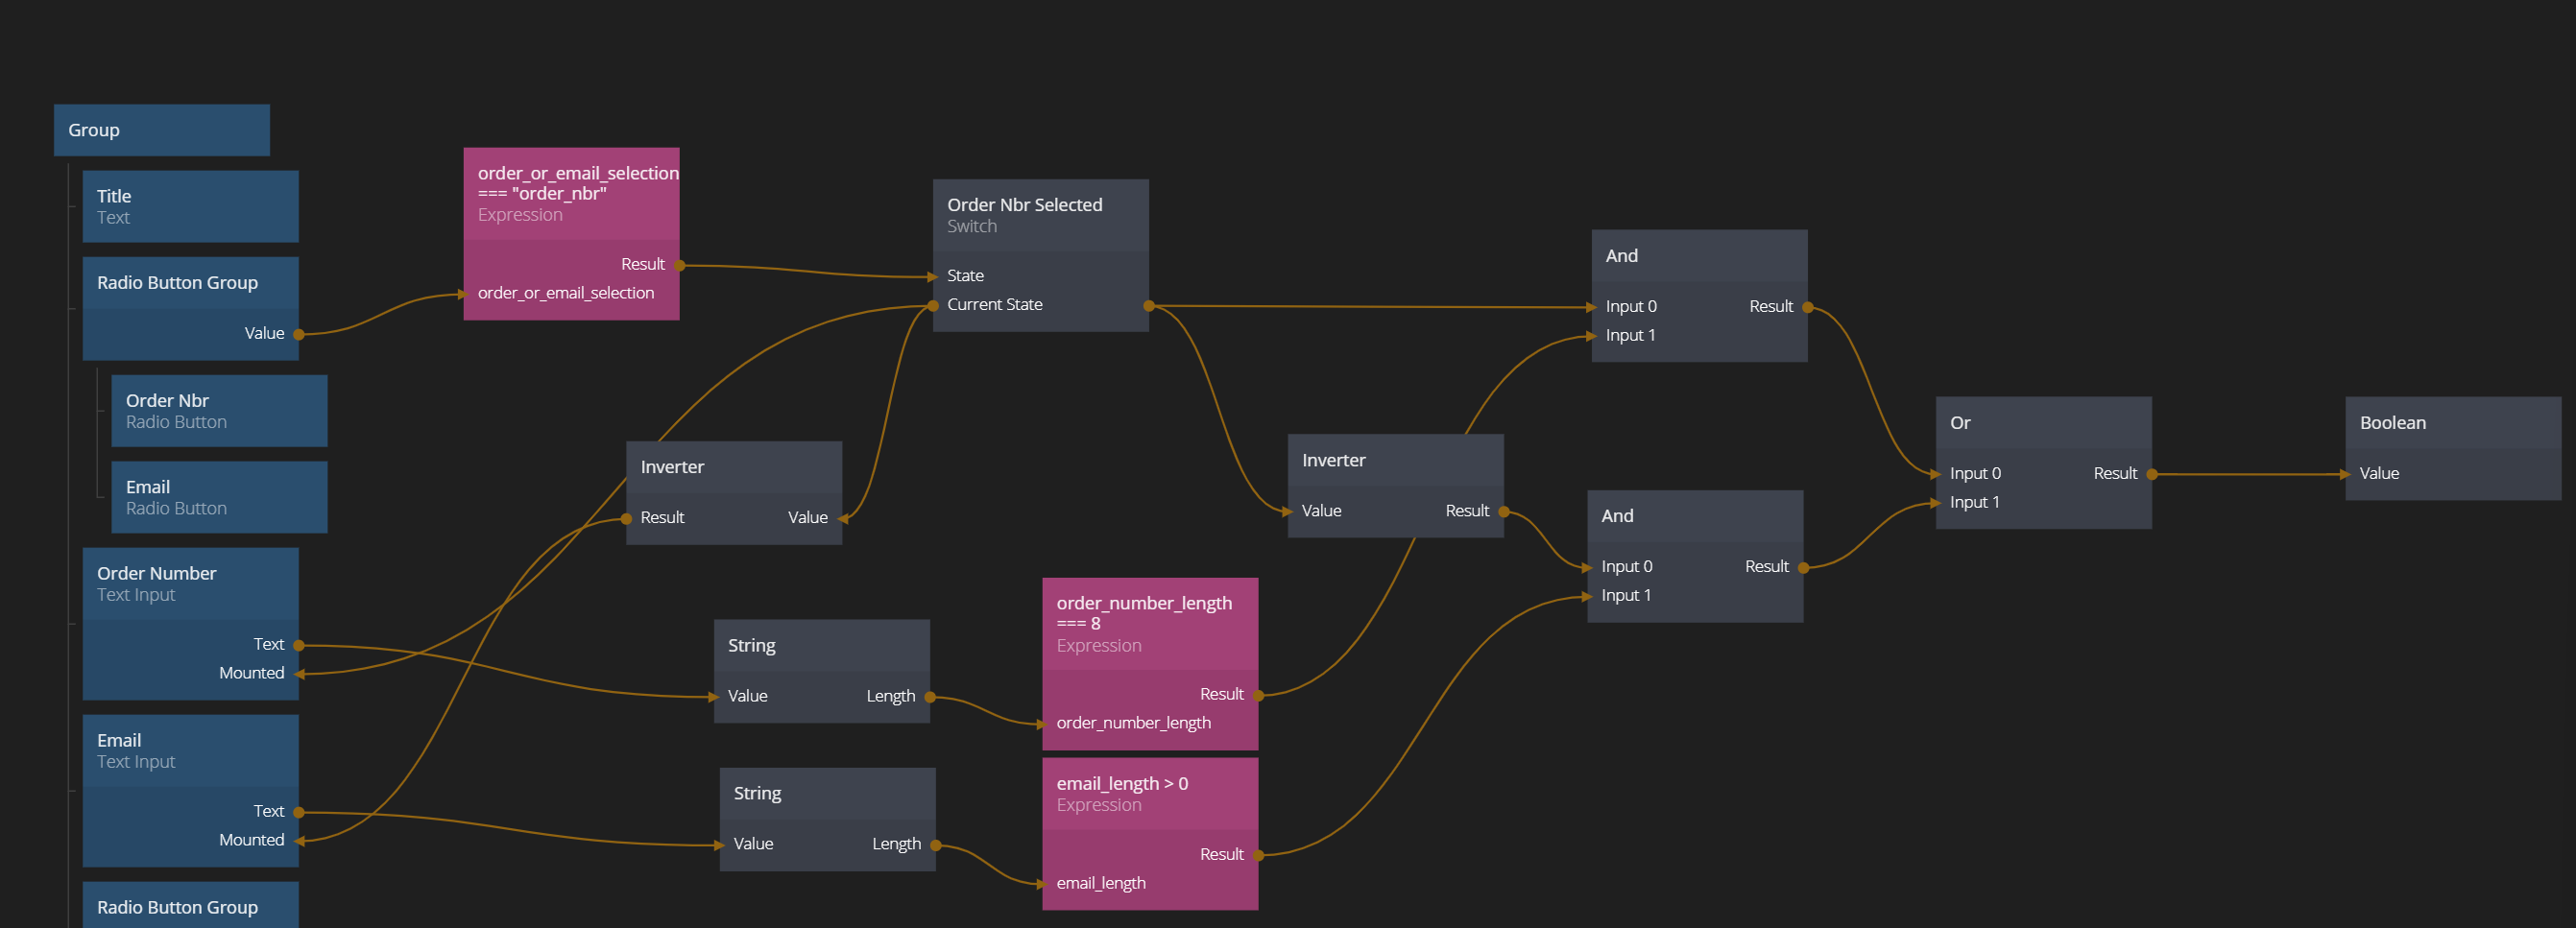
Note how the Inverted is used to encode "order number is selected", actually saying "email is not selected". Try it out by entering order numbers and emails, switching back and forth. It works! As you can see, for these boolean constructs, the node tree can be pretty big and messy. So let's clean it up by putting it all in a component.
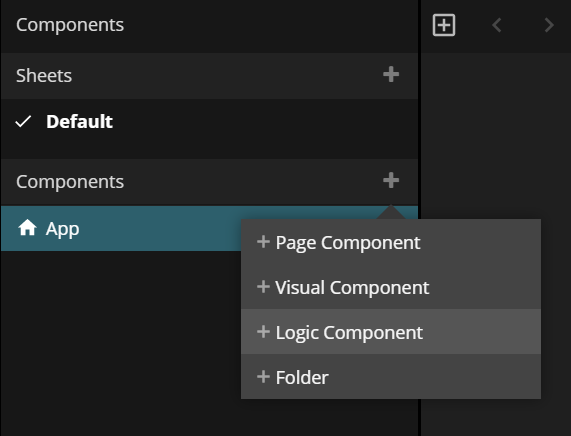
Create a new logic component.
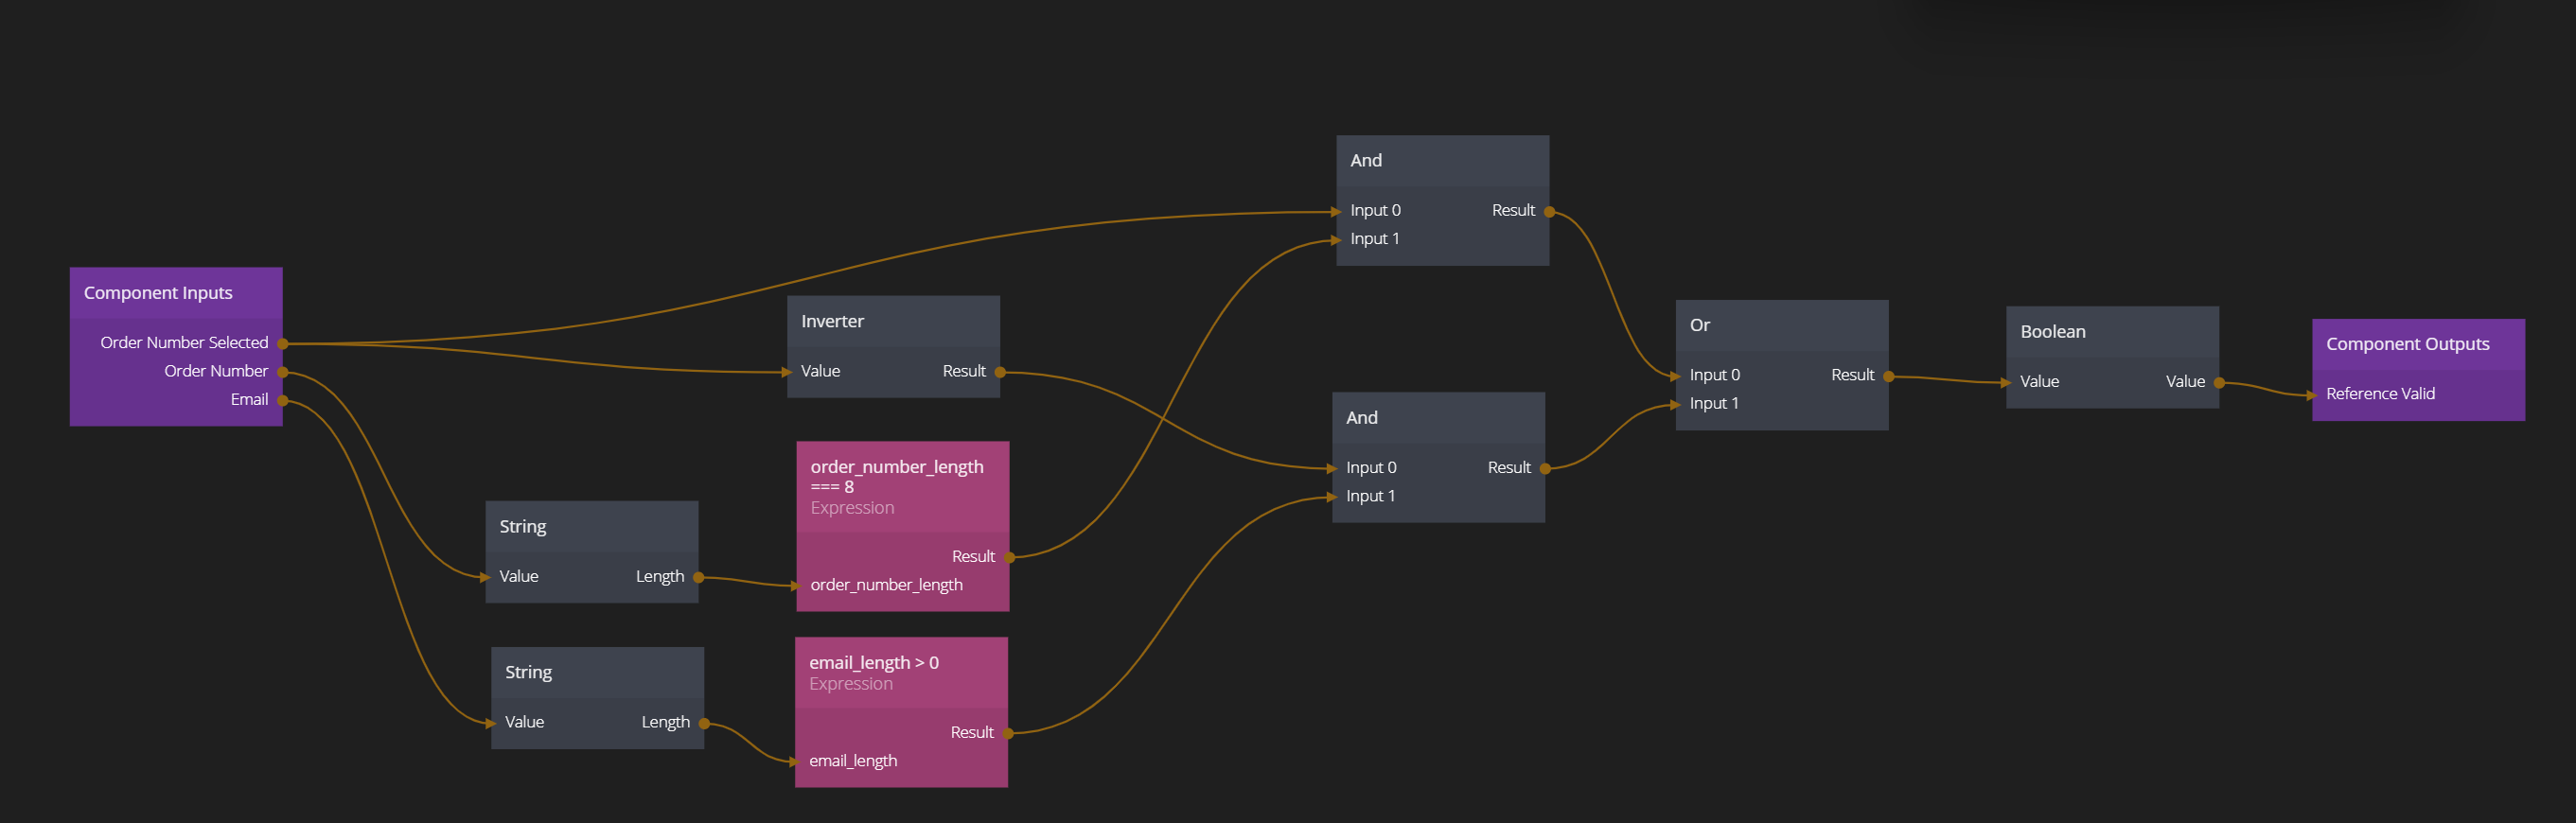
Call it "Valid Reference". As you can see you will already have a Component Input and Component Output node defined here. We need to define the inputs. To do the validation we need the following inputs: Order Number Selected. Order Number and Email. Remove the existing Do input and add those in.

The output of the component should be one boolean value, let's call it Reference Valid. So remove the two existing ports from the Component Output and add that in. Now we cut the existing logic from our root component and add into this component.
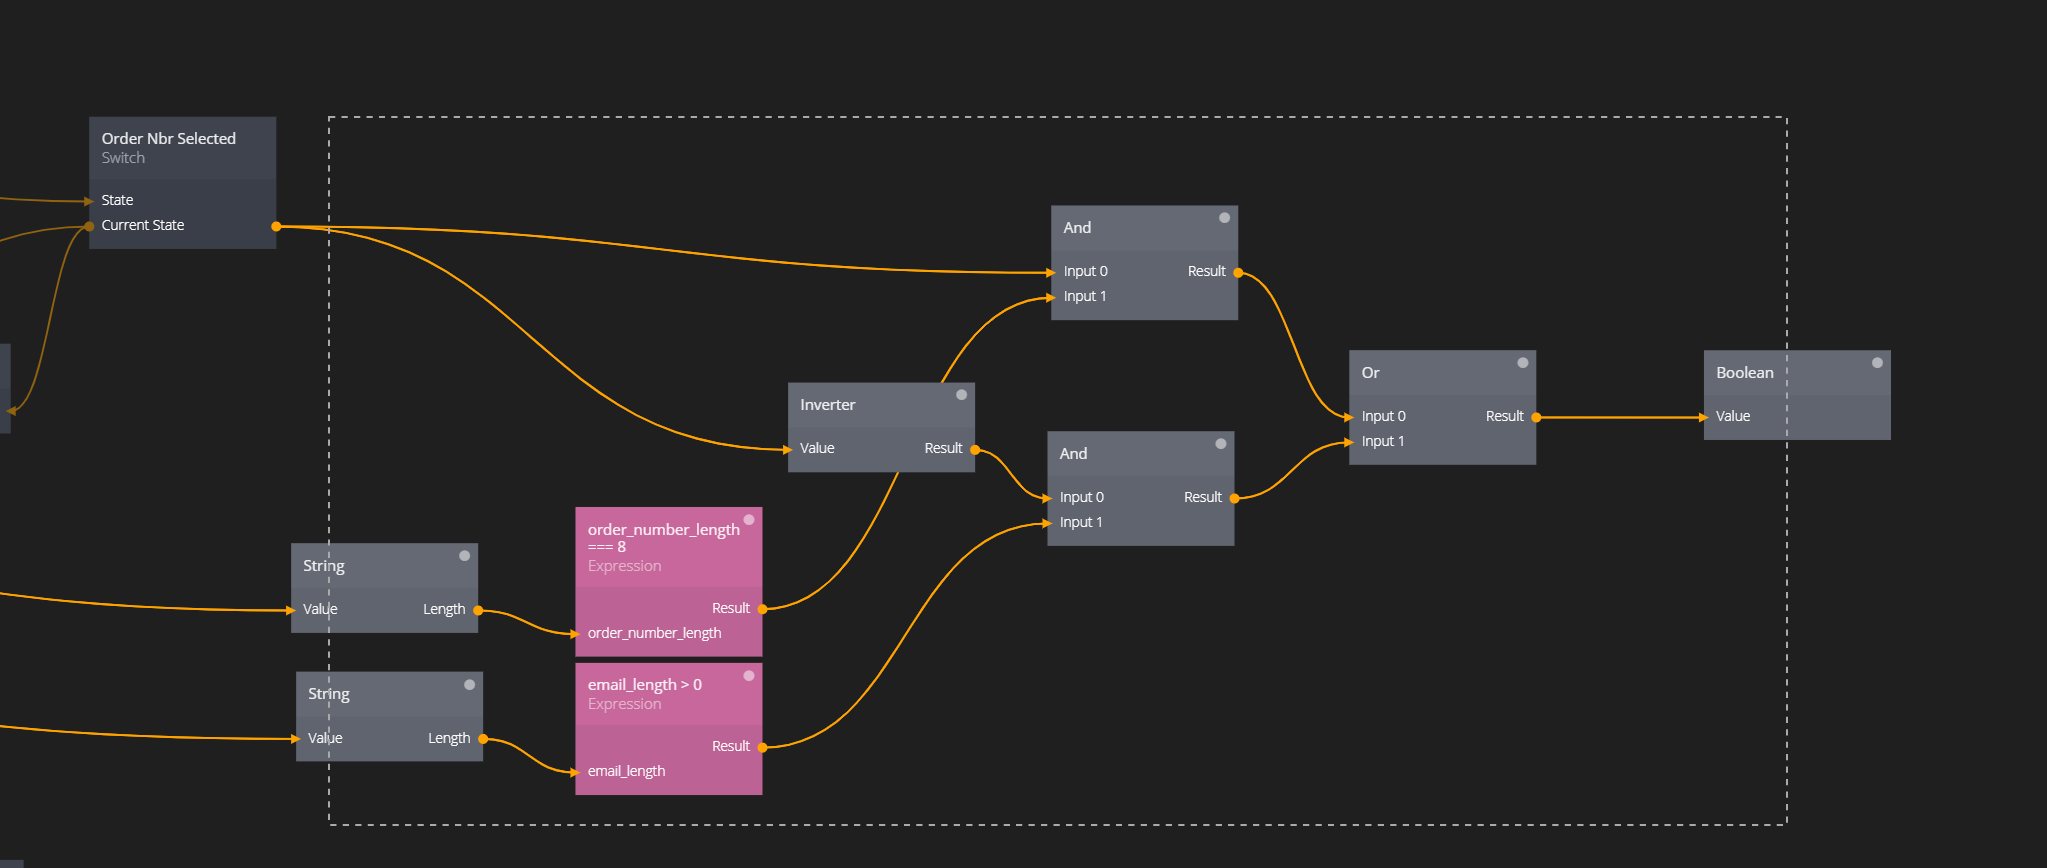
The component should look like below when the inputs and outputs have been connected properly. You can also copy and paste the nodes below into the components.
With the old logic replaced with our new component it will look like this:
Now we have to do something similar for the reason part of the form. This time we will start with a separate component. So create another logic component, call it Valid Reason. We know that the inputs we need to look at are Return Reason and Bad Fit Reason. The logic would be The reason is valid if (the reason is did_not_meet_exp OR other) OR (if the reason is bad_fit AND the bad fit reason is EITHER too_small OR too_large). Note that there are other ways to express this logic, this is just one way. Lets build this logic in out new component.
We add the Component Inputs and a Component Output port called Return Reason Valid. The built out logic looks like below.
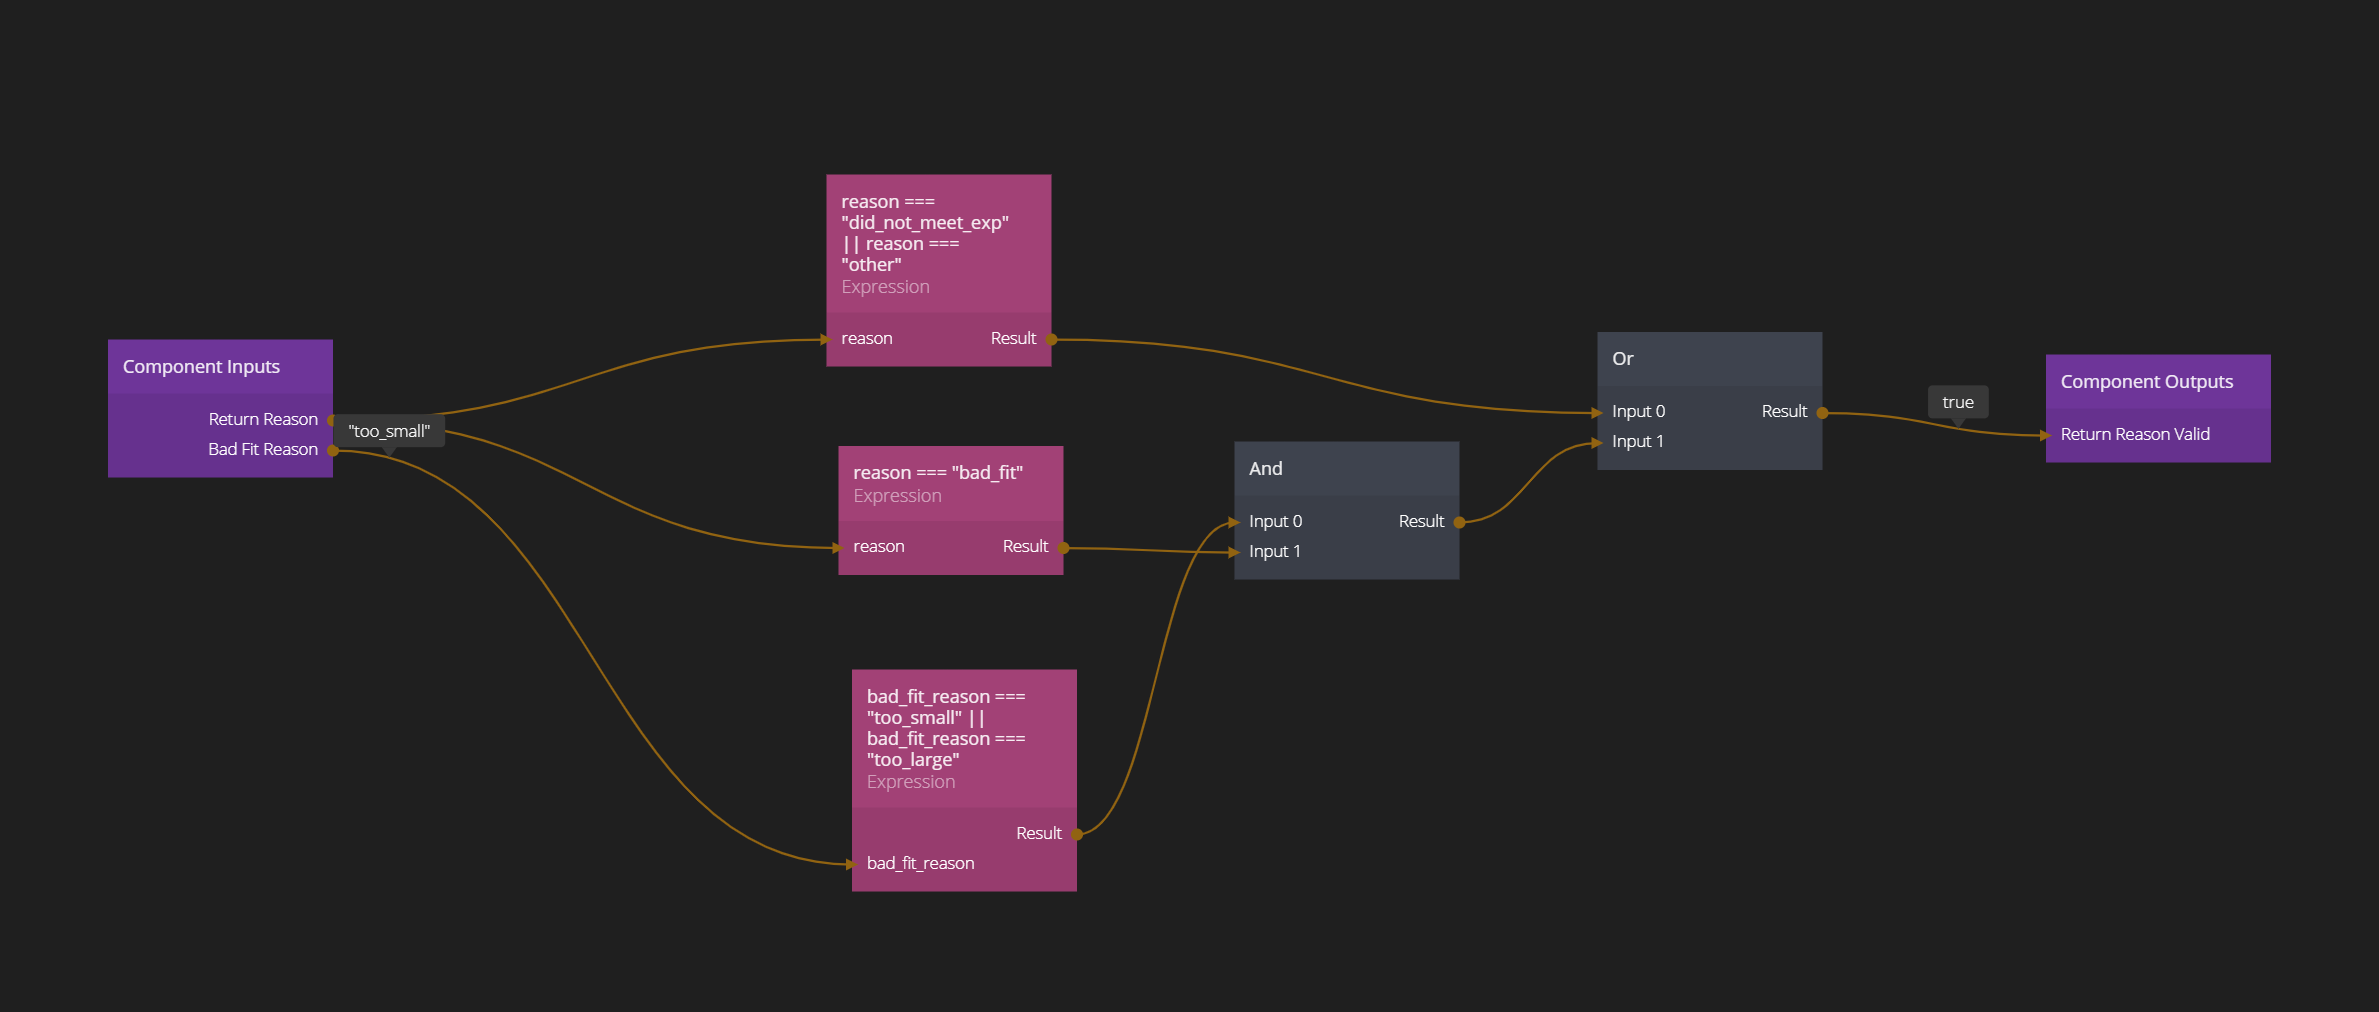
As you can see, you can use the Expression node to build more complex tests. In this case we use the || (or) operator. In fact, you could have built the whole test in one large Expression
(return_reason === "did_not_meet_exp" || return_reason === "other") || (return_reason === "bad_fit" && (bad_fit_reason === "too_large" || bad_fit_reason === "too_small"))
however, the nice thing with splitting it up is that you can see how each sub expression is evaluated which makes it easier to debug if you need to.
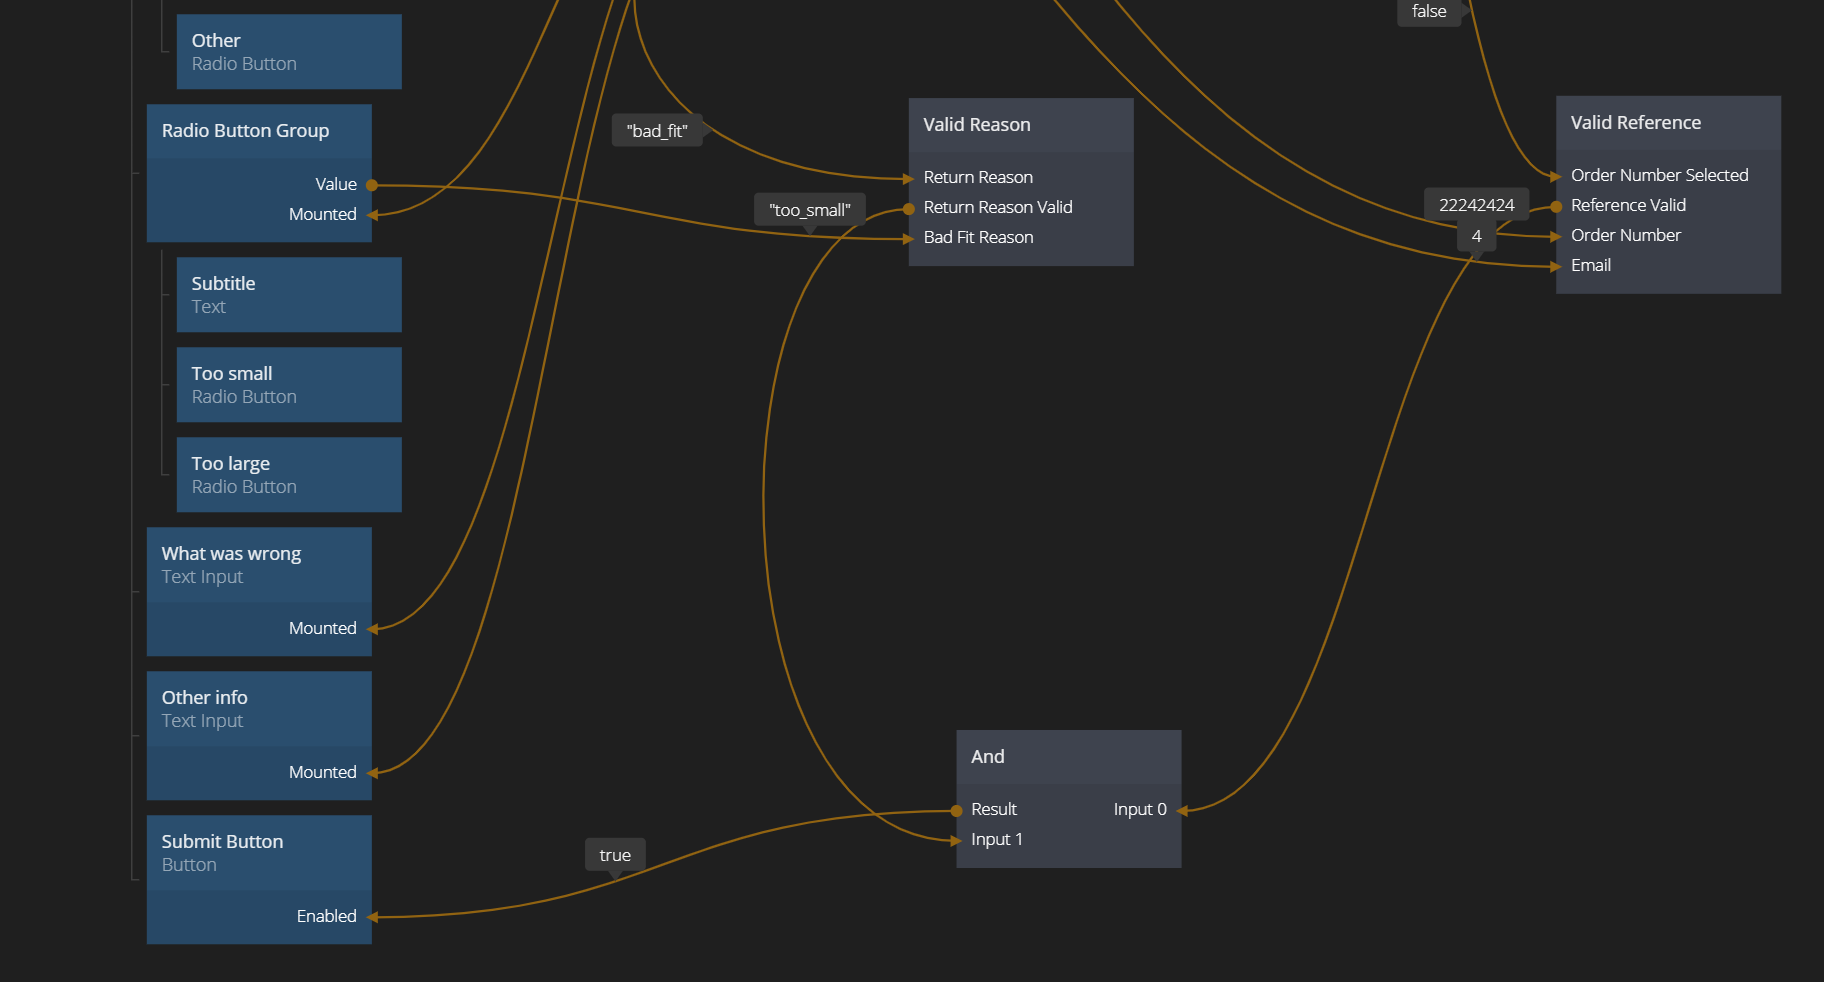
With the logic component added into the main App it now looks like below:
Ok, we are almost there. We have two components that will tell us if the reference is valid and if the reason is valid. Both of these have to be true, so we feed them both into an And node. If the result is true the "Submit" Button should be enabled, otherwise not. Easy peasy!
Storing the content of the form in an Object
Ok, the form is done. We now need to store the values in an Object so it can be used elsewhere in an App. While most of this logic is easy, just connect the values to the Object and use Set Object Properties to store them there is one complication. Let's look at the format again
 {
    "email":<the user email>,
    "order_nbr":<the order_nbr>,
    "reason":<either "bad_fit","did_not_meet_exp" or "other">,
    "bad_fit_reason":<"too_small" or "too_large">,
    "did_not_meet_exp_reason":<any text>,
    "other_reason":<any text>
 }
We need to be careful when storing the email and order_nbr. If we store both we will not know which one to use. So we need to make sure that only one is stored and the other one is empty. The other values are simple, if reason is set to bad_fit we know that bad_fit_reason is valid, otherwise we will just ignore it. Same for did_not_meet_exp and other for their respective properties.
But let's start with the basice. We want to create a new Object when the form is mounted. So we start by connecting the Did Mount signal from the root Group to a Create New Object and its Do signal.

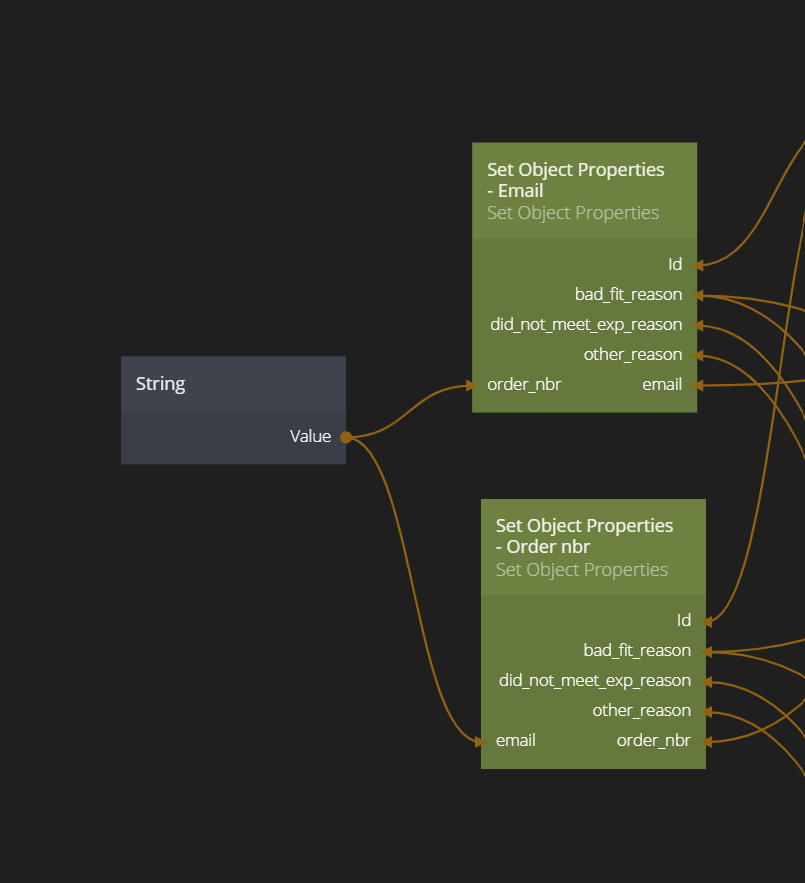
The Id of this new Object is what we will use going forward. Then lets tackle the other problem, either email or order_nbr should be stored, never both. So we create two Set Object Properties nodes. One with the properties email, reason, bad_fit_reason, did_not_meet_exp_reason and other_reason. The other have order_nbr, reason, bad_fit_reason, did_not_meet_exp_reason and other_reason. We connect the Id from our Create New Object node to the Ids of the Set Object Properties.
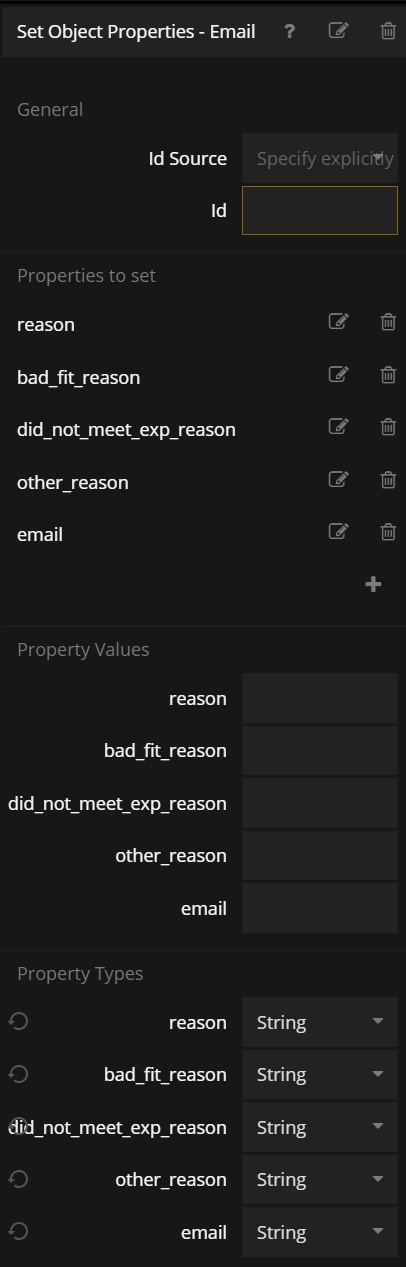
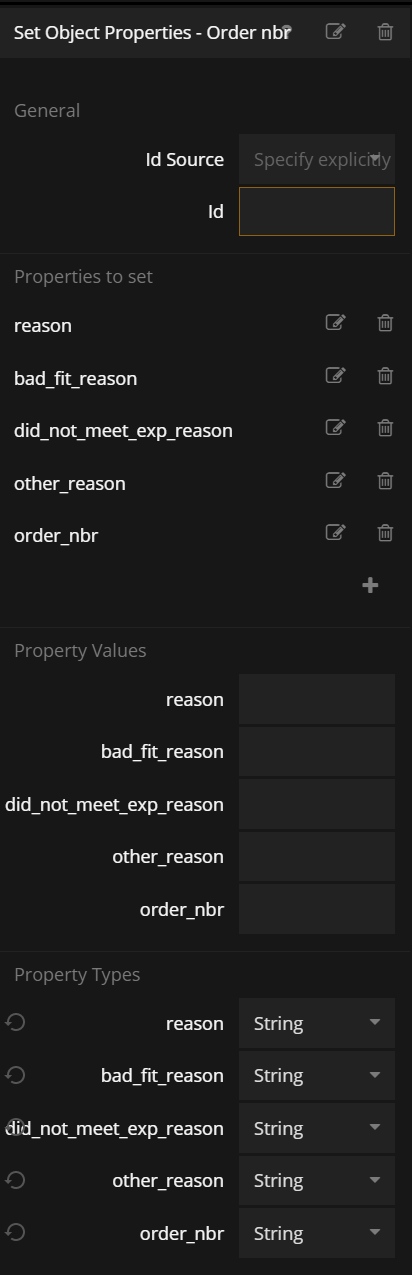
Let's connect all the values from the form components to the Set Object Properties.
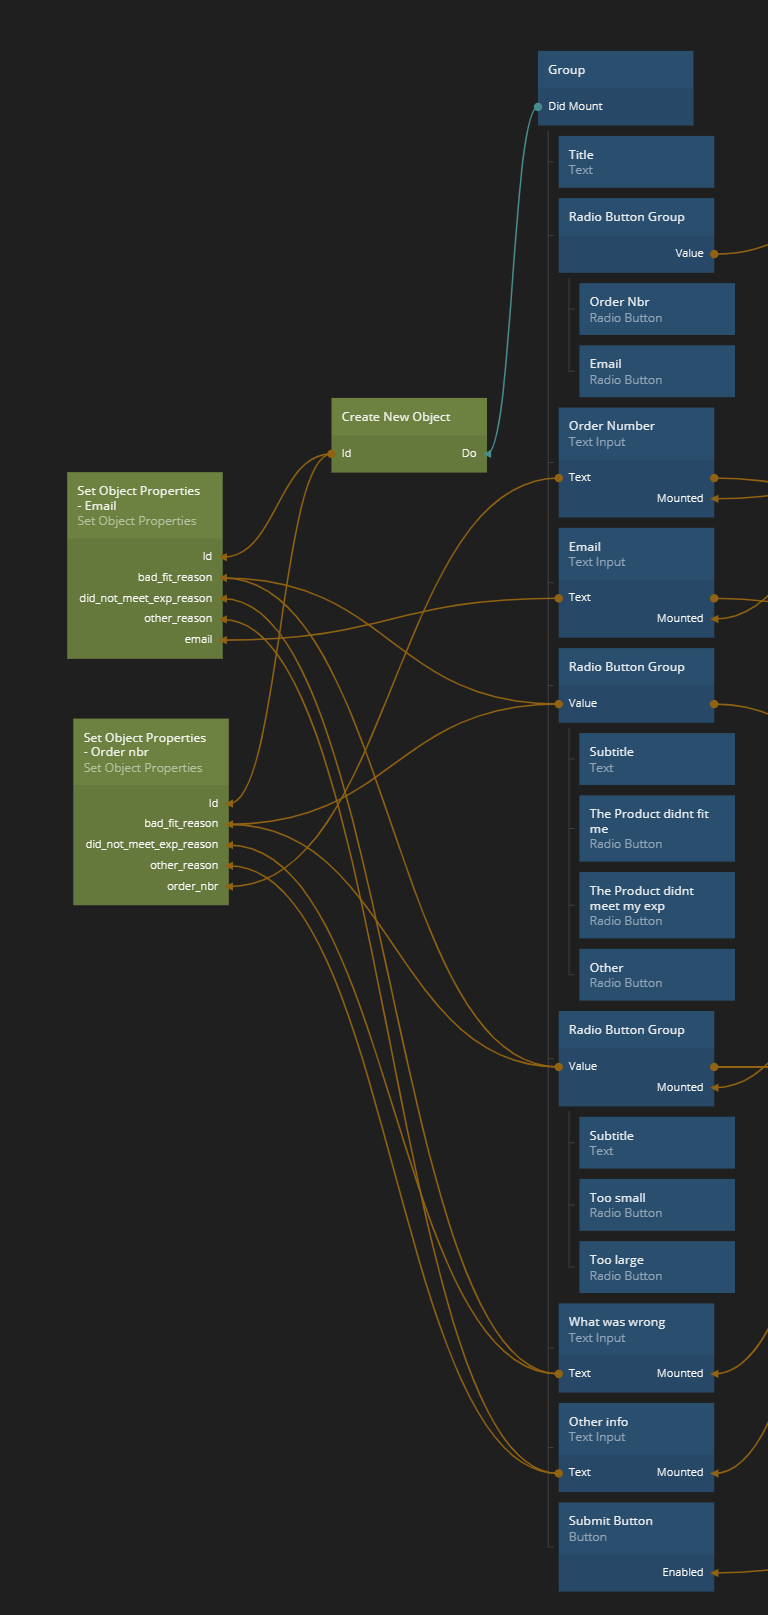
We also need to make sure that for the two cases, the value that's not stored (email when using an order number, and order_nbr when using an email) is set to an empty string. So we create those properties and connect an empty String node to the respective value. Not assigning a value to the String node will make it be an empty string.
Using a Condition node to trigger different nodes
What's left to do is to trigger one of the two Set Object Properties depending on the Switch we use to determine the two reference cases. We will use a Condition node. It's very good when you want to evaluate something at one particular moment - in our case when the "Submit" Button is clicked. You will get either of two signals On True or On False depending on if the value to evaluate is true or false. Let's build it!
Create a Condition node. We connect the Current State output of our Order Nbr Selected Switch to the Condition input of the Condition node. This is what we want to evaluate. We then connect the Click signal of the "Submit" Button to the Evaluate action on th Condition node. This is when we want to evaluate it. Finally we connect the On True and On False signals from the Condition node to the respective Set Object Properties nodes. On True means "Order Number Selected" is true so naturally that signal should be connected to the Set Object Properties that has email set to empty. And vice versa for On False.
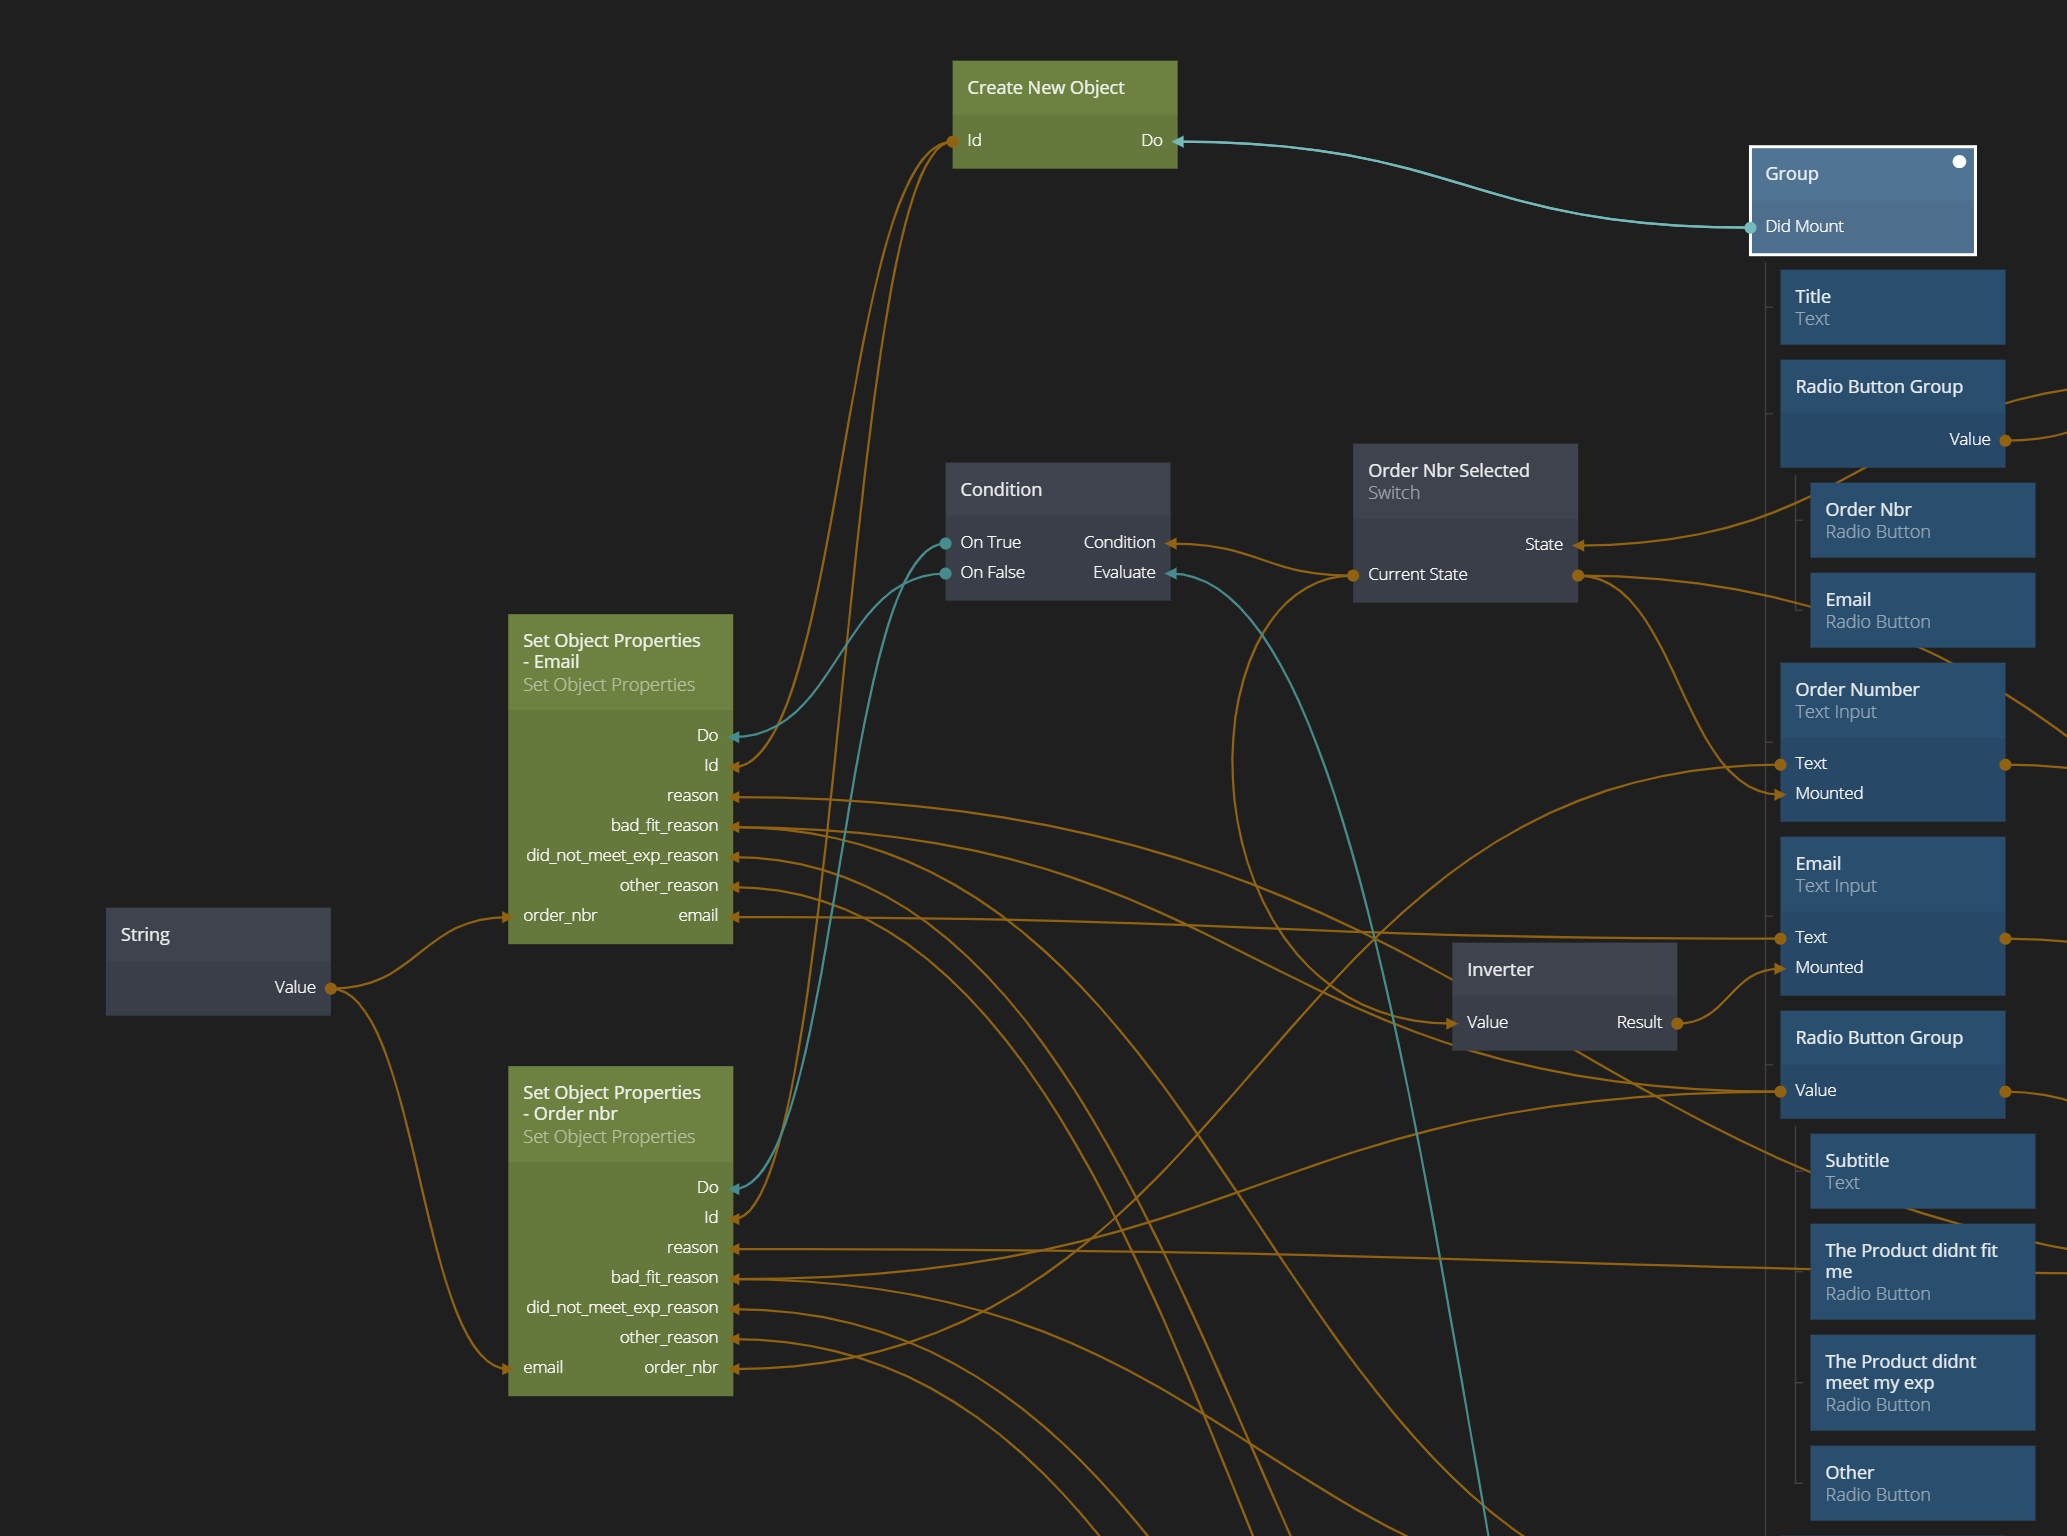
Let's connect an Object to the Id so we can see what's going on.
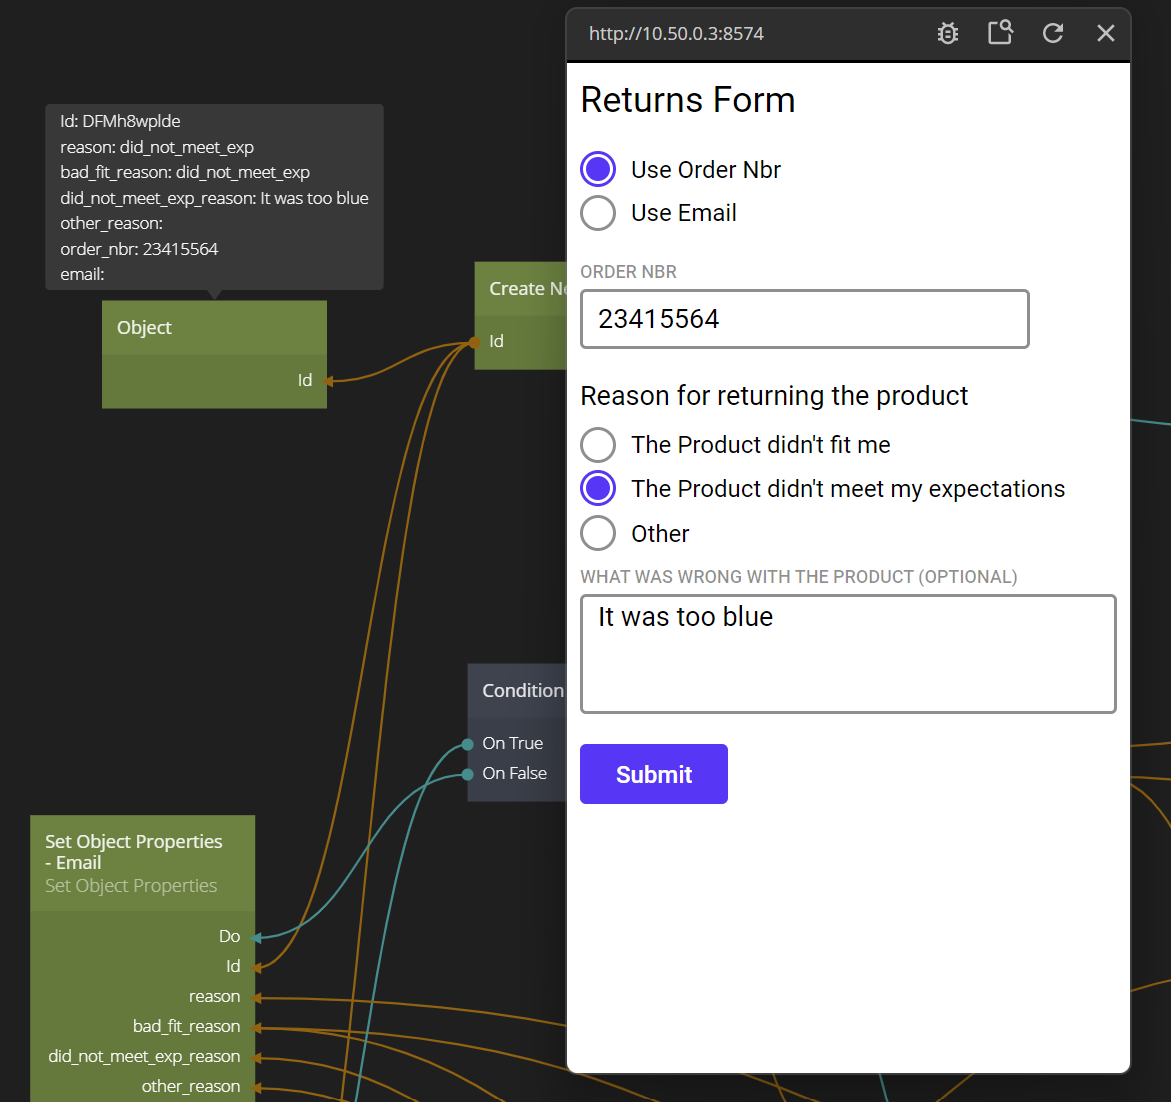
We are done, we implemented our conditional form with custom logic. You can download the full project below.