Client Side Business Logic Using Javascript
What you will learn in this guide
This guide shows how you use Javascript to implement business logic on the client (front-end) side of your app. While you can build business logic with a no-code approach using logic nodes (as described in this guide) its often easier to use Javascript since business logic sometimes is more readable in code form. In this guide we will make use of the Function and Script nodse which are the main way to mix code and no-code in Noodl. Another important node is the Component Object that's the main way of storing state data so it can be accessed easily both in the code world and the node world.
Overview
The guide will implement a simple multiselect interaction on a list and a few multiselect operations, such as delete and copy. The business logic will handle the multi-select itself (selecting, deselecting) as well as the operations on the content in the list. It will also control the state of Buttons on the screen.
We will use various Noodl concepts, such as lists, Arrays and Objects, so it's probably good if you have gone through those guides before ( List guide, Array guide and Object guide). We will also use Javascript of course, and especially many Array functions, so that's worth checking out as well. A good documentation can be found for example here.
There is also a dedicated guide on the Script node, here.
Creating a list with multiselect UI
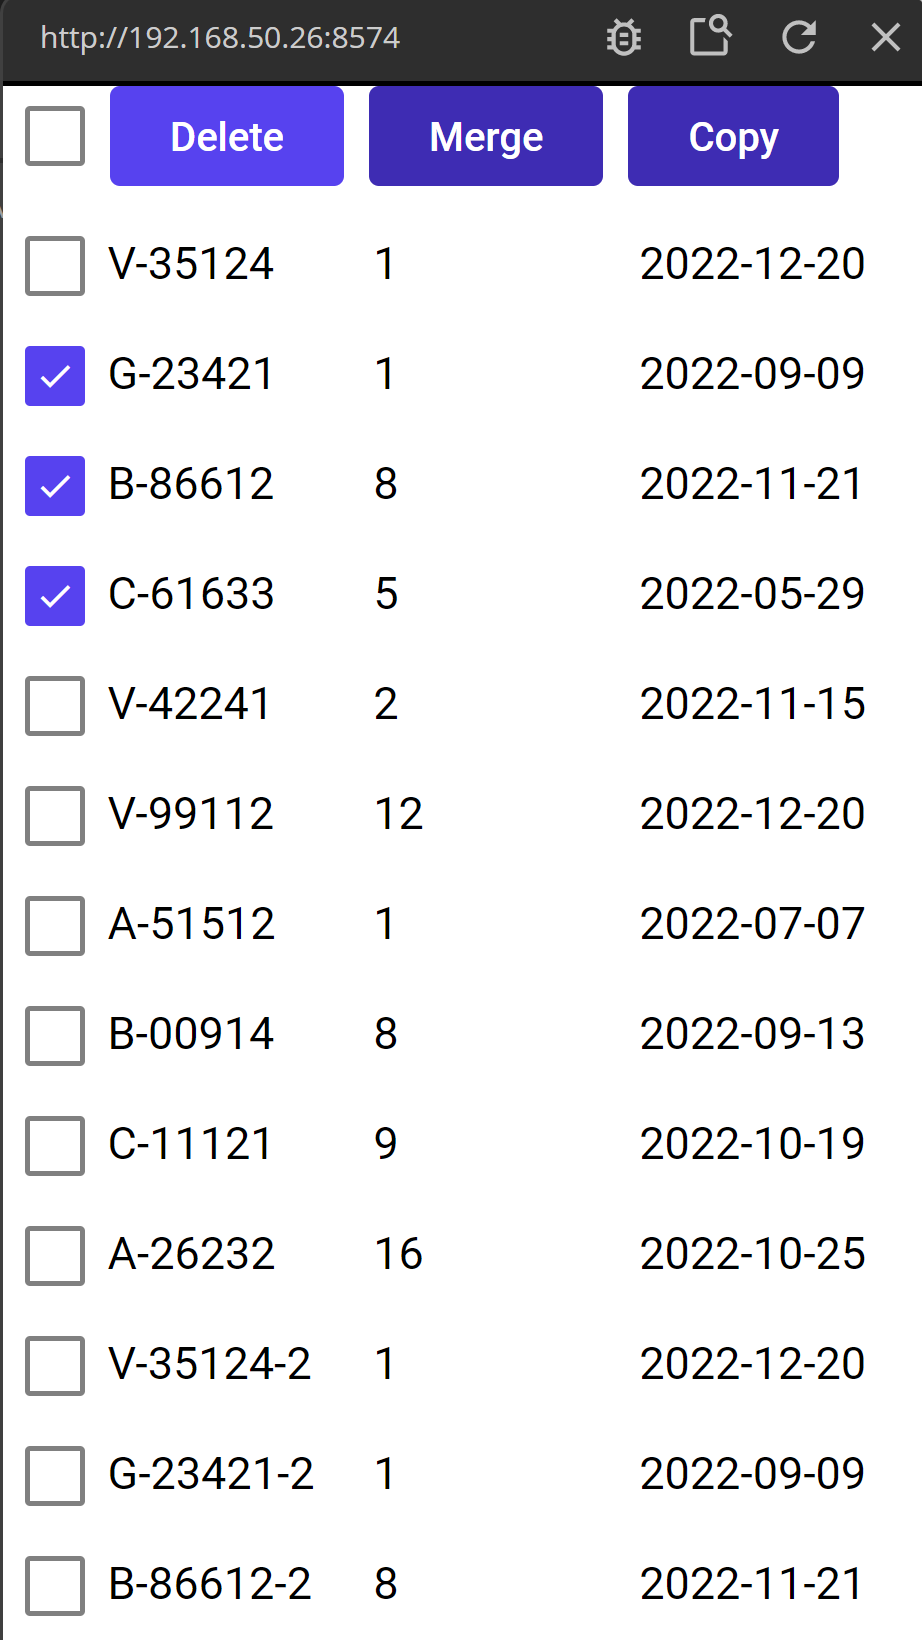
This example will revolve around a simple collection of orders, for example in a e-commerce system. The orders have an order_nbr, a quantity and a delivery_date. The App should list the orders and let the user select a number of them, using a standard multi select interaction. Then the selected orders can either be deleted, copied or merged. We will look what the actual operations mean in more detail as we implement them. It's also possible to select all or deselect all items.
The base data
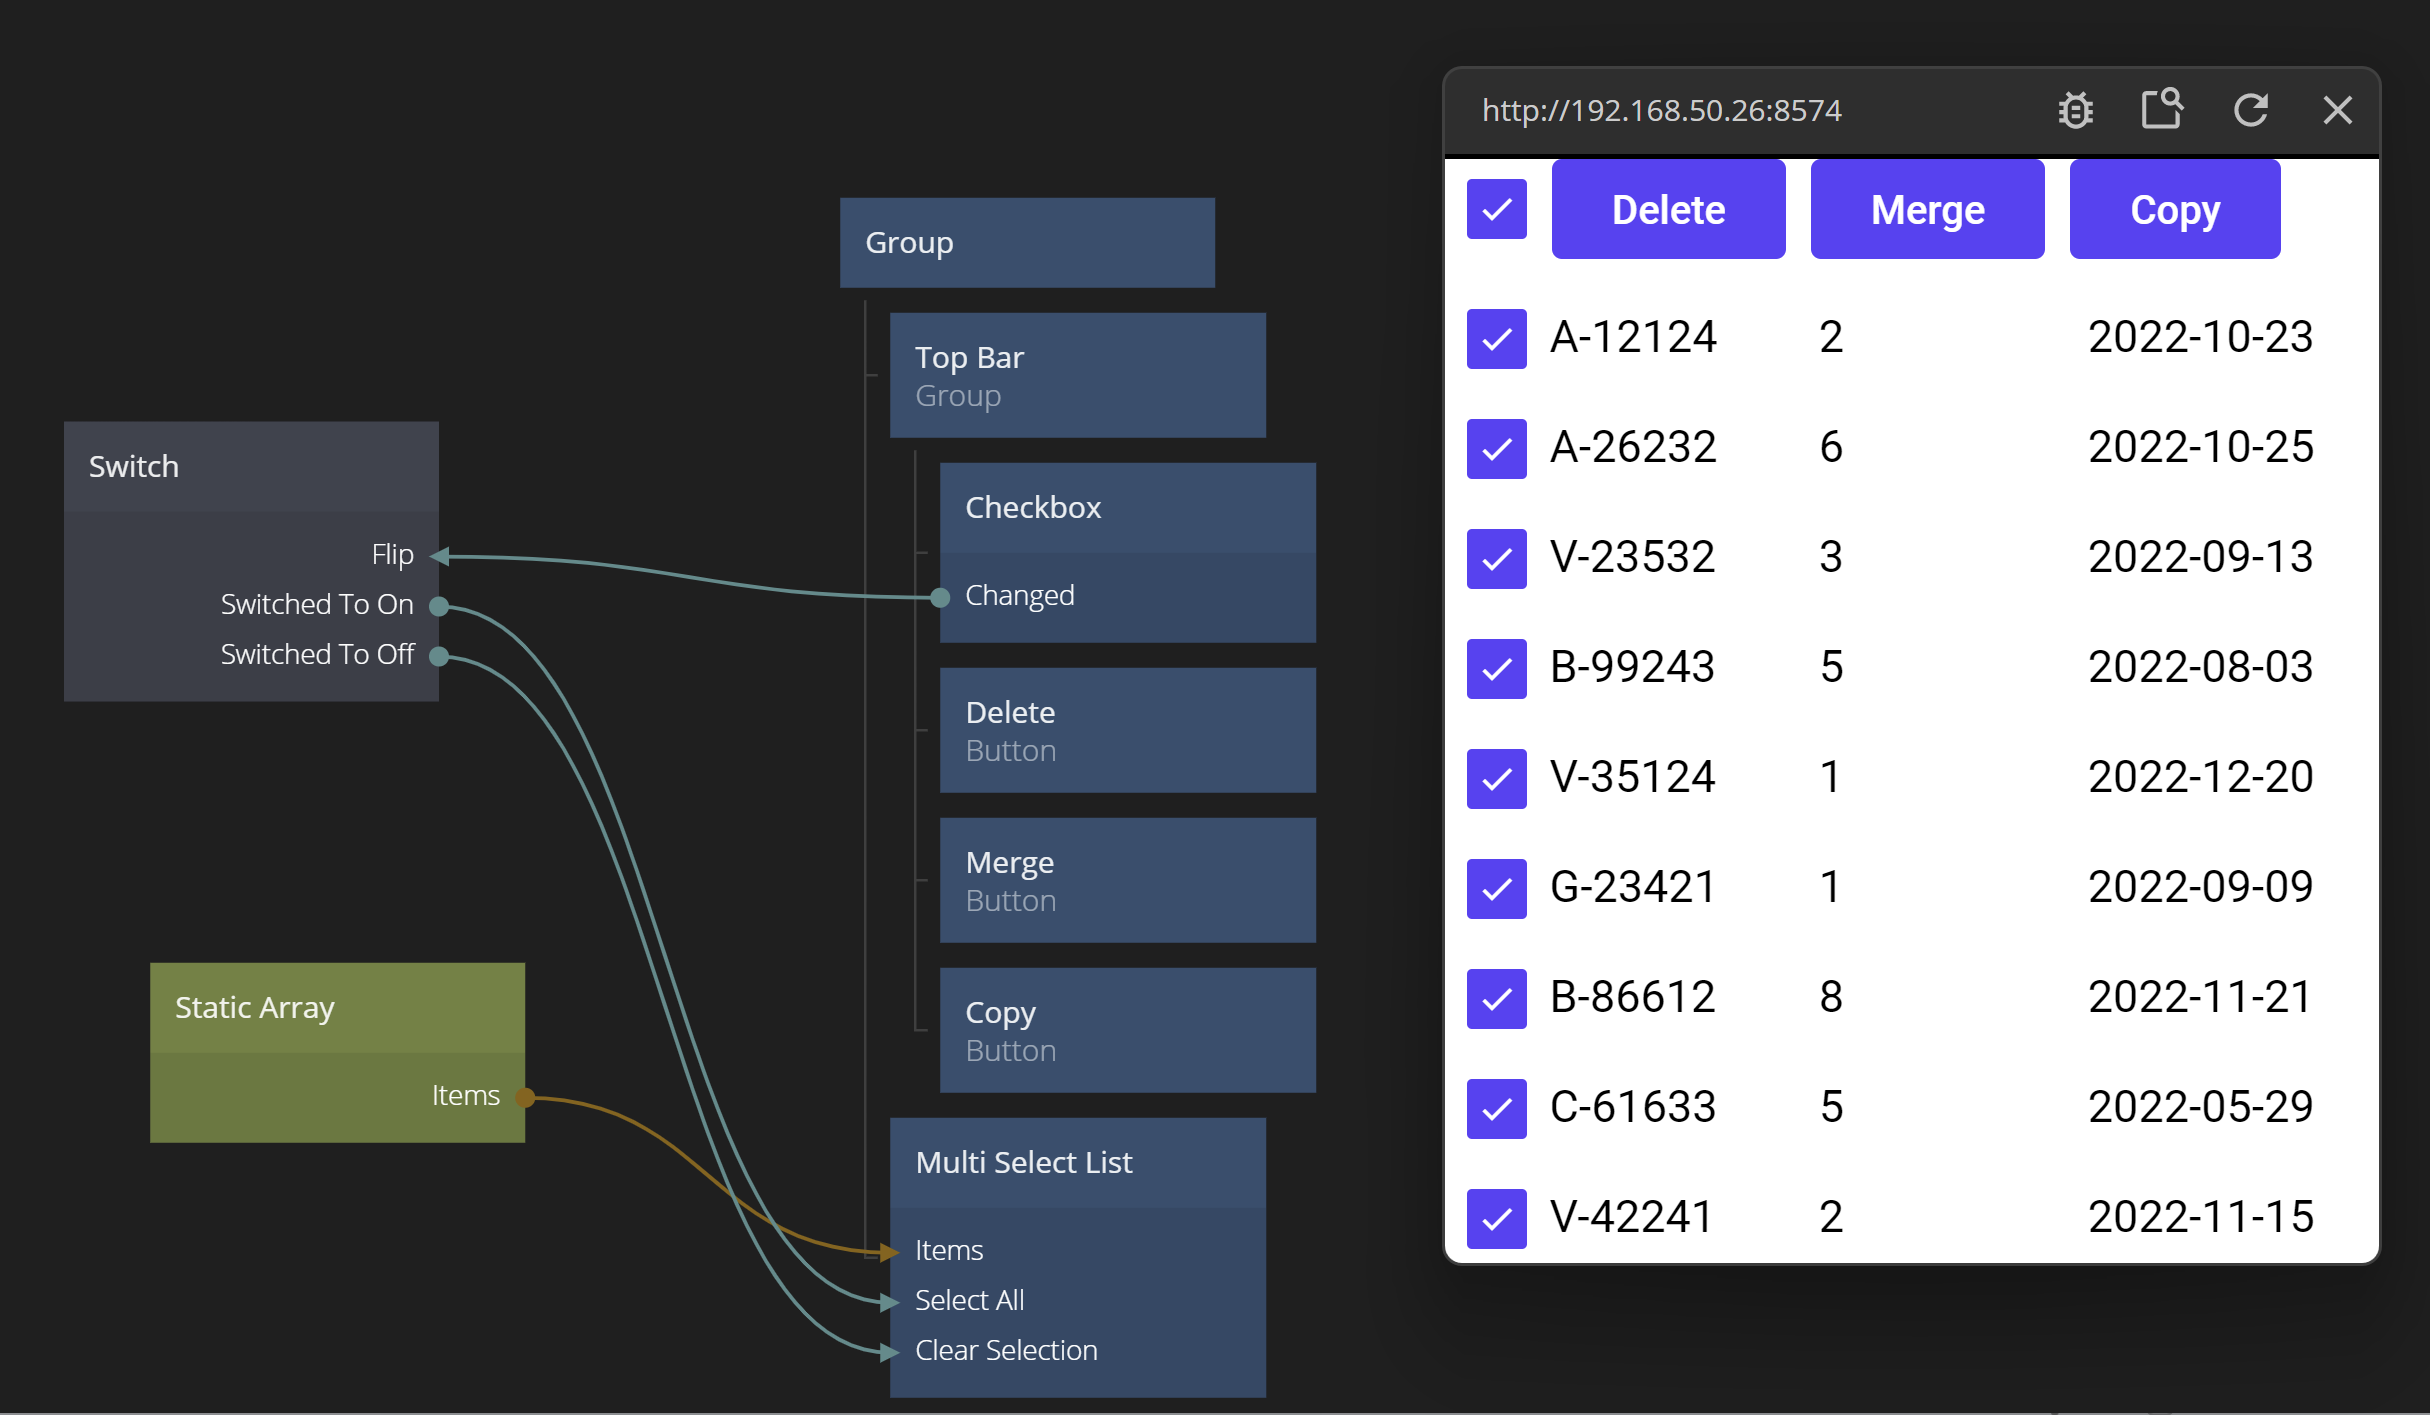
We start this guide by adding in our base dataset that we want to work on. We are going to use the Static Array to keep our data, but in essence this data could have come from a cloud database. So start a new project, using the "Hello World" template. Then add a Static Array node, set it to JSON format, and add in the following data:
[
    {"order_nbr":"A-12124", "quantity":2, "delivery_date":"2022-10-23"},
    {"order_nbr":"A-26232", "quantity":6, "delivery_date":"2022-10-25"},
    {"order_nbr":"V-23532", "quantity":3, "delivery_date":"2022-09-13"},
    {"order_nbr":"B-99243", "quantity":5, "delivery_date":"2022-08-03"},
    {"order_nbr":"V-35124", "quantity":1, "delivery_date":"2022-12-20"},
    {"order_nbr":"G-23421", "quantity":1, "delivery_date":"2022-09-09"},
    {"order_nbr":"B-86612", "quantity":8, "delivery_date":"2022-11-21"},
    {"order_nbr":"C-61633", "quantity":5, "delivery_date":"2022-05-29"},
    {"order_nbr":"V-42241", "quantity":2, "delivery_date":"2022-11-15"},
    {"order_nbr":"V-99112", "quantity":12, "delivery_date":"2022-12-20"},
    {"order_nbr":"A-51512", "quantity":1, "delivery_date":"2022-07-07"},
    {"order_nbr":"B-00914", "quantity":8, "delivery_date":"2022-09-13"},
    {"order_nbr":"C-11121", "quantity":9, "delivery_date":"2022-10-19"}
]
Now we have some orders in the system so ket's start building the UI. We will start with the multi select list.
Building a Multi Select List
We want to build a component that can show an array of items, as well as keeping track of which items that are selected. Let's outline the functionality of it below
- You should be able to feed it with items that will be shown in the list, with a checkbox in front of them
- You should be able to feed it an initial selection, i.e. which items that should be selected
- As you selected or deselect items, the component should trigger a signal and also provide an Array with the items that are currently selected
- You should be able to select or deselect all items by triggering a signal
A question is how the multi select list would encode which items that are selected. One way of doing it would be that the multiselect list would provide an Array of items of format:
{
    "Value":<id of selected object>
}
So for example, if the list has three items, with ids "111", "222" and "333". If the first and second item are selected, the output from the component would be:
[
    {
        "Value":"111"
    },
    {
        "Value":"222"
    }
]
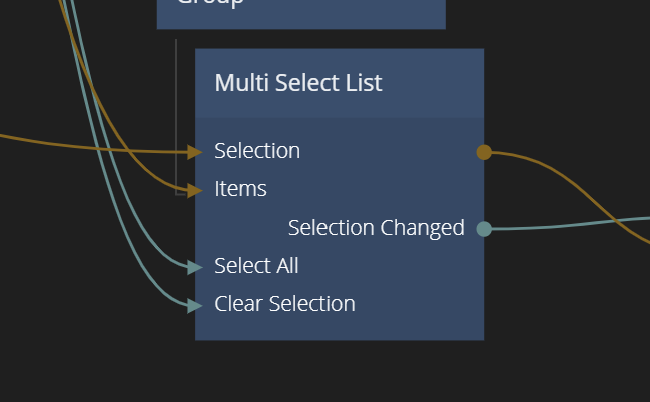
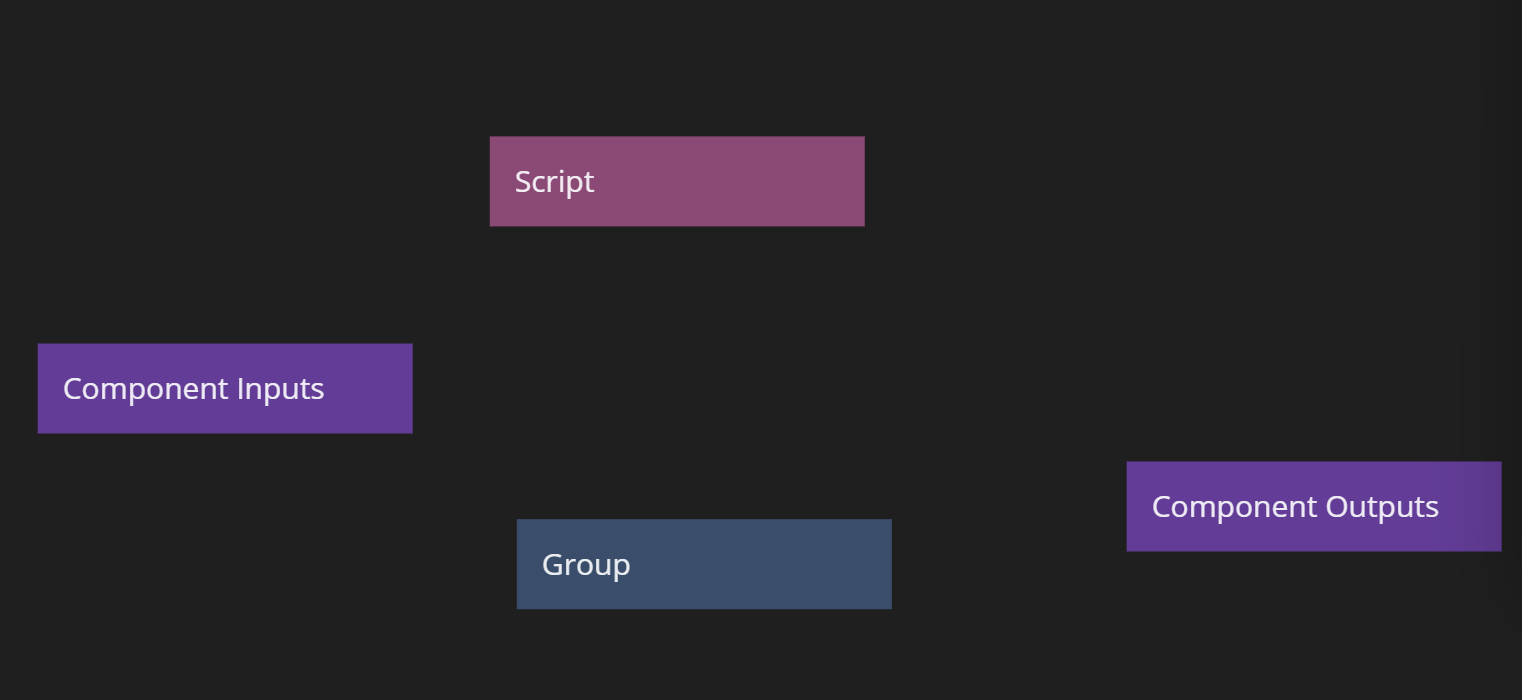
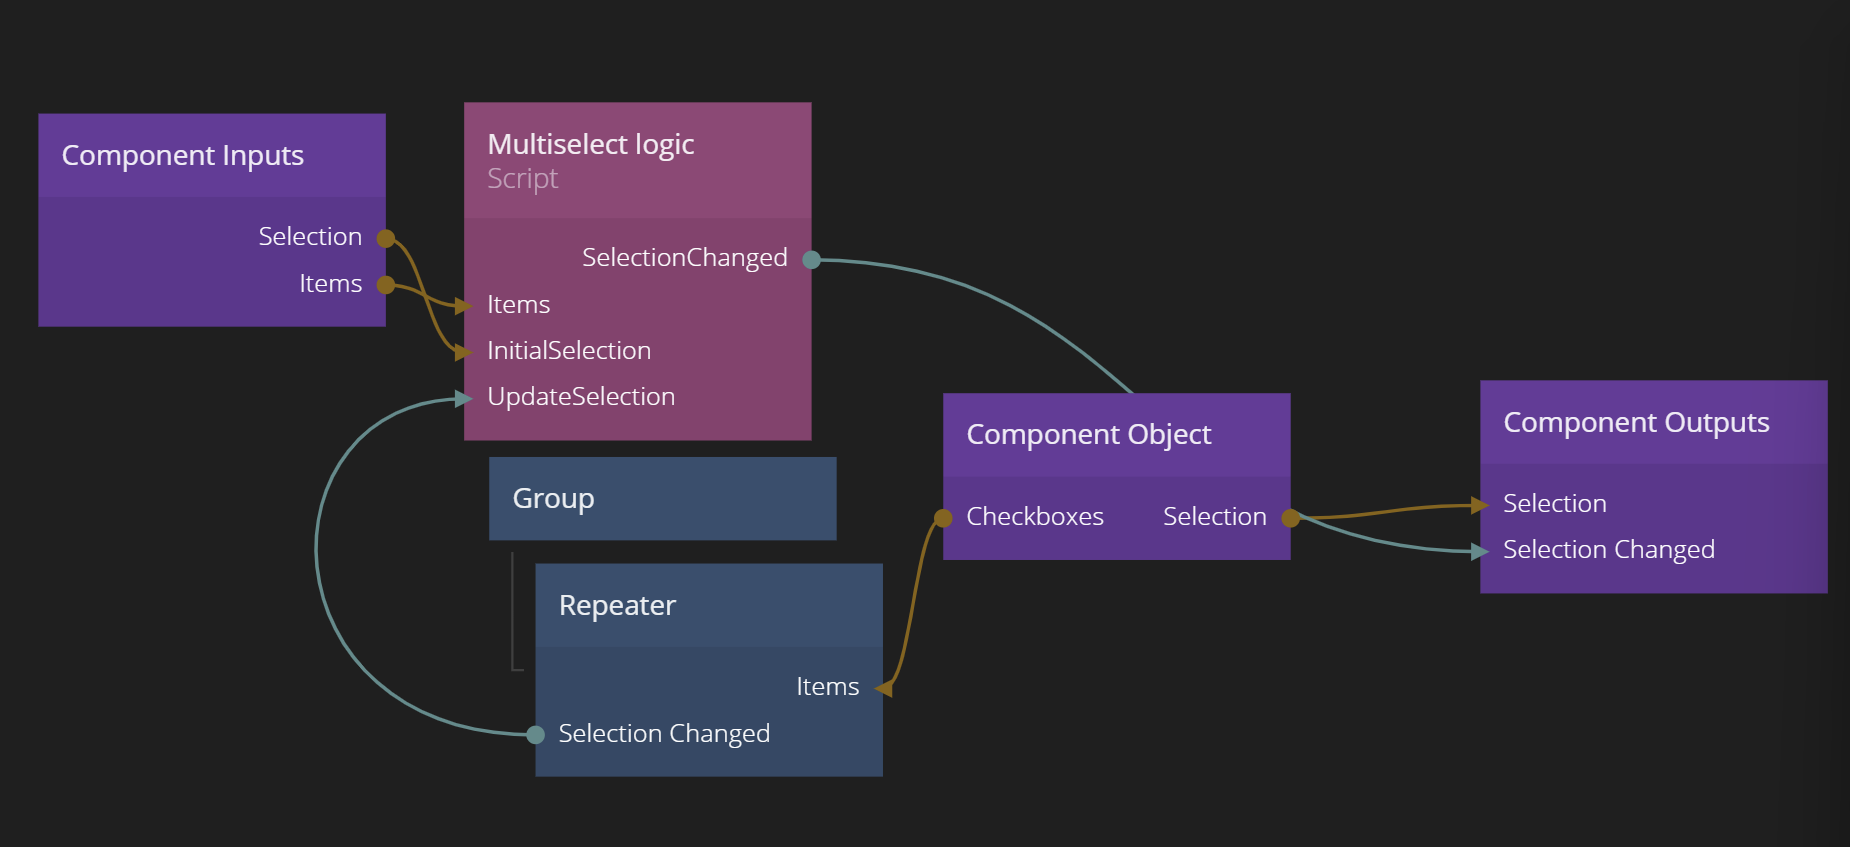
So, when we are done, the component would look something like below from the outside:
Selection logic
Let's think about the logic needed by the component. Internally the component would need to keep track of which items that are selected and which are not. Partly to be able to generate the Array above, but also to be able to visualize it correctly.
You could of course store the selection state directly in the item, i.e. an order in our case, but that's actually not a great design. What would happen if the order was part of multiple Multi Select lists? Also, if we end up storing the item in the database we might also store the selection state if we are not careful, which doesn't make sense at all.
A better design is to "wrap" the each order in another Object that keeps track of the selection state. Then we display a list of those objects when we present the list instead of the original items. The "wrapper" of course needs to store the Id of the Object that it wraps so it can present the data from the item too. The format of the wrapper could be:
[
    {
        "Checked":<true or false depending if the item is checked or not>,
        "Value":<the id of the Object it wraps>
    }
]
So, again in the example above with the items with id "111", "222" and "333", with the first two checked, the Checkbox array would look like the following:
[
    {
        "Checked":true,
        "Value":"111"
    },
    {
        "Checked":true,
        "Value":"222"
    },
    {
        "Checked":false,
        "Value":"333"
    },
]
So in summary our Multi Select list component will need the following logic on the inside
- When the list is fed with new items, it will create one new Checkbox Array containing an Object per item (the wrapper) and set
Checkedtotrueorfalsedepending on initial selection. - The list item presenting each item will use the
Checkedproperty to visualize the checked status of the item. If the user clicks the checkbox theCheckedproperty is toggled. - Whenever the checked status changes, the Multi Select List should generete a new list that only holds the items that are checked, according to the format above, i.e.
[{"Value":<id of a checked item>}, ...]. This will be presented to the outside world.
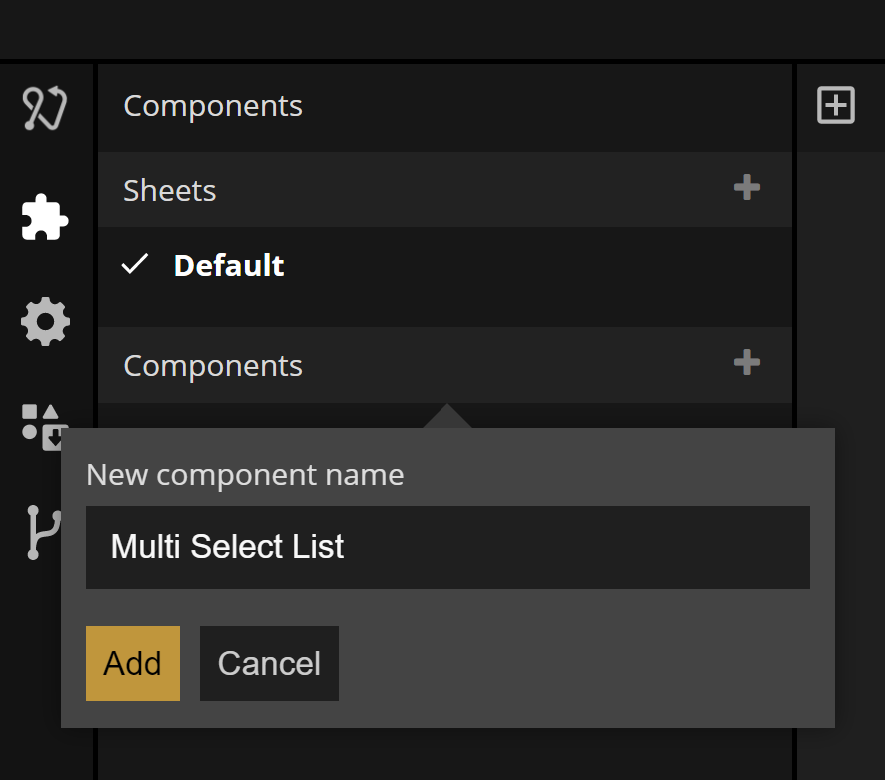
Start by creating a new visual component. Call it "Multi Select List".
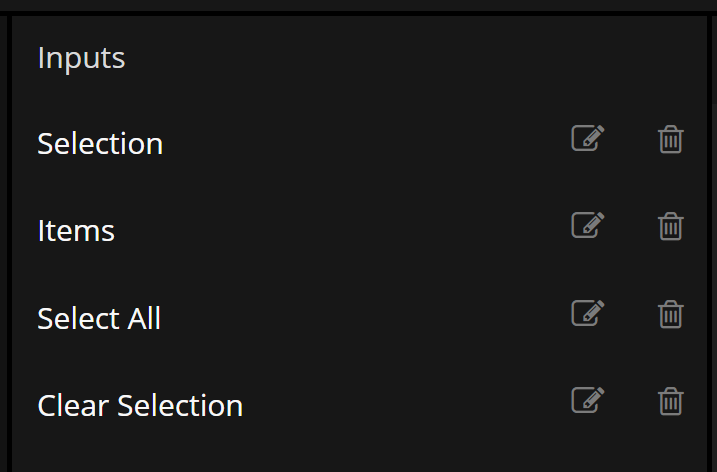
You will now have a more or less empty component. Add in a Component Inputs and a Component Outputs. We now what they should contain are already, i.e. how to interact with our component. So in the Component Inputs add the ports Selection, Items, Select All and Clear Selection.
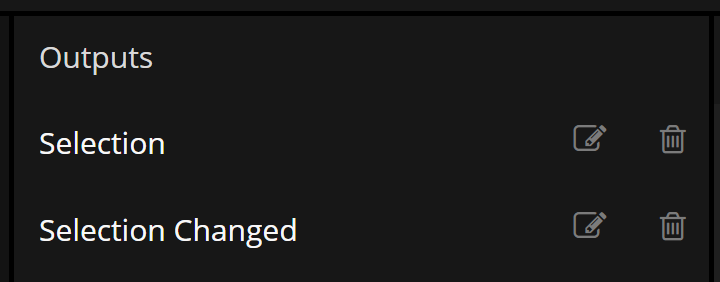
In the Component Outputs we create the ports Selection and Selection Changed.
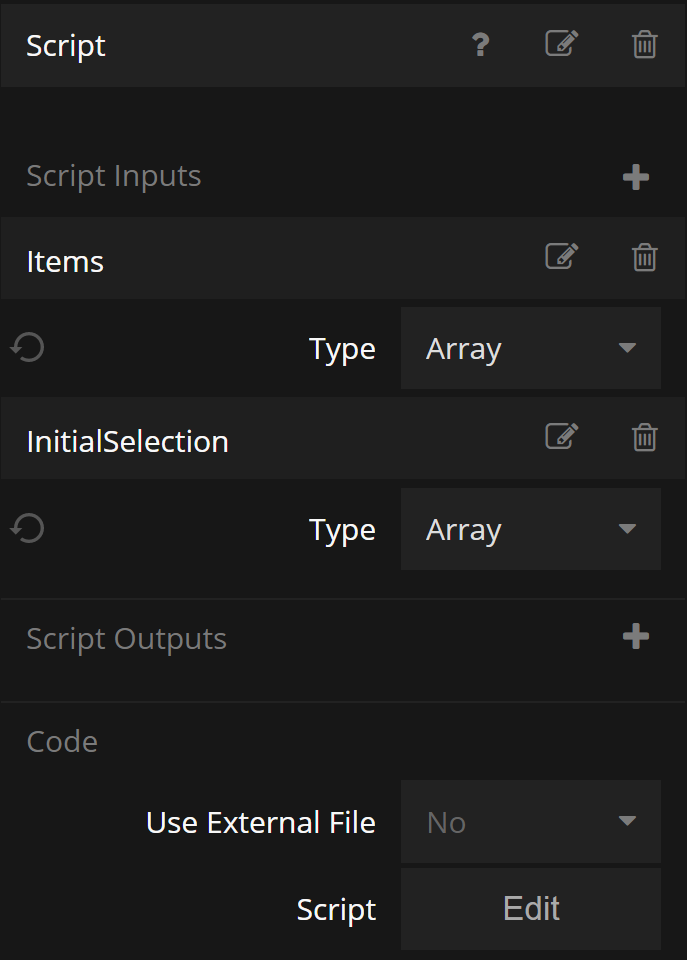
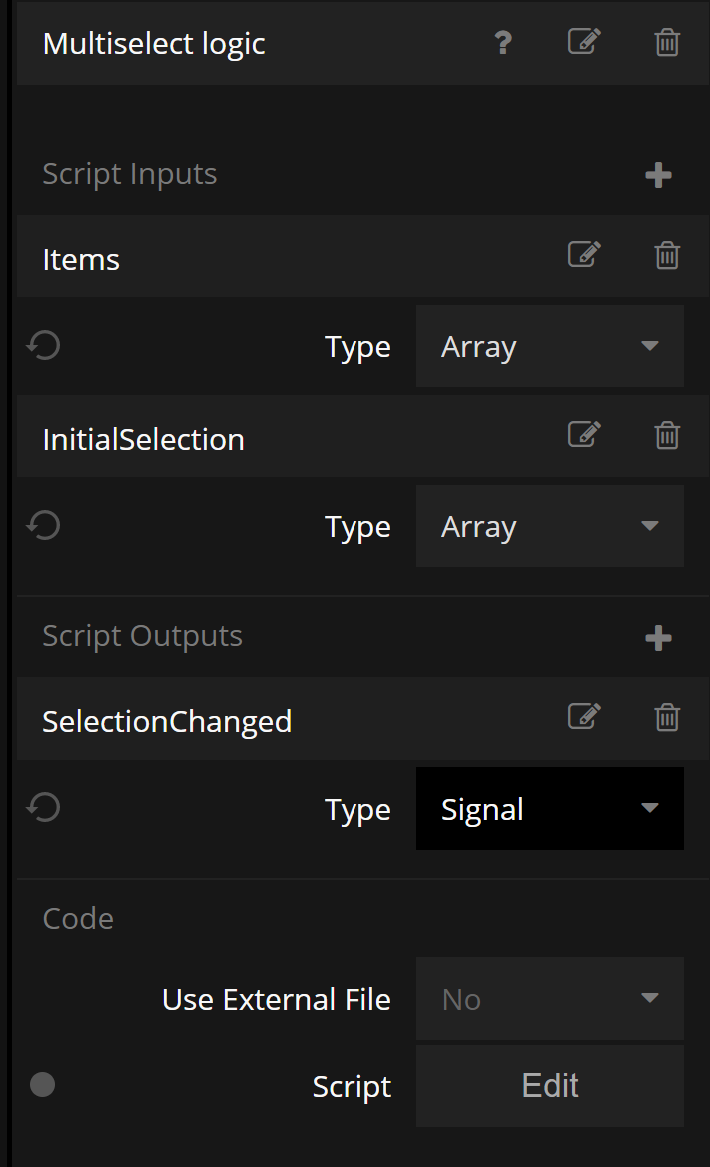
Now we begin writing our Javascript logic. Add a Script node.
We begin by adding two inputs, one is the Items that the list should display. The other is the InitialSelection that contains any items that should be selected initially by the list. Both of these are of Array type.
Ok, let's start coding! The first thing we want to do is to generate our Checkbox list, i.e. the Array of wrapping Objects that hold the checked state of each item.
Setter functions - execute code when an input changes
We want to generate that Array any time the Items input changes. If you want to execute a piece of script any time a specific input changes you can use a Setter function. These are declared using the following format:
Script.Setters.<property name> = function (value) {...}
In our case we want to generate the Checkbox Array whenever Items is changed so we add the follwing code in our script file:
Script.Setters.Items = function (items) {
    if(!Script.Inputs.Items) return
    // Create a list of all items with checked status, based on the initial selection array
    Component.Object.Checkboxes = Script.Inputs.Items.map(o => Noodl.Object.create({
        id:Component.Object.id+'-'+o.id,
        Value:o.id,
        Checked:Script.Inputs.InitialSelection!==undefined && !!Script.Inputs.InitialSelection.find(s => s.Value === o.id)
    }))
}
This code goes through the incoming Items (referred to through Script.Inputs.Items), and for each item creates a new wrapper Object (using Noodl.Object.create). It checks the checked state and sets either true or false against the initial selection array. It also stores a pointer to the wrapped Object in the property Value.
Checking for undefined inputs
If an input of a script node hasn't been set yet, for example in the case of our Items input or InitialSelection here, they will have the value undefined. It's often a good idea to explicitly check for this case in your code.
Another little trick here is that we explicitly set the id of the wrapper Object. This is actually not needed, as Noodl will generate a new id if no id is specified. But by making up an id of our own, that will be unique but the same for every wrapper object that wraps a specific object, we will reuse old Objects rather than creating new.
As you can see, the resulting Array is stored in Component.Object.Checkboxes. This we should pay some extra attention to.
Using a Component Object in your scripts
Each component in Noodl have a Component Object that's unique. Opposite to a regular Object a Component Object can only be accessed by the component itself, or by children of the component using Parent Component Objects. This creates a scope and you does not risk other components accessing this object by mistake. For example if you would show two Multi Select lists on the same screen, if you used a regular Object to store your Checkboxes, you would need to make sure the Objects had unique ids (the Checkboxes can be different in the two lists). We avoid this problem all togheter by storing our Checkboxes in our Component Object.
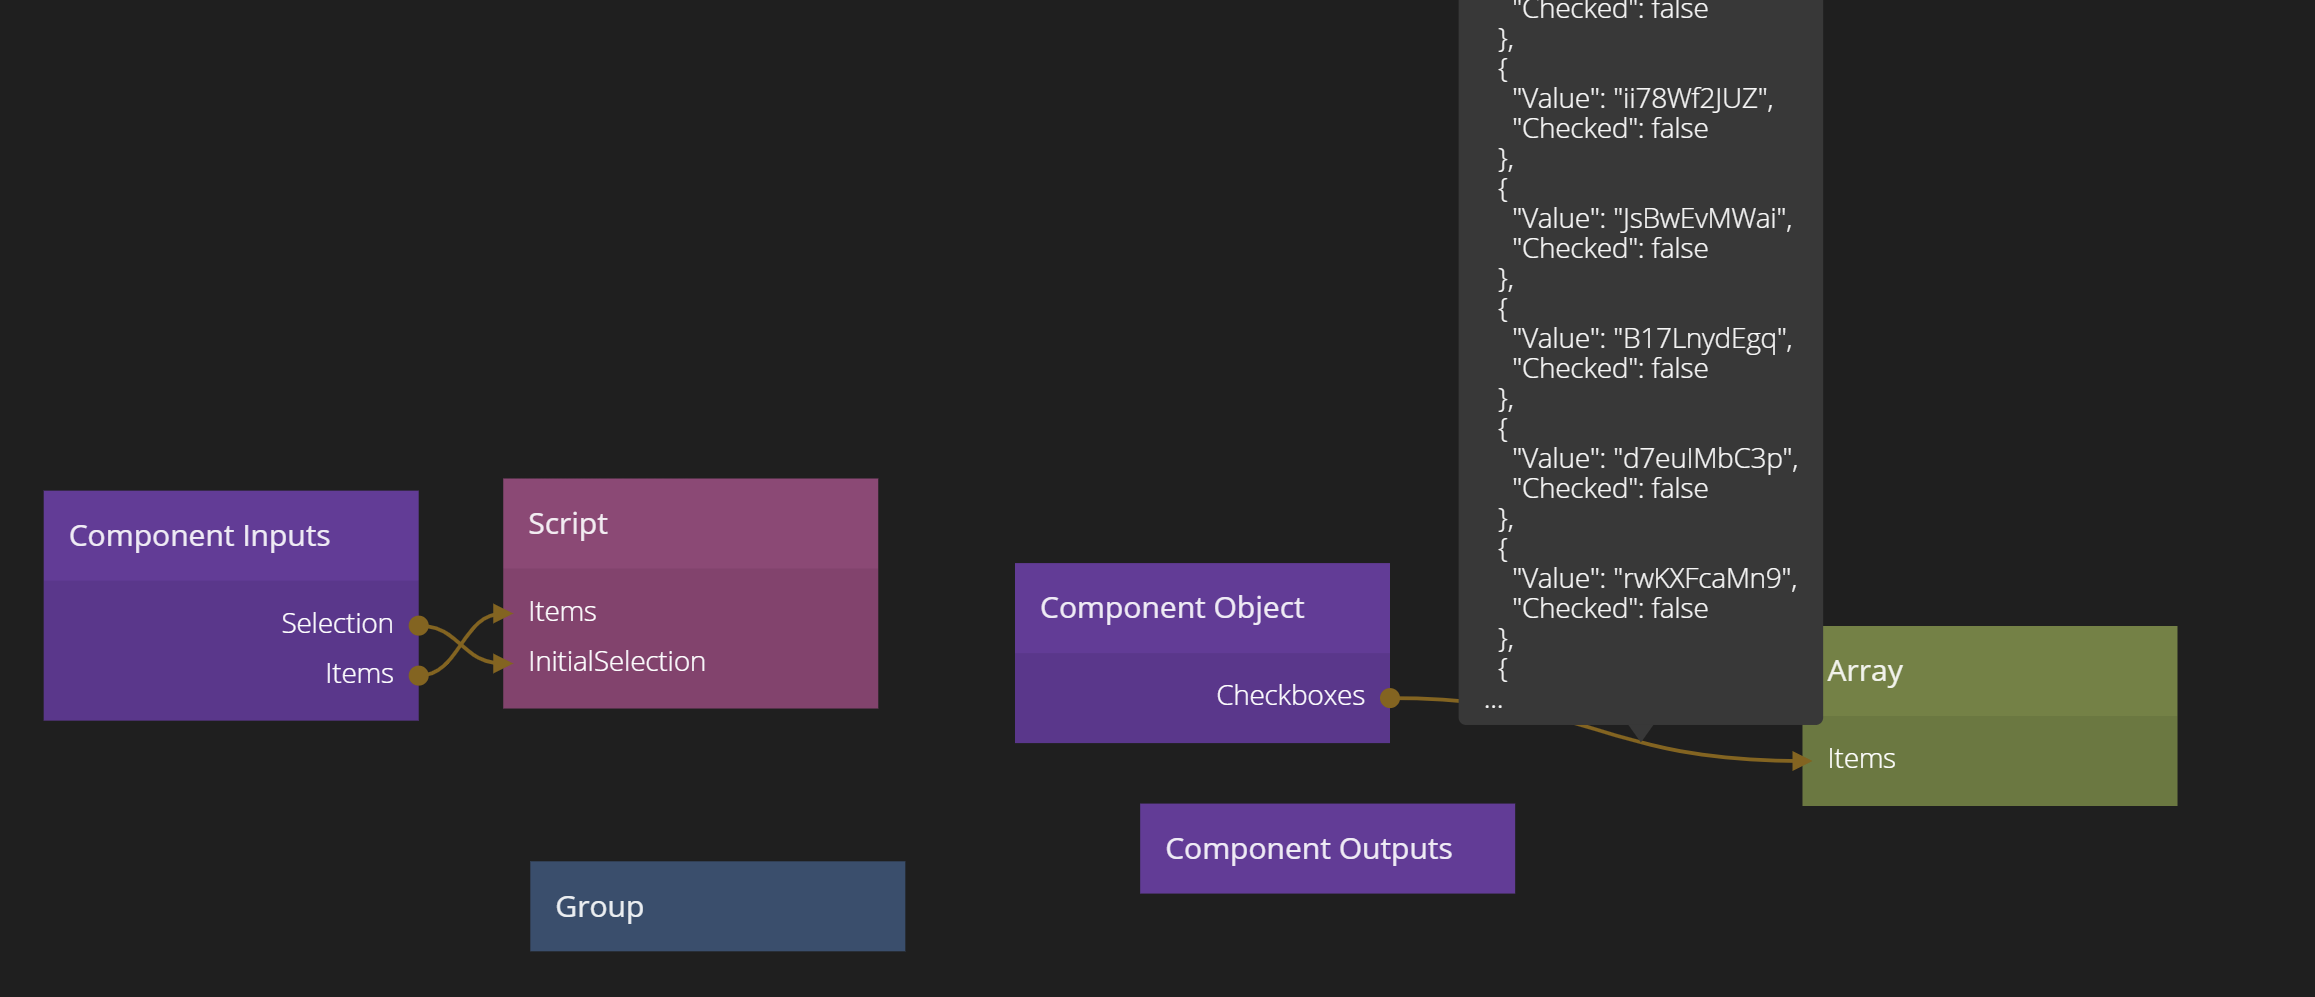
All components have a Component Object, and you can access it in the Node world by adding a Component Object node. So close the Script node for now, and add in a Component Object node. Also add the property Checkboxes on the Component Object.
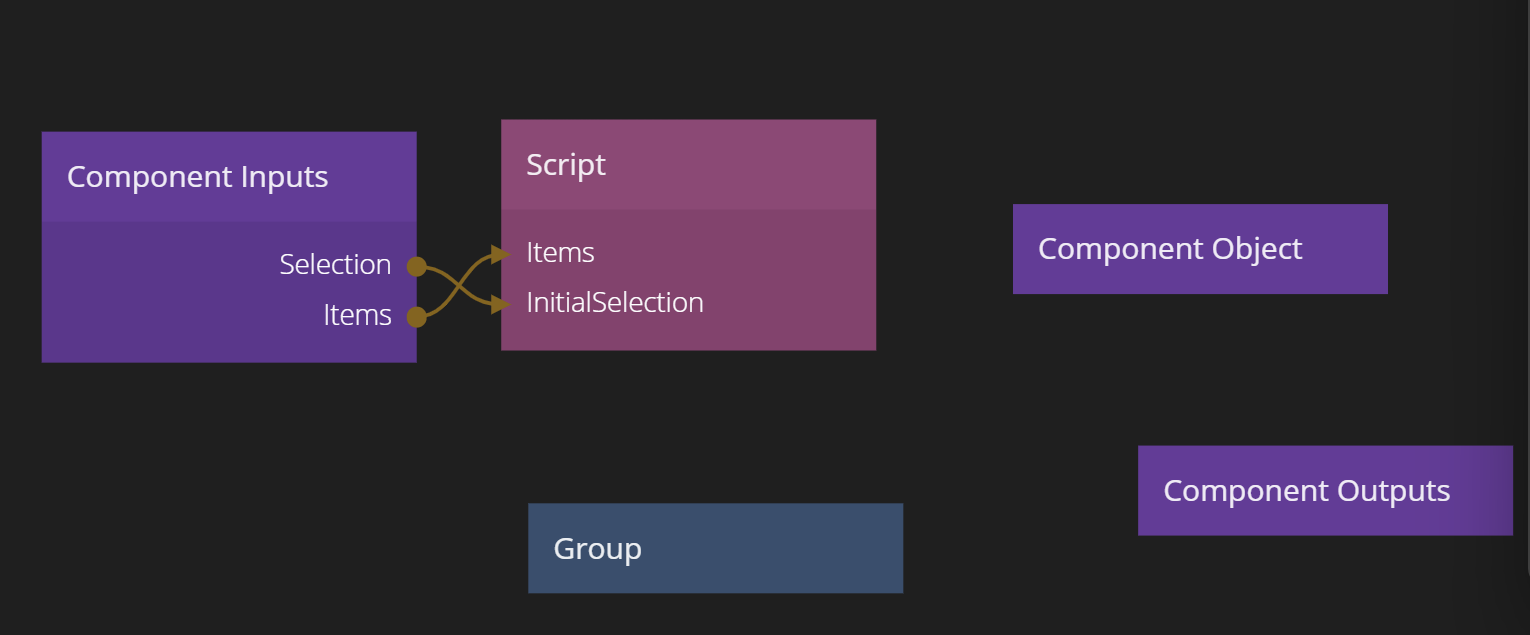
While we are at it we also connect the two outputs from Component Inputs (Items and Selection) to Items and Initial Selection inputs on the Script node.
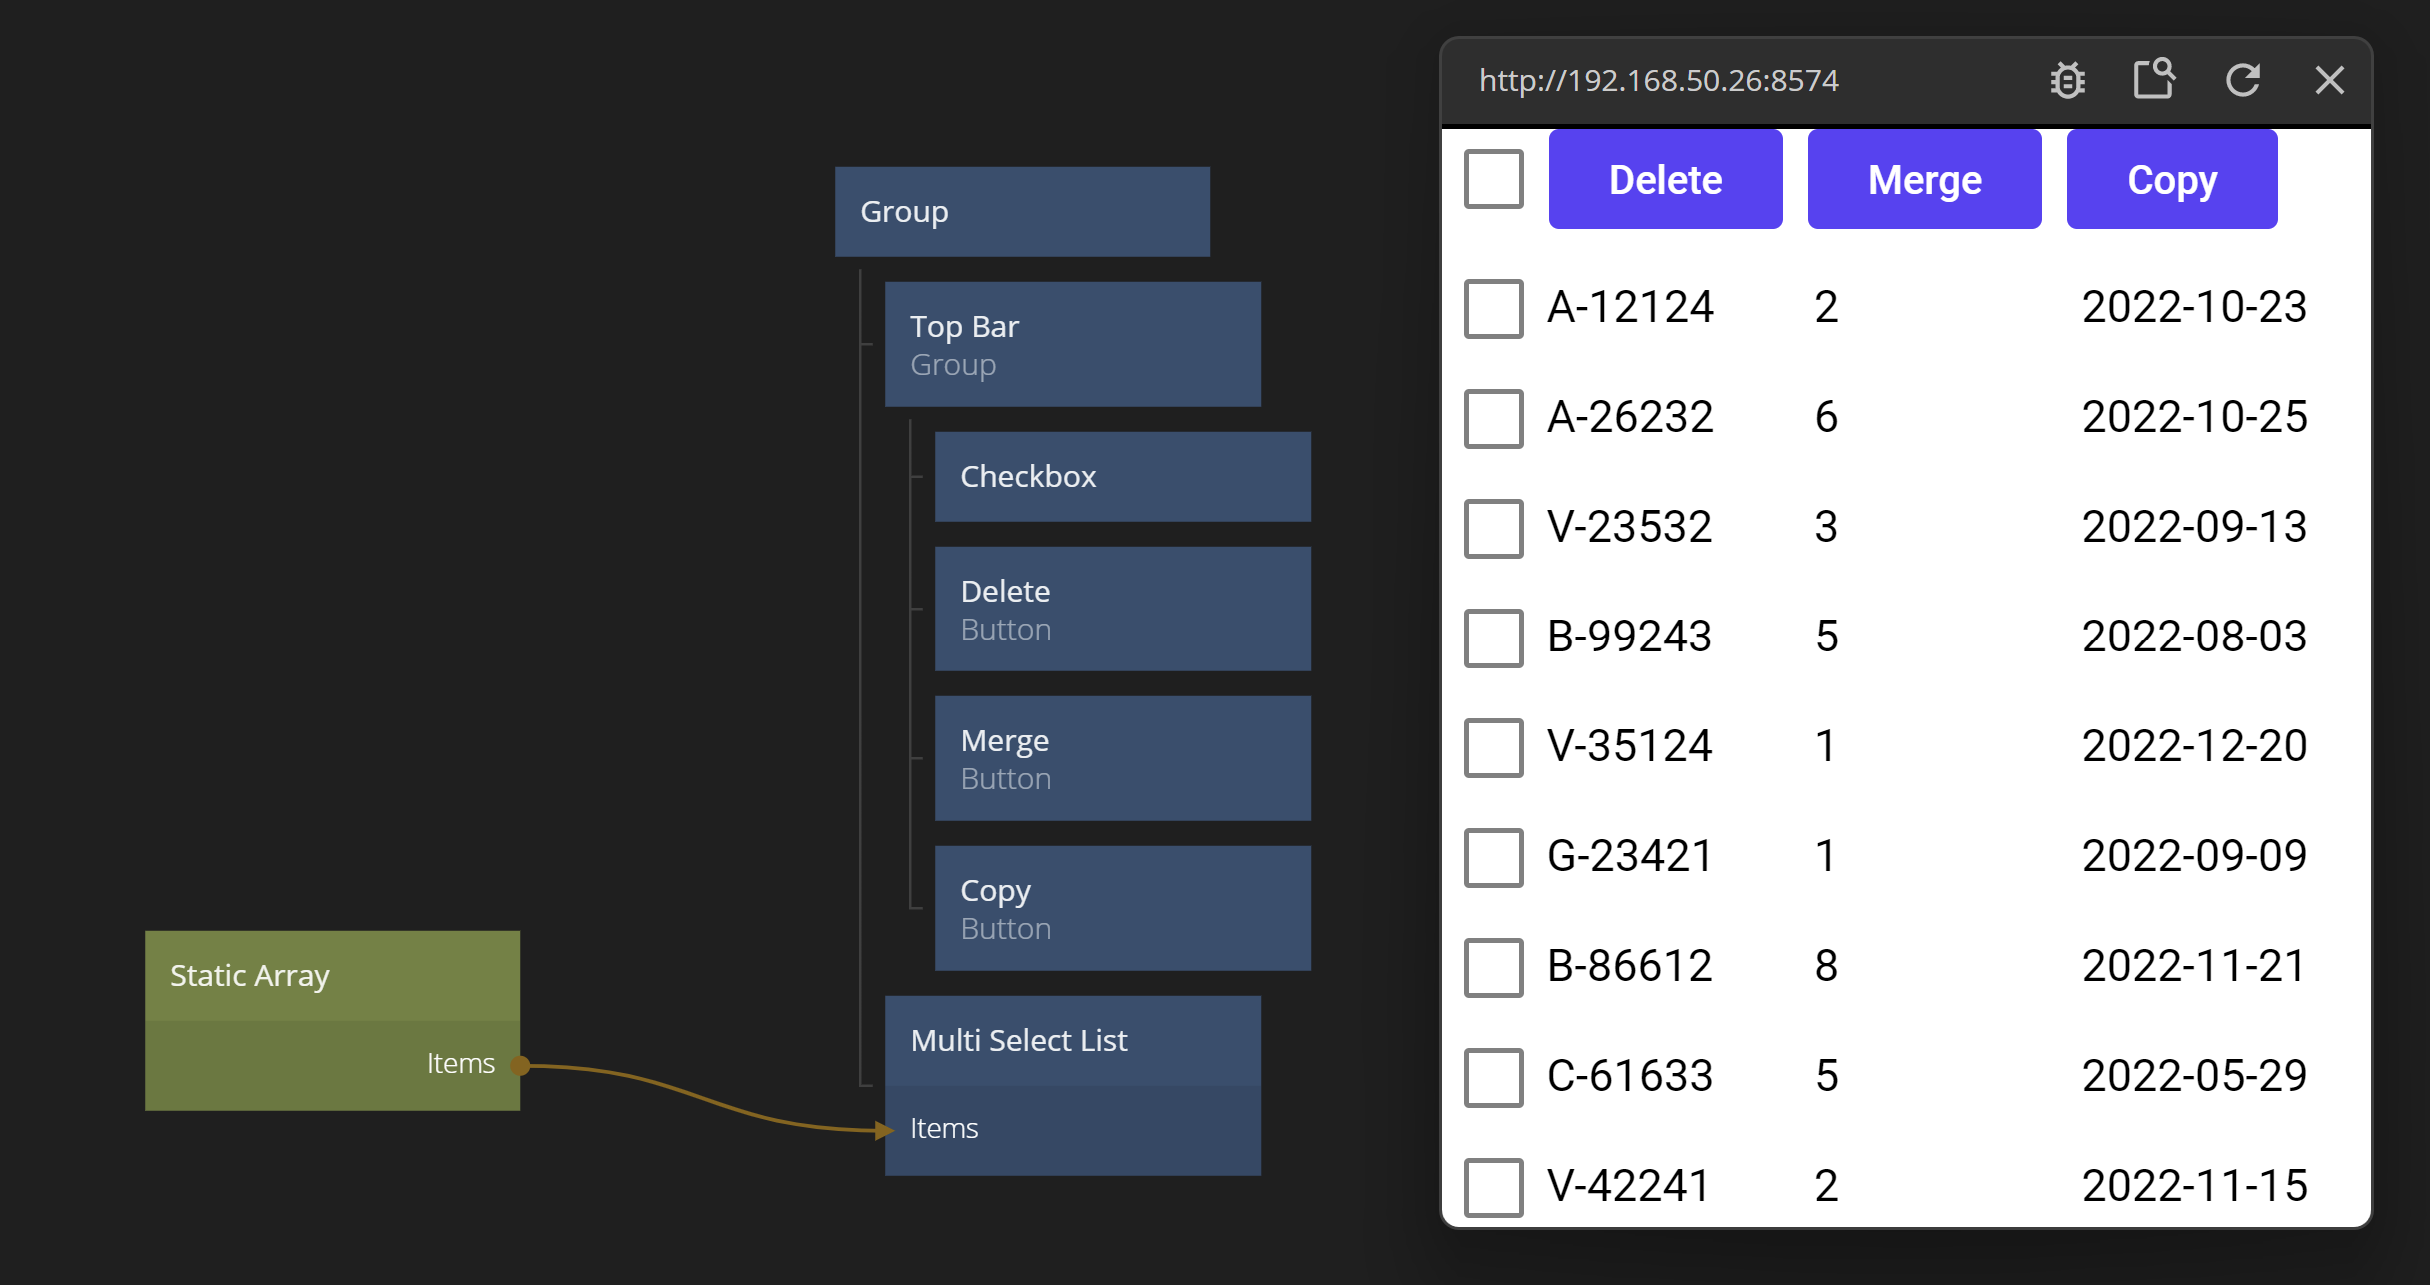
Let's test what we done so far, so we add in an Array node and connect the Checkboxes property of the Component Object to it (through the Items property). Next, we add in the Multi Select List component into our main App. Give it some items by connecting the Static Array items to it. If all is set up correctly, you should see some Checkbox items flowing into the Array.
Making the List Items
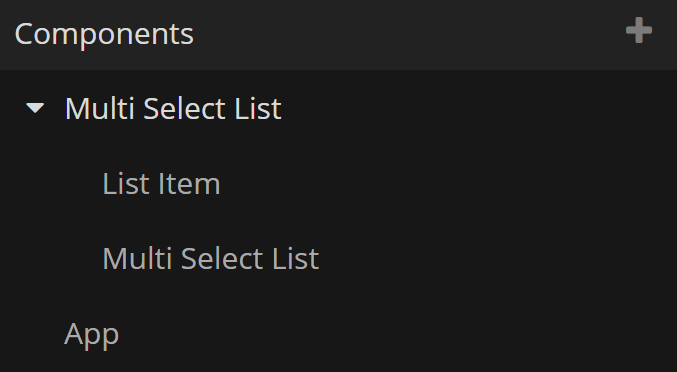
Now we are ready to create the List Items. Let's package up our Multi Select List components into a folder. So create a new folder, call it Multi Select List. Move our Multi Select List component into it. Then add another visual component. Call it List Item.
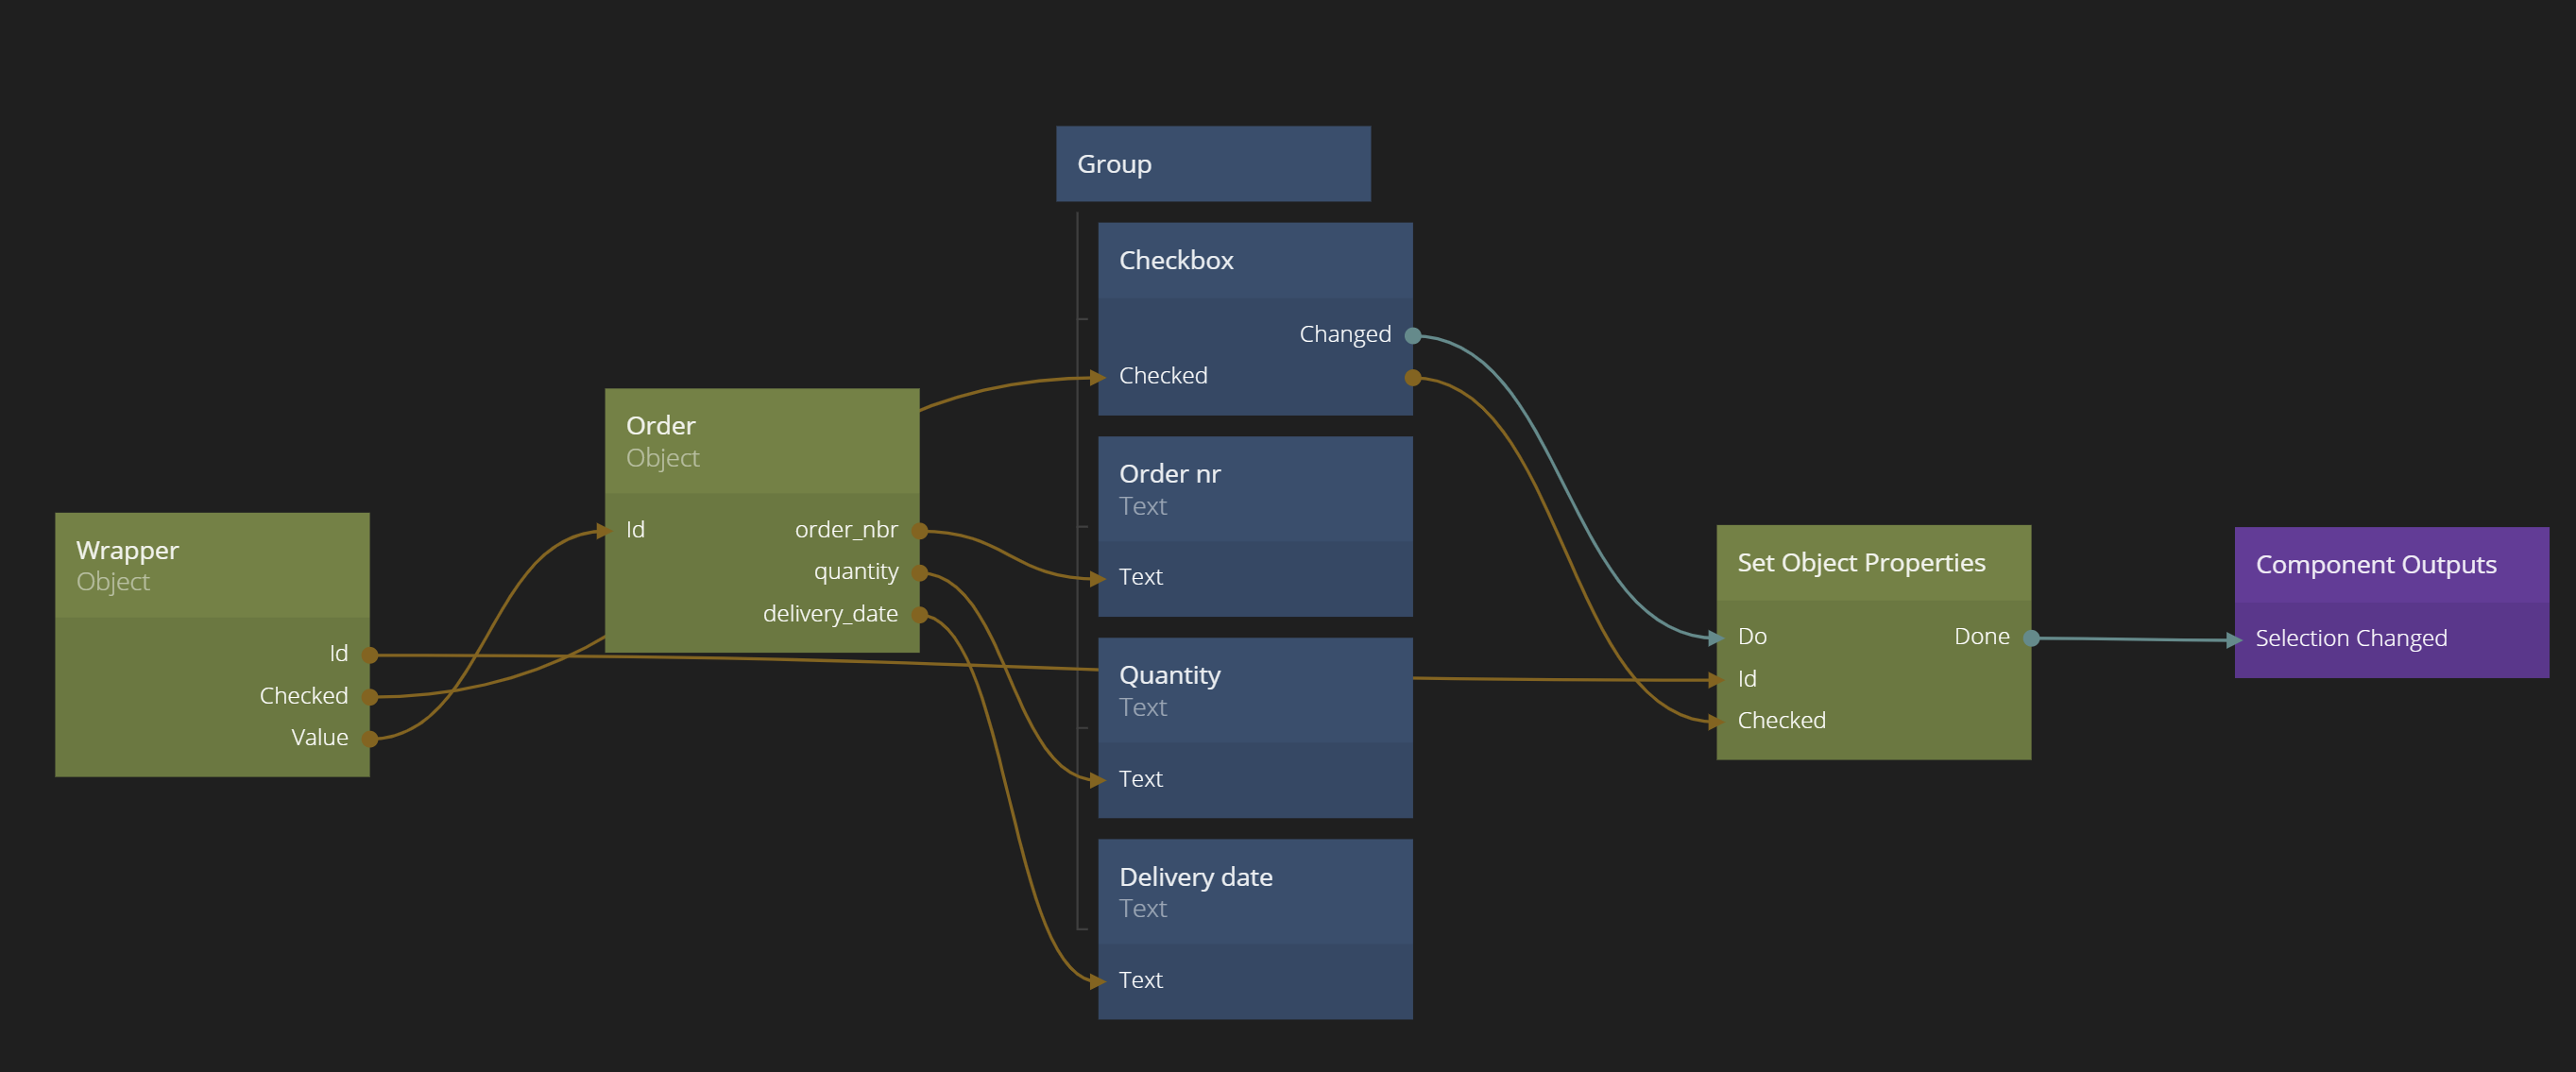
We keep the list item visually simple. A horizontal layout with a Checkbox and three texts. Add some padding and margins to make it a little prettier. If you want, you can copy and paste the nodes into your component.
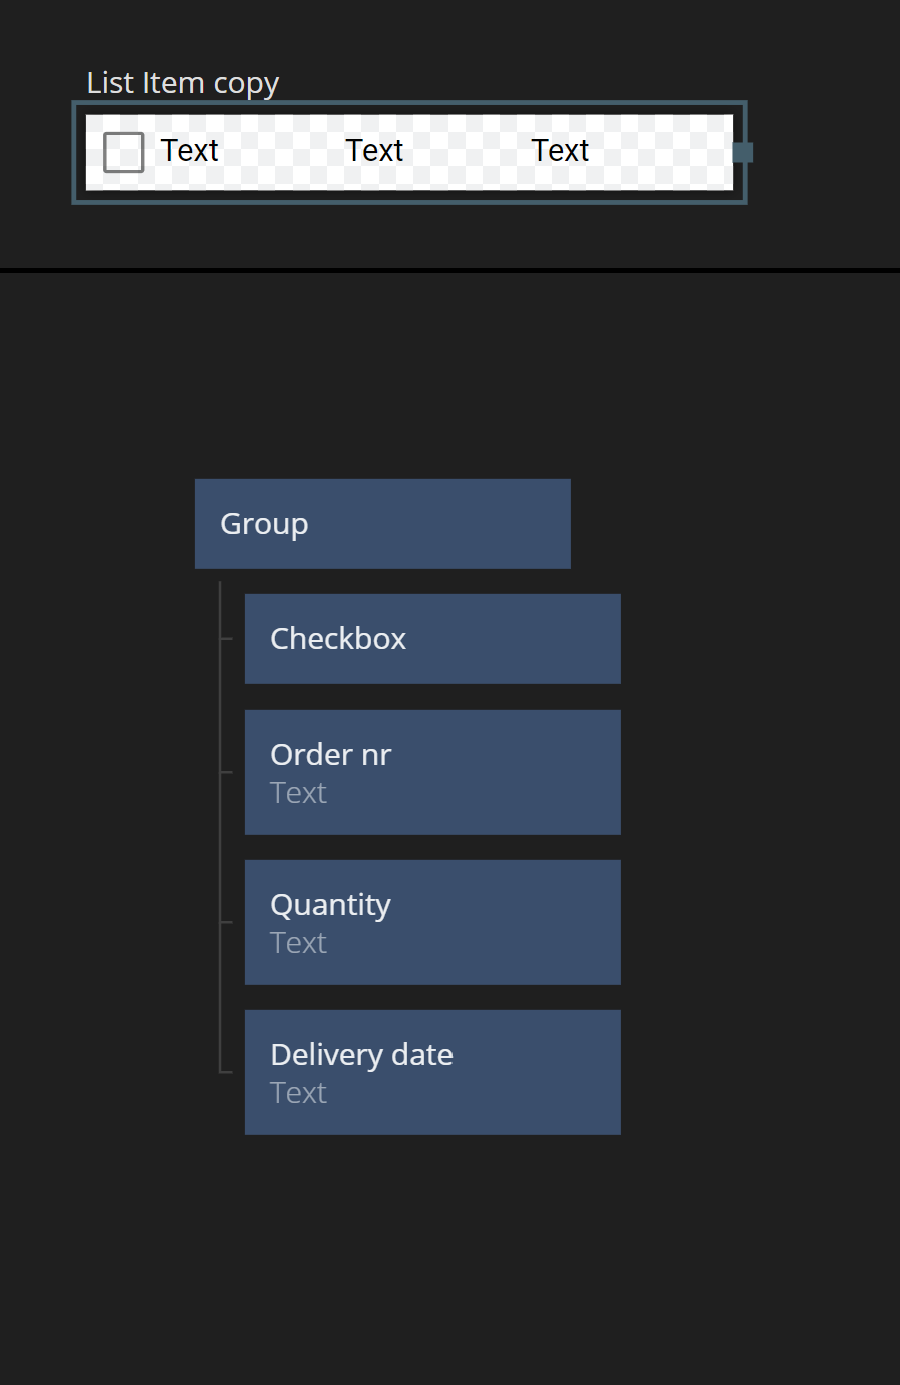
Then we hook up the data. We need to keep two Objects in mind this time. We have the Object providede by the Repeater - the "wrapper", and the actual order. We hook it up like below. We also add a Component Output to we can know if a Checkbox was clicked.
We add in a Repeater node in our Multi Select List component, pick our newly created list item as the item template. Finally we connect the Checkboxes output on our Component Object to the Items input of the repeater. We have a list!
Triggering Signals in a Script
Now it's time that we write the script that will generate our selection list, i.e. an Array that will contain all the items that are currently checked. As you may remember, we decided on this format:
{
    "Value":<id of selected object>
}
We go back into our Multiselect Logic Script node and start by adding in a new function. Call it updateSelection. It will look like below:
function updateSelection () {
    Component.Object.Selection = Component.Object.Checkboxes.filter(o => o.Checked)
    .map(o => Noodl.Object.create({
            id:Component.Object.id+"_"+o.Value,
            Value:o.Value}
    ));
}
Again, we are using our Component Object to store our Array. The Array is generated by walking through the Checkboxes Array and look for checked items. We then make a new Object (or recycling an old one if the id already exists) storing the id of the checked item in Value.
Array outputs used in lists
note
While you can re-use the Array that contains the old items and just modify it, this will not be recognized as a change by the Repeater node (or any other node for that matter) and not automatically trigger it to update. Technically the Array didn't change - only it's contents. That's why it's important that you actually make a new Array and assigning it to the output, rather than modifying the existing one, unless you want to manually trigger Repeaters etc, using the Array to update. Generally the Javascript Array functions (filter, map, find, etc) will return new Arrays which makes them very easy to use in these cases.
We actually need to call updateSelection in our Setter function for Items from before so right after we created the Checkboxes Array, so we immedieately get the Selection Array set up. So we update it like below:
Script.Setters.Items = function (items) {
    if(!Script.Inputs.Items) return
    // Create a lits of all checked items, based on the initial selection array
    Component.Object.Checkboxes = Script.Inputs.Items.map(o => Noodl.Object.create({
        id:Component.Object.id+'-'+o.id,
        Value:o.id,
        Checked:Script.Inputs.InitialSelection!==undefined && !!Script.Inputs.InitialSelection.find(s => s.Value === o.id)
    }))

    updateSelection ();
}
We also need to be able to trigger the updateSelection whenever a user clicks a checkbox, regenerating the list. We can add signals to our scripts by writing Script.Signals.<Signal name>. These signals will become inputs on the Script node that we can trigger. So our signal be named UpdateSelection and will look like this:
Script.Signals.UpdateSelection = function () {
    updateSelection ();
}
We can now connect the outgoing signal Selection Changed from our Repeater (which is triggered from the Checkbox in the list item) to this new signal. We also connect the Selections Array in our Component Object to our Component Output in the Multi Select List.

Try clicking different Checkboxes and you should see the Selection Array change accordingly.
Timing of signals
There is a timing aspect that's important to look into. Our Multi Select List should send out an event whenever the selection changes, together with the new selection array. If we directly connect the Selection Changed signal from the Repeater node to the Component Output we cannot be certain that the Script node has executed once the signal is triggered. It may or may not be the case. So anyone listening to the Selection Changed signal of the Multi Select List that also reads the new selection ( a very likely case) may read the previous Array.
The solution is to chain these events. The Selection Changed event should trigger the UpdateSelection signal on the Script node, then once the new selection Array is generated we need to send a signal from the Script that then will be used as the output signal from the component.
Sending signals from a script
Let's add that signal. Click on the Script node. Then add a new output. Call it SelectionChanged.
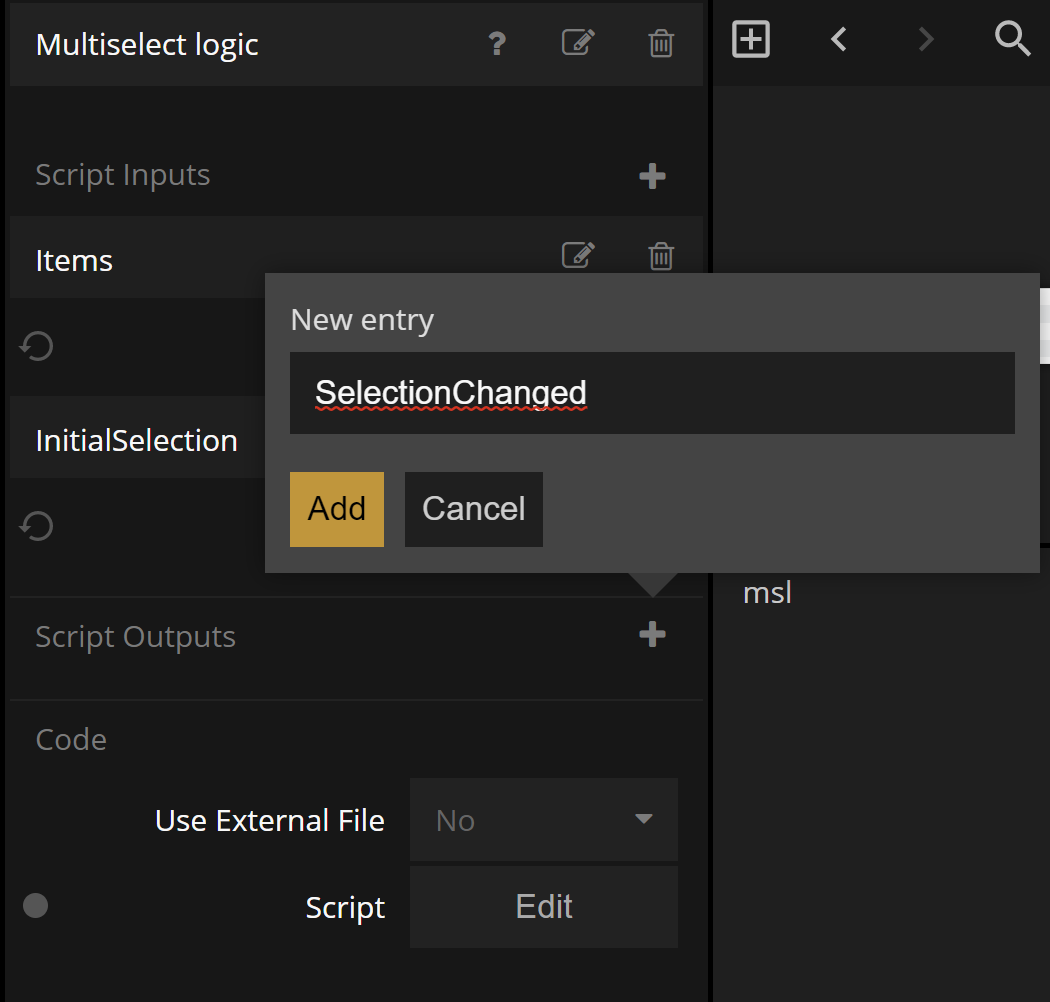
Then make sure it's set up as a Signal.
Now we can send the signal from within our Script by calling it as a function Script.Outputs.<signal name> (). In our case we add it in i our updateSelection function, as below:
Component.Object.Selection = Component.Object.Checkboxes.filter(o => o.Checked)
    .map(o => Noodl.Object.create({
            id:Component.Object.id+"_"+o.Value,
            Value:o.Value}
    ));
    Script.Outputs.SelectionChanged ();
We can now connect our new output SelectionChanged to the Selection Changed input on the Component Outputs.
Finishing off the Multi Select List
The only thing left now is to implement the Select all / Clear selection functionality. This will be very easily done. We add two more incoming signals in our Scrip node, Script.Signals.SelectAll and Script.Signals.DeselectAll.
Adding implementing them in our Script node is easy and the full code now looks like below:
function updateSelection () {
    Component.Object.Selection = Component.Object.Checkboxes.filter(o => o.Checked)
    .map(o => Noodl.Object.create({
            id:Component.Object.id+"_"+o.Value,
            Value:o.Value}
    ));
    Script.Outputs.SelectionChanged ();
}

Script.Setters.Items = function (items) {
    if(!Script.Inputs.Items) return
    // Create a lits of all checked items, based on the initial selection array
    Component.Object.Checkboxes = Script.Inputs.Items.map(o => Noodl.Object.create({
        id:Component.Object.id+'-'+o.id,
        Value:o.id,
        Checked:Script.Inputs.InitialSelection!==undefined && !!Script.Inputs.InitialSelection.find(s => s.Value === o.id)
    }))

    updateSelection ();
}

Script.Signals.UpdateSelection = function () {
    updateSelection ();
}

Script.Signals.SelectAll = function () {
    if(!Component.Object.Checkboxes) return

    Component.Object.Checkboxes.forEach ( o => o.Checked = true);
    updateSelection ();
}

Script.Signals.DeselectAll = function () {
    if(!Component.Object.Checkboxes) return

    Component.Object.Checkboxes.forEach ( o => o.Checked = false);
    updateSelection ();
}
We of course also need to trigger these functions from the Component Inputs ports, Select All and Clear Selection.

We are done with the multi select list. Time to build the multi select operations we want to use it for.
Adding in the multi select operations
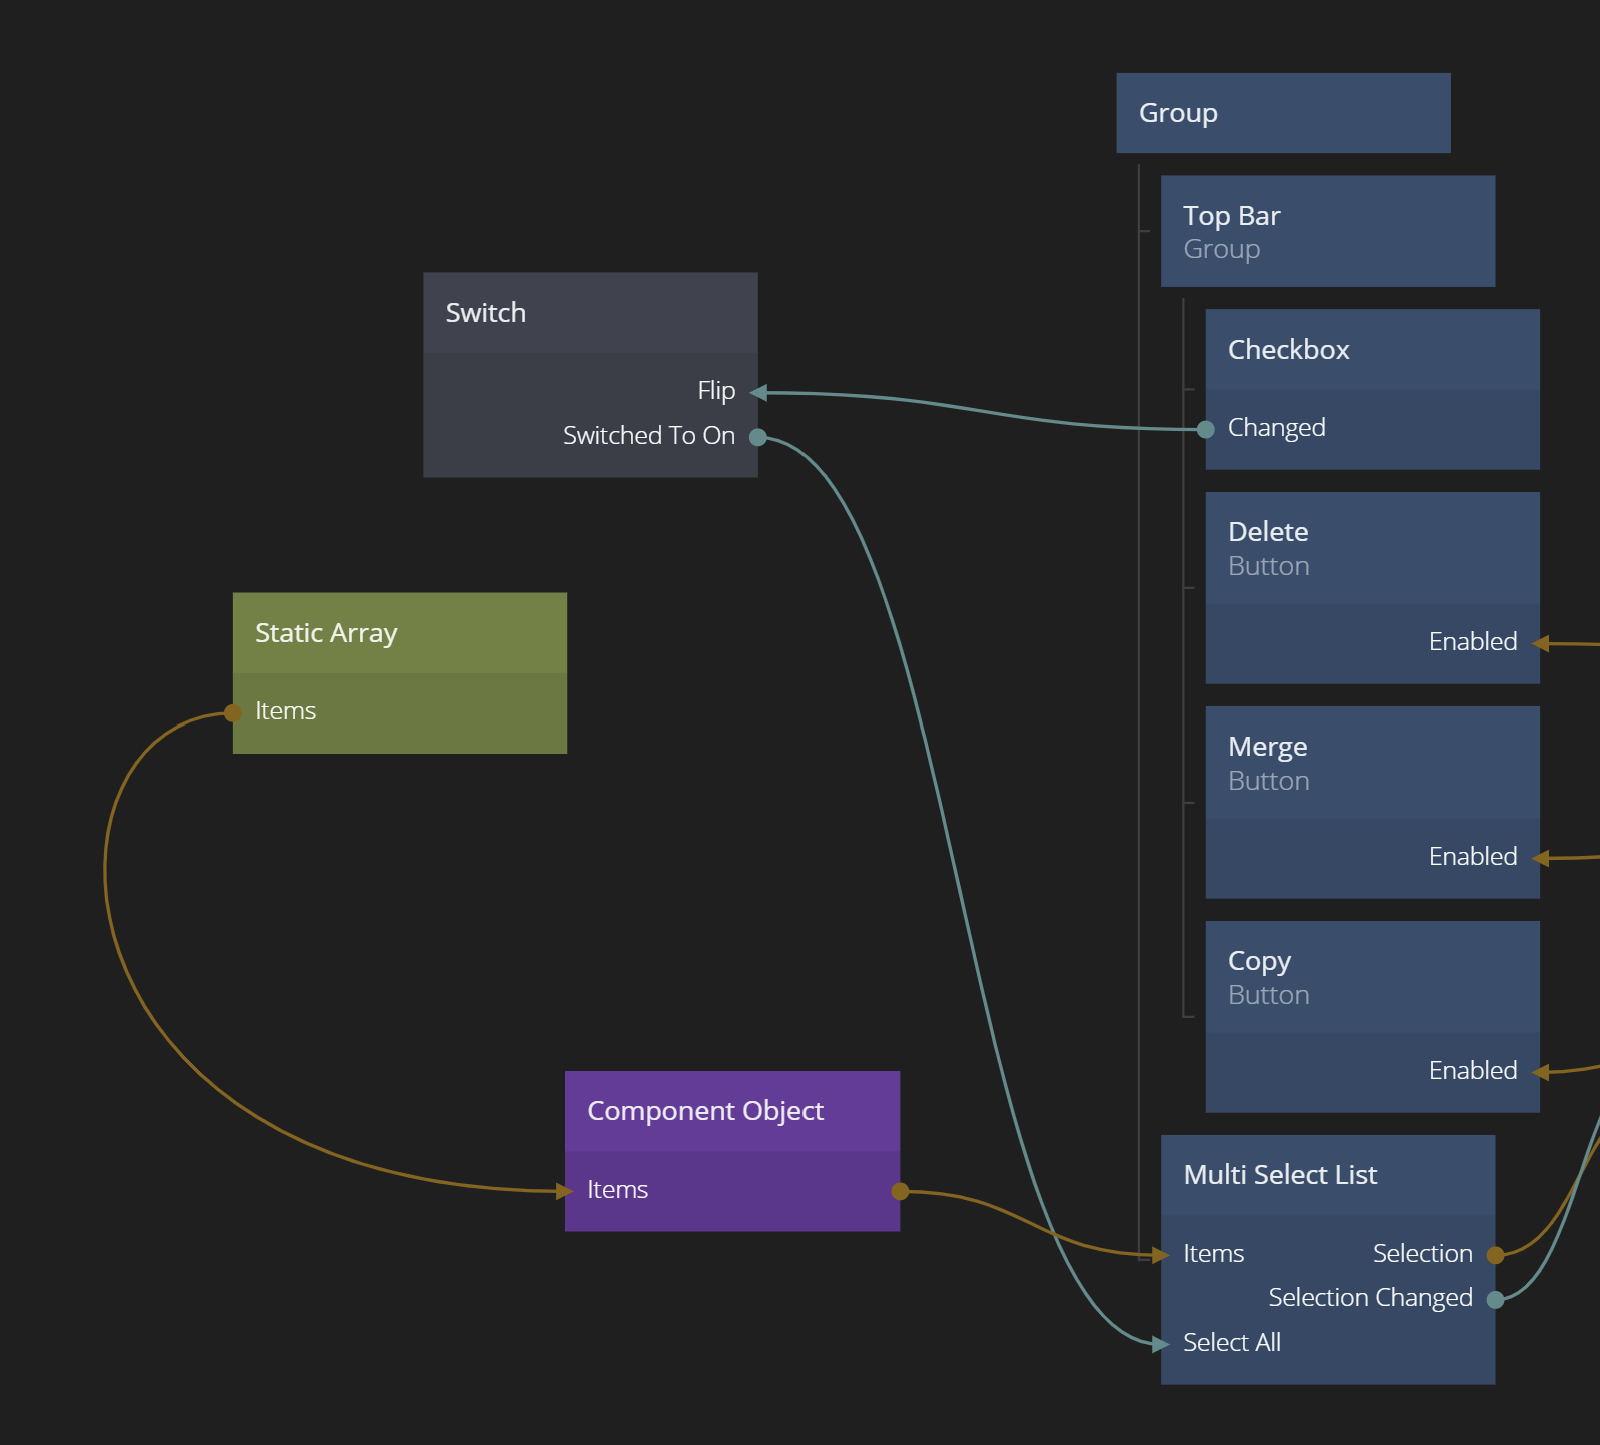
As described in the beginning, we want to implement the operations merge, delete and copy. We also want to be able to select all or clear all selections. So we need to build some UI. We will create a top bar that consist of a Checkbox and three Buttons. We do it as simple as possible. A horizontally laid out Group node with some margins and padding to make it easy to read. You can copy the nodes below if you don't want to build it yourself.
We can now connect the Select and Clear selection logic to our multi select list. We will use a Switch to trigger the two signals we implemented.
We can now test out that our select all / clear selection implementation work as it should in our multi select list.
More Component Objects
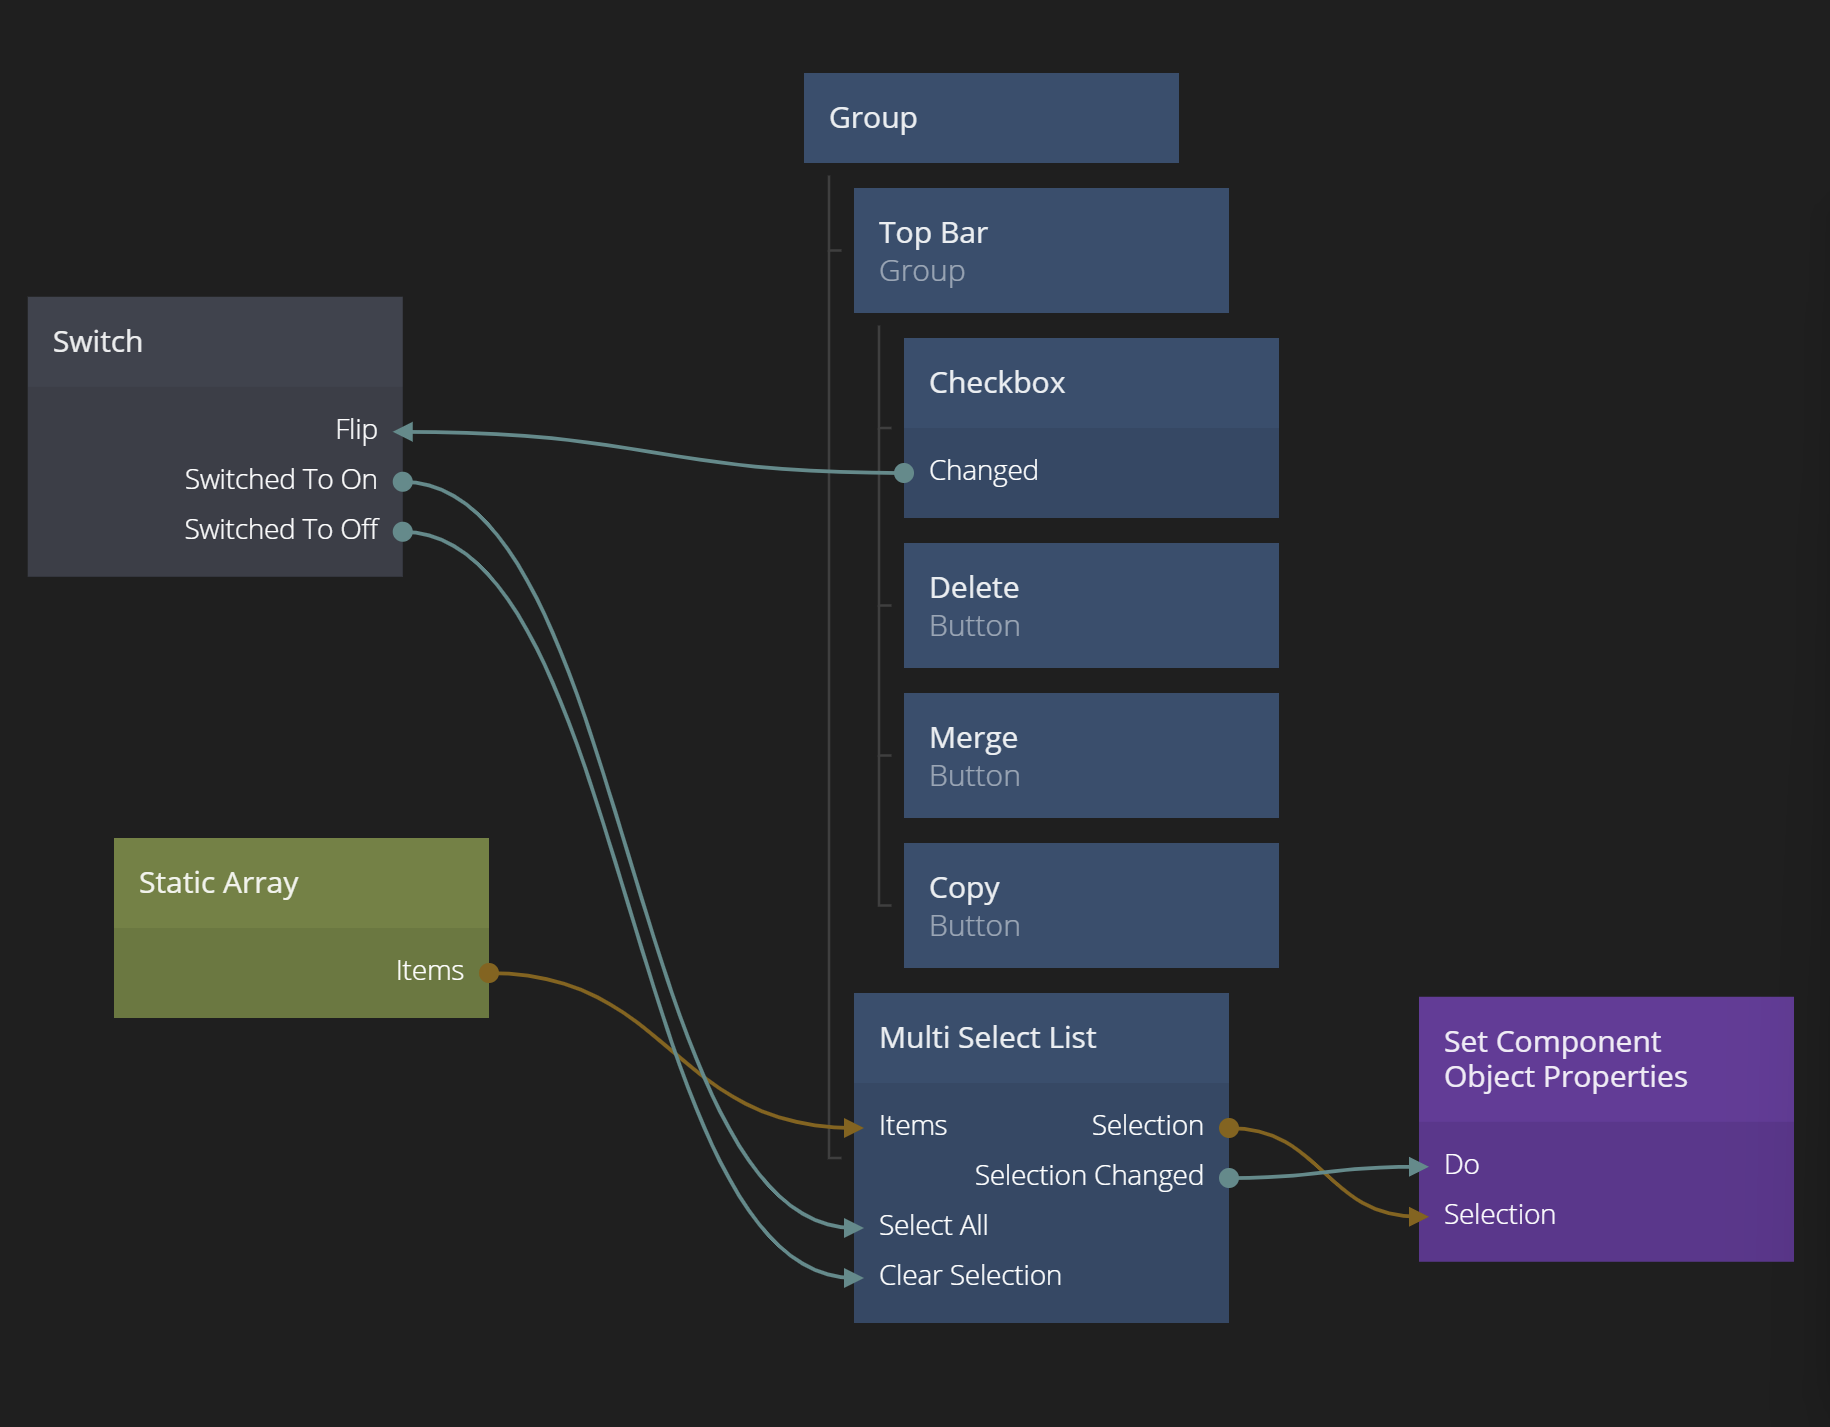
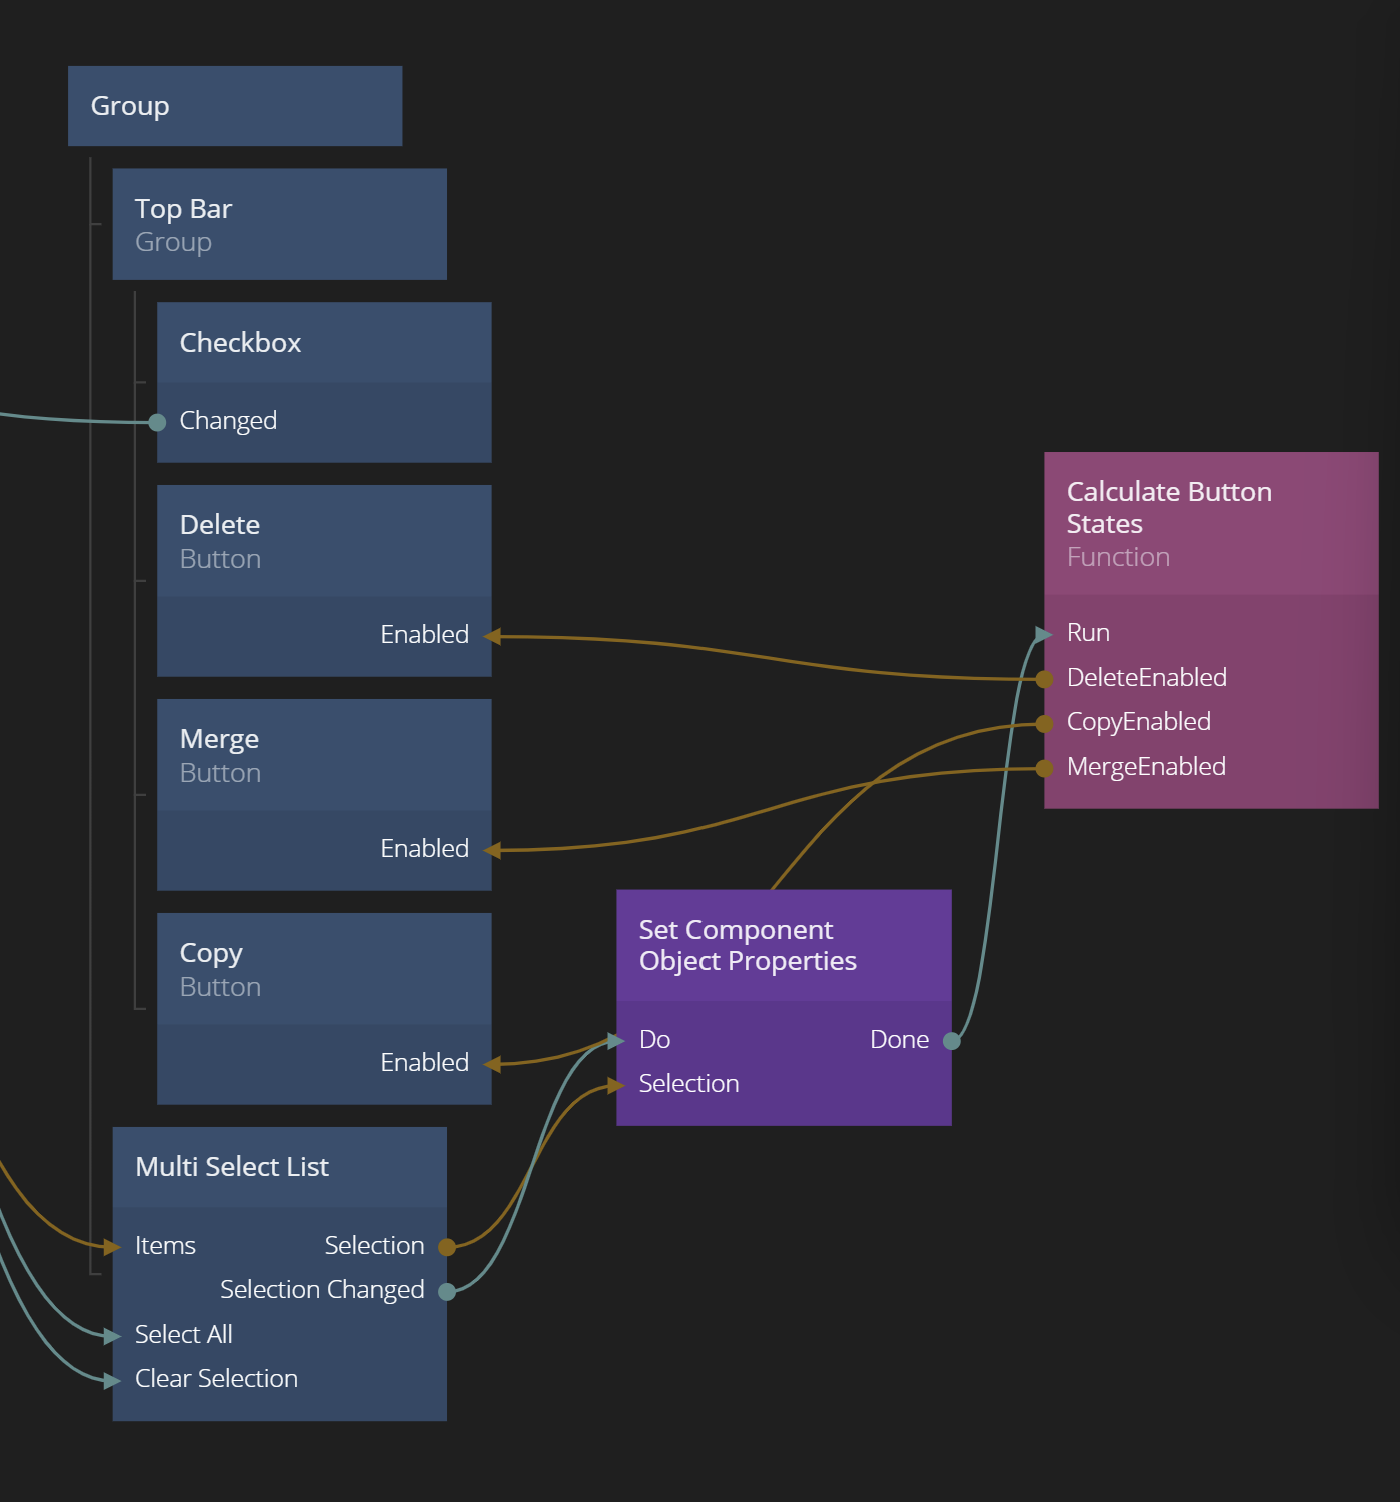
In preparation for our upcoming script to implement the merge / copy / delete operations we need to save the selection state so we can easily access it in our Script. Again we will use a Component Object. For the actual storing operation of the selection we can use the node Set Component Object Properties. Add in the node and add a property Selection. Set it to Array type.
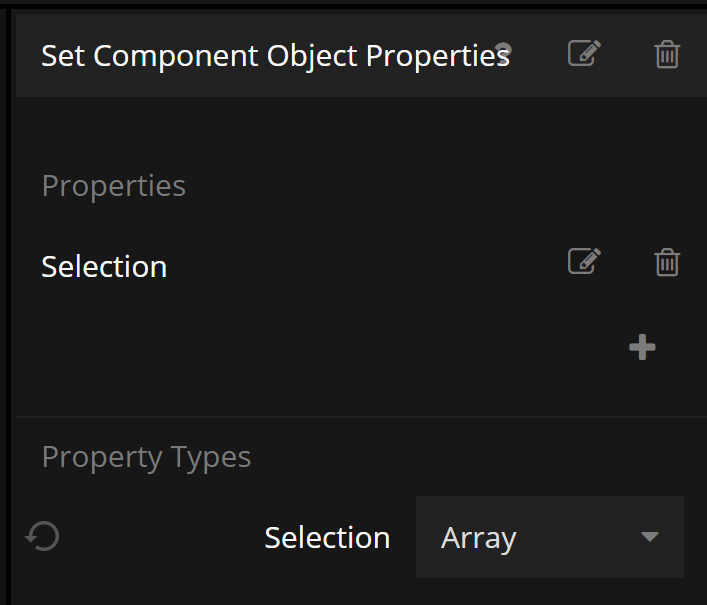
Then connect the outgoing Selection property from the Multi Select List component to the property. We should set it everytime the selection changes, so we also connect Selection Changed to Do.
Using Function node for lightweight scripting
Our Buttons need a bit of business logic on their own. If you have no items selected the items should be disabled. And for the merge operation to make sense you actually need at least two items selected.
If you want to write this in Javascript a Script node is a little heavy - we only are going to have one function. Instead we use the Function node.
So add in a Function node in our main app. Call it Calculate Button States. Also add three outputs called DeleteEnabled, CopyEnabled and MergeEnabled. They should be of Boolean type, because we want to connect them directly to the Enabled property of the Buttons.
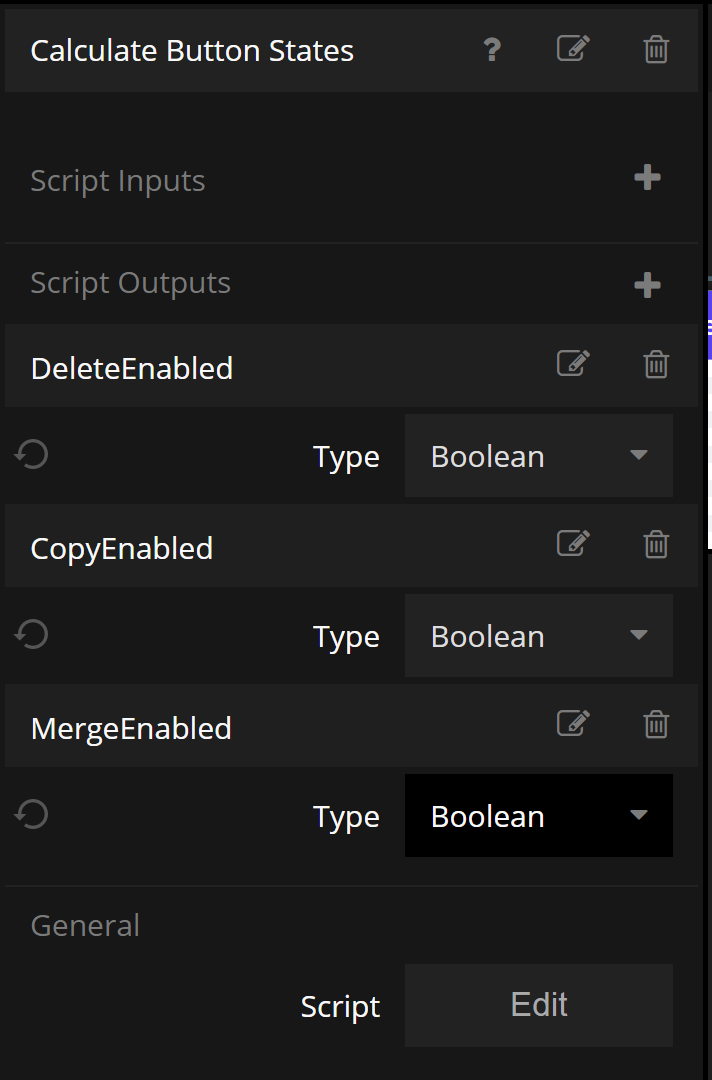
The we open up the Function node and just write the code directly. In a Function node you don't have to write anything but your actual code, i.e. no function declarations etc is necessary.
Our code looks like below:
Outputs.CopyEnabled = Component.Object.Selection !== undefined && Component.Object.Selection.length > 0;
Outputs.DeleteEnabled = Component.Object.Selection !== undefined && Component.Object.Selection.length > 0;
Outputs.MergeEnabled = Component.Object.Selection !== undefined && Component.Object.Selection.length > 1;
As you can see you access the outputs using Outputs.<output name> and inputs (if we had to use one) are accessed through Inputs.<input name>. You can also see that we make use of the Component Object again.
A Function node runs whenever an input changes, unless the Run signal is connected in which case it only runs whtn Run is triggered. In our case, we have no inputs, so we need to trigger Run. To make sure Component.Object.Selection is valid and set when we trigger it, we connect the outgoing Done from Set Component Object Properties to Run. We also hook up the outputs from the Function node to the Buttons.
Try out the logic and make sure the Buttons gets enabled/disabled as they should.
Implementing the list operations
We are almost done. We just need to implement the actual operations in a Script node. Before that we need to think a little bit about how we treat the Array that holds the items of the list. Currently we take the items directly from our Static Array. This will not work once we start modifying them, we need to store the Array somewhere where the Script can retrieve it, and then update to a new Array once a copy / delete / merge occurs.
Component Object to the rescue! Create a Component Object node and add a property Items. Then connect the Items from the Static Array to it. Also connect from the Component Object to the Mult Select List component.
We are now ready to write our list operation scripts. Add a new Script node. We implement our three functions below:
/* Returns a new array only continain the items that's selected */
function getSelectedItems () {
    if (Component.Object.Selection === undefined) {
        // if there is no selection, return an empty array
        return [];
    }
    else {
        return Component.Object.Selection.map ( (o) => Noodl.Object.get (o.Value));
    }
}


/* returns a new array containing all items
except the ones that's selected */

function removeSelectedItems () {

    return Component.Object.Items.filter ( (o) => {
        // check if this item is in the selected list
        if (Component.Object.Selection === undefined) {
            // if there is no selection, the items should be kept in the list
            return true;
        }
        else {
            // check if this item is in the selected list. If it isn't return true (i.e. keep the item)
            return Component.Object.Selection.find (p => (p.Value === o.id)) === undefined;
        }
    });
}

/*
Merge all selected items into one item.
Use the item with the latest date as the new item
delete the other items. */

Script.Signals.Merge = function () {
    if (Component.Object.Items !== undefined && Component.Object.Selection !== undefined) {
        // start with looking at the items that's selected
        let itemsToMerge = getSelectedItems();
        // sort them by latest date
        let sortedItems = itemsToMerge.sort ( (o,p) => {
                return new Date (p.delivery_date) - new Date (o.delivery_date);
            });
        // the first item in the sorted list is the one we want to keep
        let itemToKeep = sortedItems[0];

        // calculate the sum of all quantities in the items to merge
        let sumOfQuantities = sortedItems.reduce ( (total , o) => total + o.quantity, 0);
        // and store in the item we want to keep
        itemToKeep.quantity = sumOfQuantities;
        // remove all items that's selected
        let itemsToKeep = removeSelectedItems ();
        // Add back the item to keep
        itemsToKeep.push (itemToKeep);
        // this is our new items!
        Component.Object.Items = itemsToKeep;
    }

}

Script.Signals.Copy = function () {
    if (Component.Object.Items !== undefined && Component.Object.Selection !== undefined) {
        let selectedItems = getSelectedItems ();
        // Get all selected items
        // For each item in the selection, create a new object and copy the values
        // Add a "-2" to the order_nbr
        let copiedItems = selectedItems.map ( (o) => {
            return Noodl.Object.create ({
            order_nbr: o.order_nbr+"-2",
            quantity: o.quantity,
            delivery_date: o.delivery_date
            });
        });
        Component.Object.Items = Component.Object.Items.concat (copiedItems);
    }
}

Script.Signals.Delete = function () {
     if (Component.Object.Items !== undefined && Component.Object.Selection !== undefined) {
          Component.Object.Items = removeSelectedItems ();
     }
}
Paste the code into the Script node. Again note that Component.Object.Items is always replaced with a new Array - we never modify the old one. This is to ensure that the multi select list understand that it needs to update.
Finally we connect our Buttons to the respective list operation and we are done!
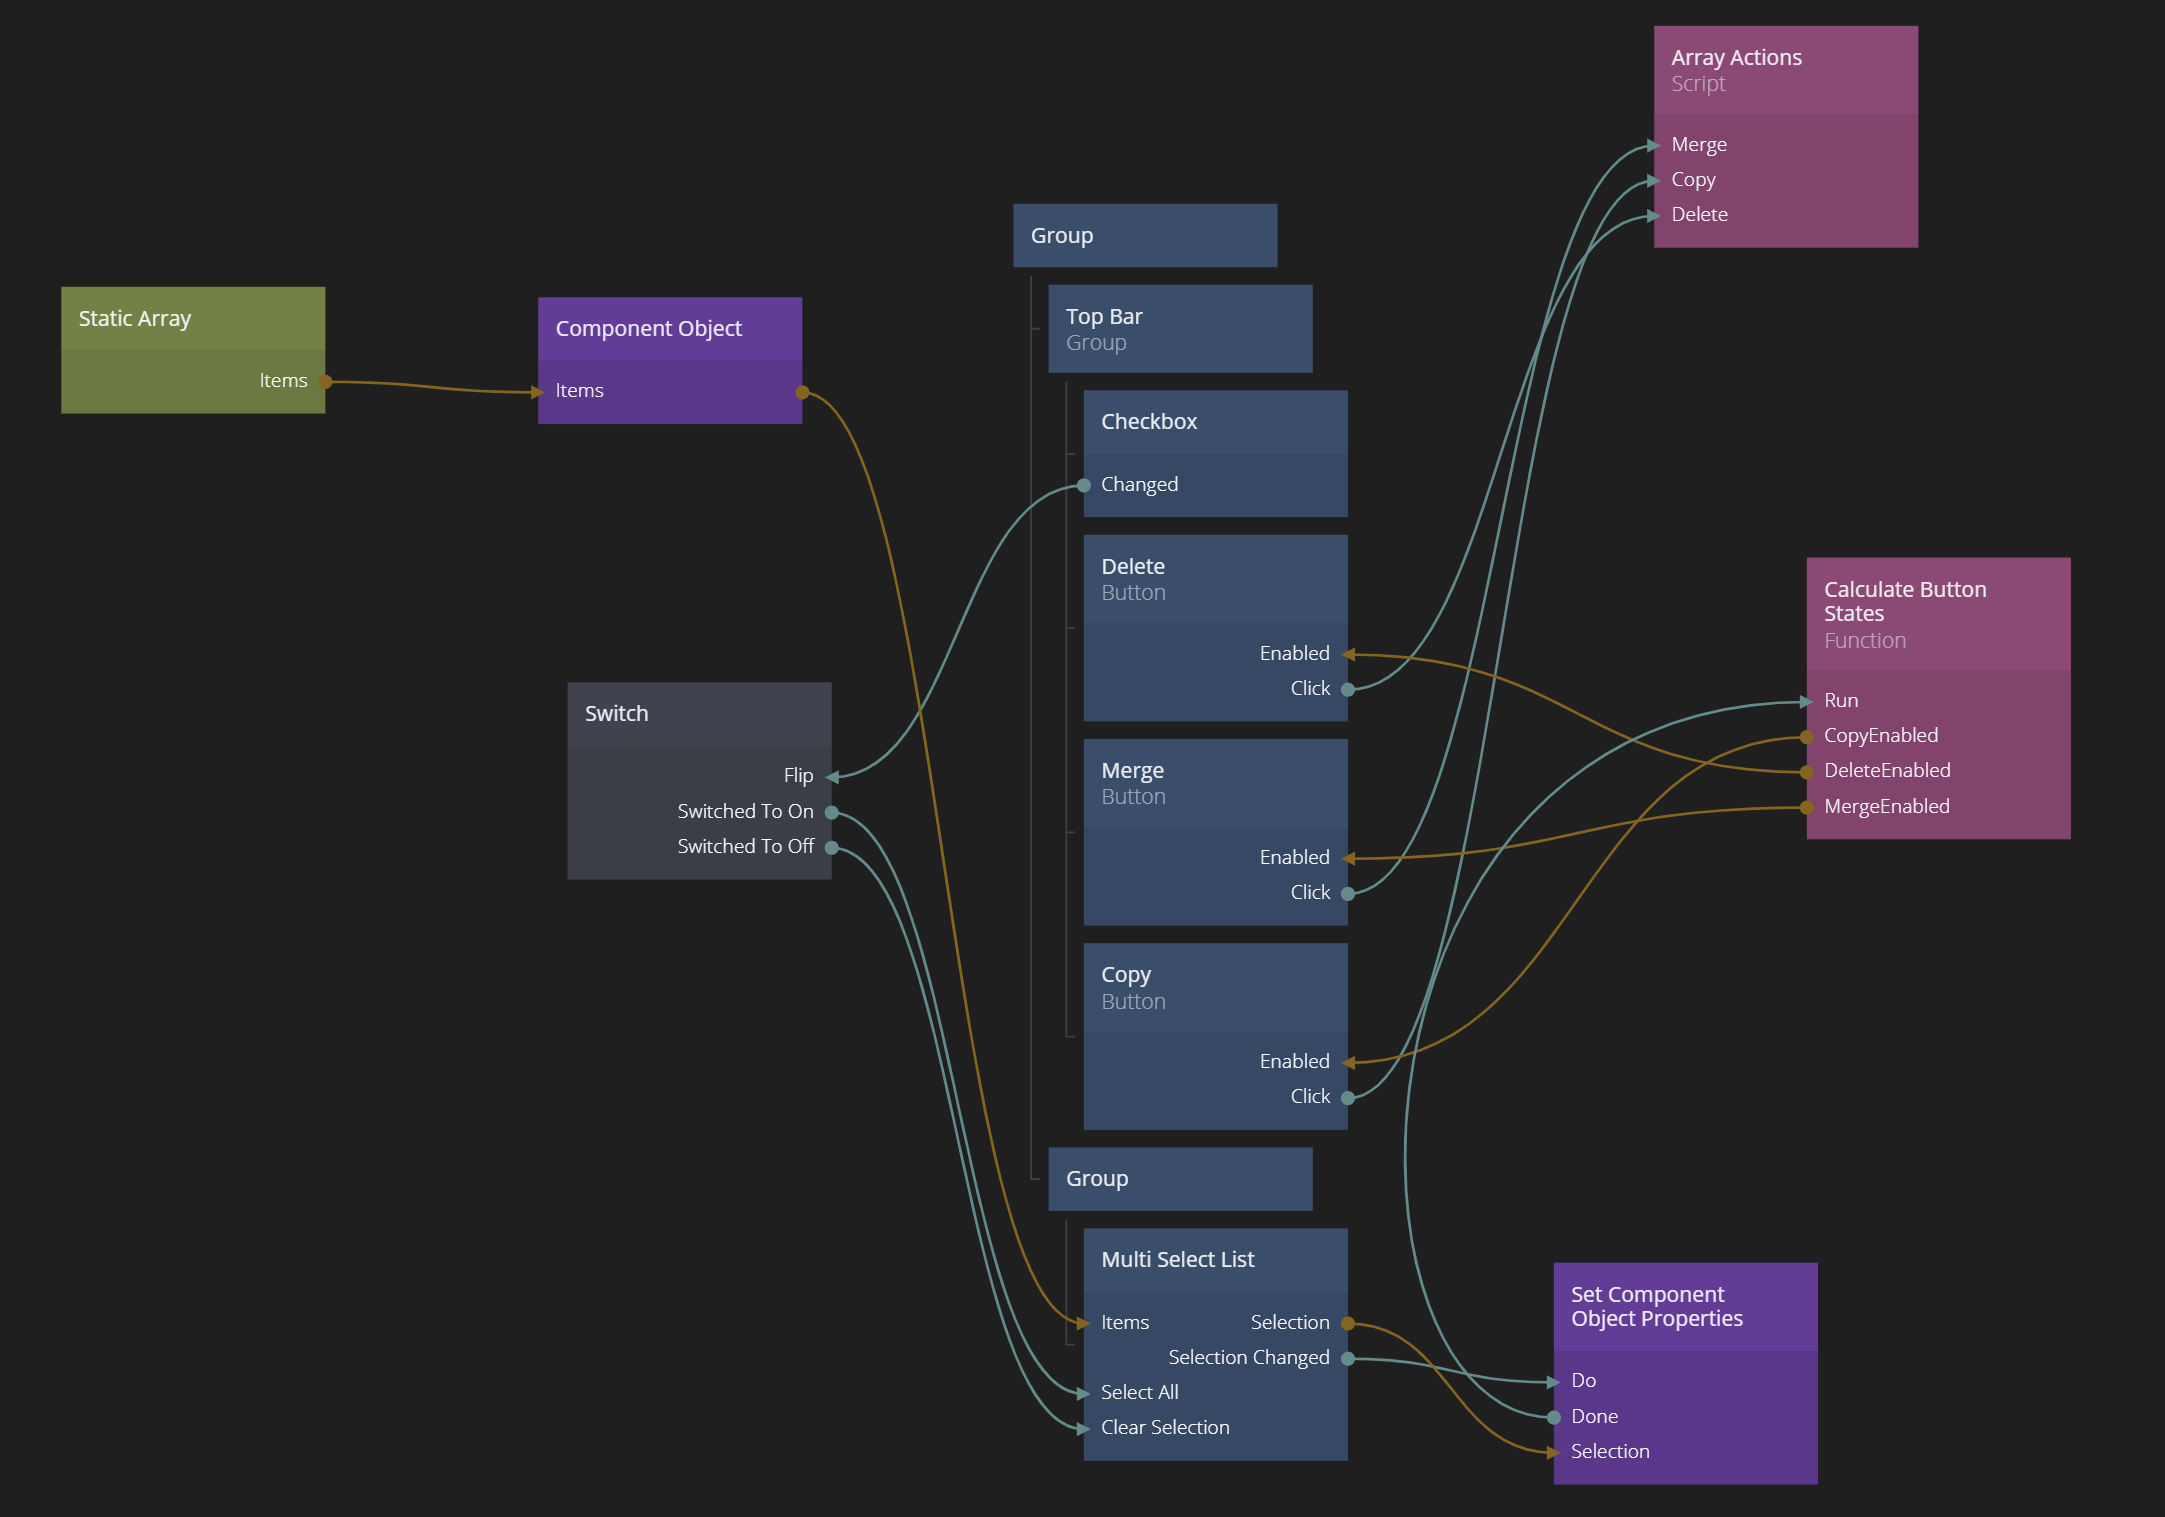
You can import the full project below.