Javascript in Noodl

What you will learn in this guide
This guide will introduce you to how to use Javascript in Noodl. While almost everything can be achieved in Noodl using Nodes, if you know your way around Javascript it's sometimes just more convenient to add in Javascript code directly. Noodl make the mix of nodes and code very easy using the Function and Script nodes.
Overview
The guide will first go through the Function node, which is excellent for simple, single function, Javascript code. Then it will show a more extensive Javascript example using the Script node. The two nodes can also be seen used combined in the Business Logic using Javascript Guide
Using the Function node
The easiest way to write Javascript in Noodl is using the Function node. There is literally no overhead at all - you just open the code editor and write code! Let's try it!
Create a new project using the "Hello World" template. Add in two Text Input nodes before the text node. Give them the labels "First String" and "Second String". Then add in a Function node. Call the function node "Merge Strings".
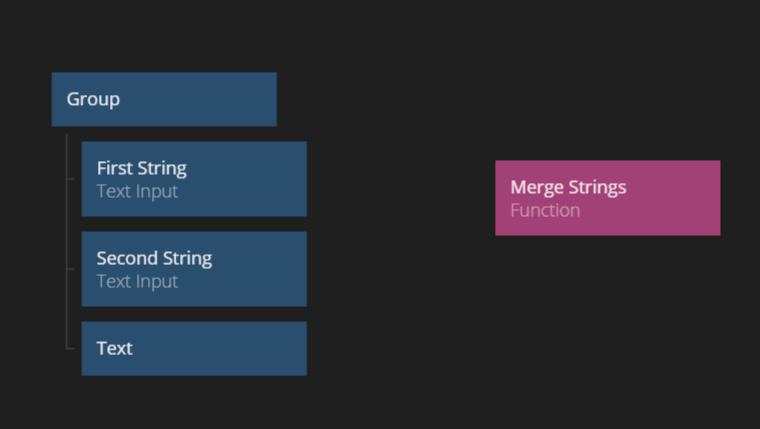
Now click the Function node and edit the script. Paste in the Javascript below:
if (Inputs.String1 !== undefined && Inputs.String2 !== undefined) {
  let length = Math.max(Inputs.String1.length, Inputs.String2.length);
  let outputString = "";
  for (let i = 0; i < length; i++) {
    if (i < Inputs.String1.length) {
      outputString = outputString + Inputs.String1.charAt(i);
    }
    if (i < Inputs.String2.length) {
      outputString = outputString + Inputs.String2.charAt(i);
    }
  }
  Outputs.MergedString = outputString;
}
Inputs and Outputs in the Function node
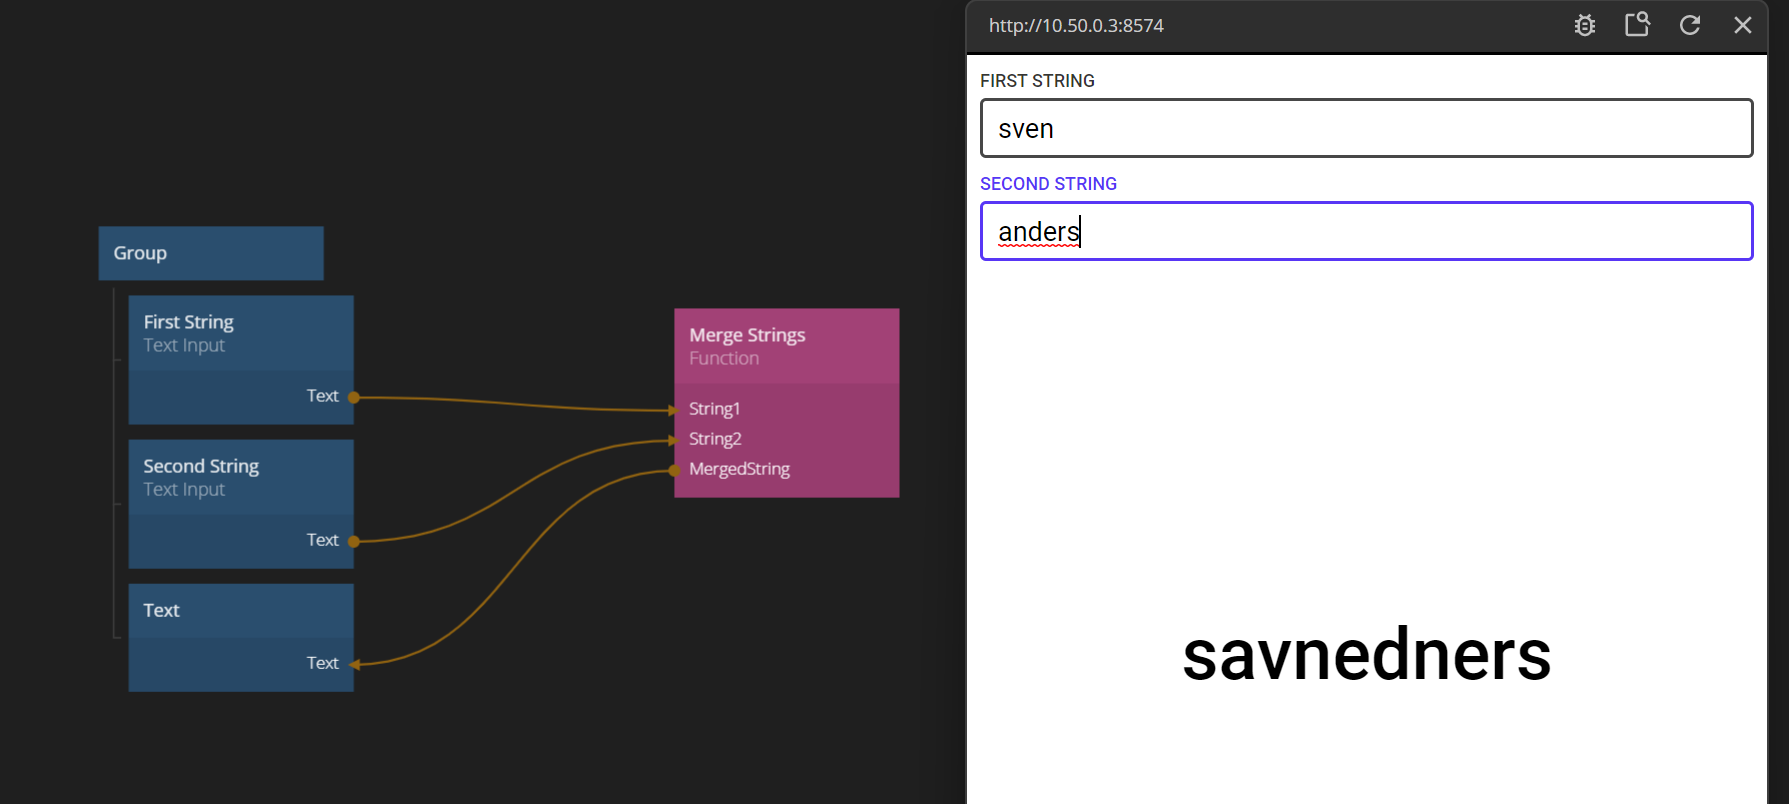
This little function merges two strings called String1 and String2.
They are declared as Inputs.String1 and Inputs.String2 and will become inputs on the Function node.
You can also declare inputs manually on the function node - if you click it you will see that you can add inputs and outputs.
By adding them manually you can be a bit more precise on which type an input is,
but generally is not needed. One reason to explicitly state type of input is for example when you connect a Function node to a Component Inputs.
By knowing the type Noodl can present the right control in the property of the Component.
There is also an output defined in the code, Outputs.MergedString.
We can now connect the Function node.
Connect the Text property from the Text Inputs to String1 and String2 and connect the output MergedString to the Text.
Now if you start writing in the Text Fields you will see the two strings merged on the screen.
Running the Function node on change or on a signal
There are two ways to make the Function run.
- If Run signal is not connected, the Function will run as soon as any of its inputs are changed. This is the case with our current example.
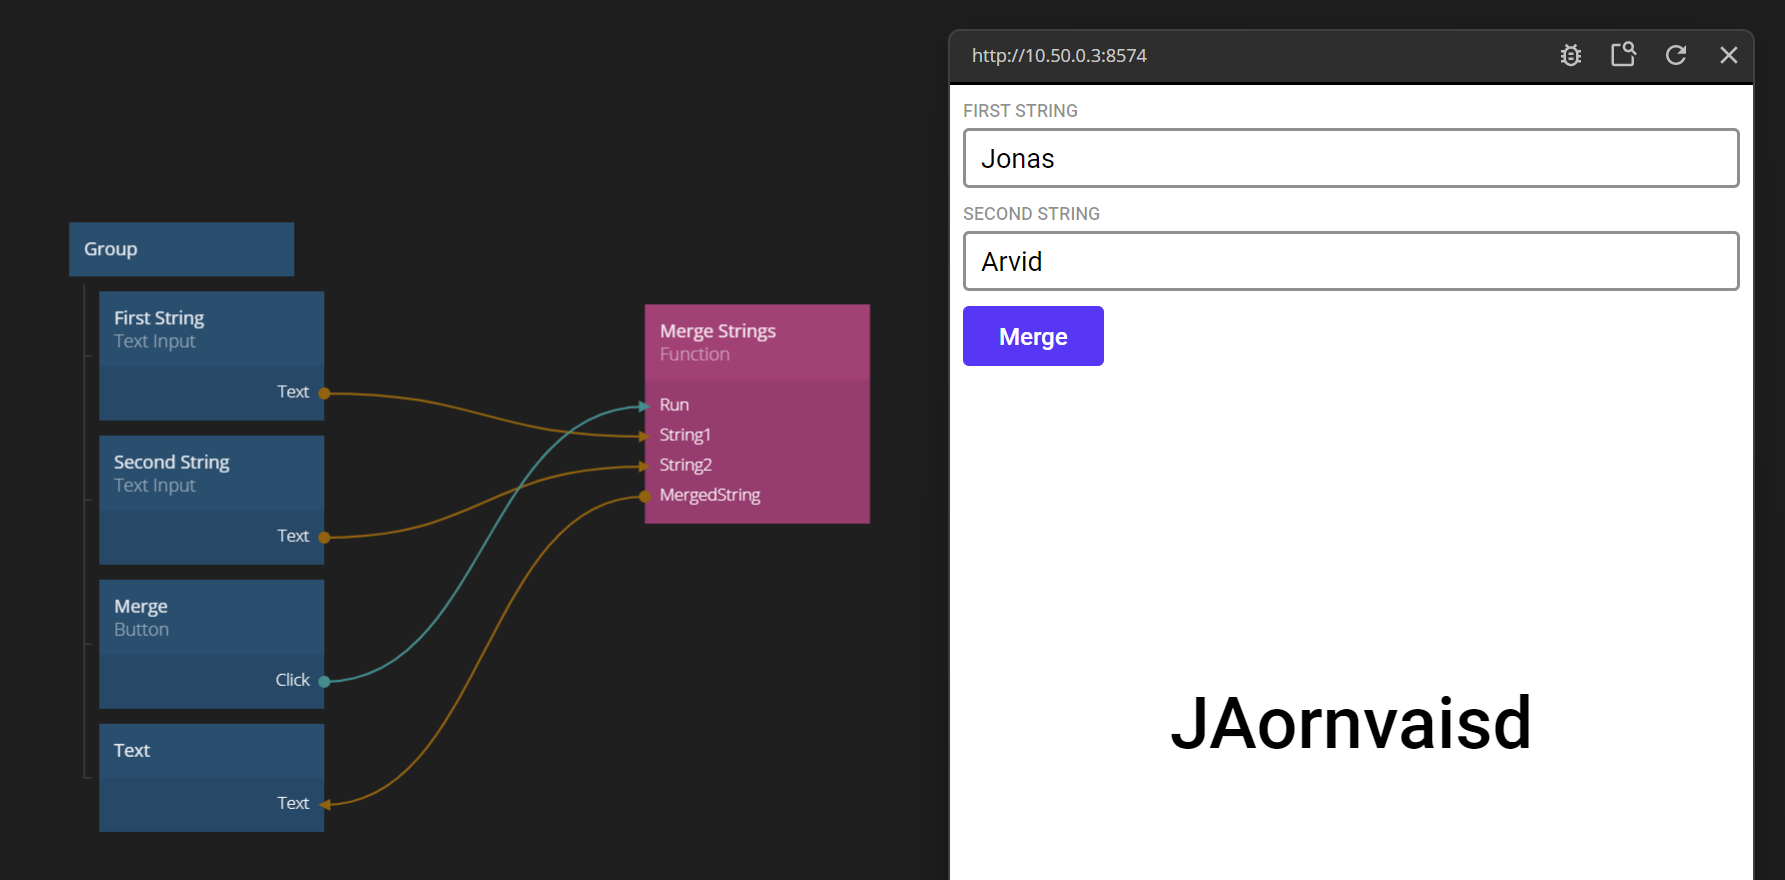
- If Run signal is connected, the Function will only run when triggered.
Let's try to change to number two. We only want to merge the string once the user clicks a button. So add a Button after the Text Inputs. Give it the label Merge. Then connect Click to Run on the function.
Sending Signals on Outputs
A Function node can also send signals. This is very useful for many scenarions, for example to trigger something that should happen once the Function is executed. For example, if we would want to store our merged string, we would want to trigger a Set Variable node. Let's add in the signal, once the merging is done:
Now click the Function node and edit the script. Paste in the Javascript below:
if (Inputs.String1 !== undefined && Inputs.String2 !== undefined) {
  let length = Math.max(Inputs.String1.length, Inputs.String2.length);
  let outputString = "";
  for (let i = 0; i < length; i++) {
    if (i < Inputs.String1.length) {
      outputString = outputString + Inputs.String1.charAt(i);
    }
    if (i < Inputs.String2.length) {
      outputString = outputString + Inputs.String2.charAt(i);
    }
  }
  Outputs.MergedString = outputString;
  Outputs.Done();
}
Note the additional line Outputs.Done(). That's all you need to send a signal.
So add in a Set Variable node and save the value in an Variable called Merged String.
You might think that connecting directly from the Button to the Do action on the Set Variable might have worked, but it actually doesn't.
You cannot know if the Function node have executed so the Do signal may trigger at the wrong time.
Instead explicitly triggering Done once you've set the output to the correct value takes care of this.
Another common way of using outgoing signals could be to trigger two different paths going forward.
Perhaps the Function validates a data value and triggers a Valid signal if the value is ok,
that saves then triggers a database save, while a Invalid signal would open an error popup.
Now let's look at the more powerful Script node.
JavaScript using the Script node
This part of the guide will cover the functionality of the Script node.
The Script node is a great way to implement logic and calculations that are easier to express in code than in nodes and connections.
It's also a great way to get access to useful JavaScript APIs in the browser, for example Date for date functionality or Math for advanced math-functionality.
The Script node is a bit more powerful than the Function node that also can be used to write JavaScript. The Script node can have multiple methods and functions, as well as a well defined lifespan with callbacks when the node is created and destroyed. For simpler JavaScript for processing inputs, usually the Function node is a simpler choice as you have seen above.
A Script node works as any other node in Noodl, in the sense that it has inputs and outputs that can be connected to other nodes. All inputs and outputs are available to the developer in their JavaScript code. In a Script node you can call any JavaScript function normally available in a browser environment.
The Script source file
You can either edit the JavaScript code directly in the built-in editor in Noodl or you can use an external file with an external editor. While it's easy to write code snippets in the inline editor, the external file option might be better if you are working on larger files or even multiple files and modules.
An external file needs to be located in your project folder for Noodl to find it. You can copy a file to your project folder by dragging the file onto the Noodl window.

The source code provided for the Script is executed as soon as the node is created. In order to specify inputs, outputs and receive and send signals from the node the Node object must be used.
Inputs and outputs
There are a number of ways to specify the inputs and outputs of the Script node. One way is to use the property panel and explicitly add them there. You can also provide the type.
Another way is to specify them programmatically in the source code. The inputs are defined in the Script.Inputs object. Each input also specifies what type it is. The available types are:
numberstringbooleancolorobjectarray. This is for Noodl Arrays, not JavaScript arrays.reference. A reference to a Noodl node, accessible through the This output of visual nodes.cloudfile
Note that there is no signal type for inputs, as the signals are handled by using the Script.Signals object (more on that later).
The outputs work in the same way as the inputs except that there's one more type you can use: signal. The signal type is used for triggering a pulse on an output rather than outputting a specific value. Below we have added outputs to a Script node.
Since the inputs and outputs are members of an object, they should be separated by a comma. Below is an example of a Script node with two inputs and one output.
Script.Inputs = {
  RangeLow: "number",
  RangeHigh: "number",
};

Script.Outputs = {
  RandomNumber: "number",
};
Lets use the two inputs RangeLow and RangeHigh to generate a random number on the RandomNumber output. To execute the code, we will introduce a signal, Generate.
Input signals
Input signals are mapped to functions in the Script.Signals object in the JavaScript node. A signal function is called when the signal with the same name is triggered. Here's the implementation of the Generate signal. You can copy this code and add it to the Script source code.
Script.Signals.Generate = function () {
  let randomNumber =
    Math.random() * (Script.Inputs.RangeHigh - Script.Inputs.RangeLow) +
    Script.Inputs.RangeLow;
  Script.Outputs.RandomNumber = randomNumber;
};
Let's connect the the inputs, outputs and signals to some nodes.
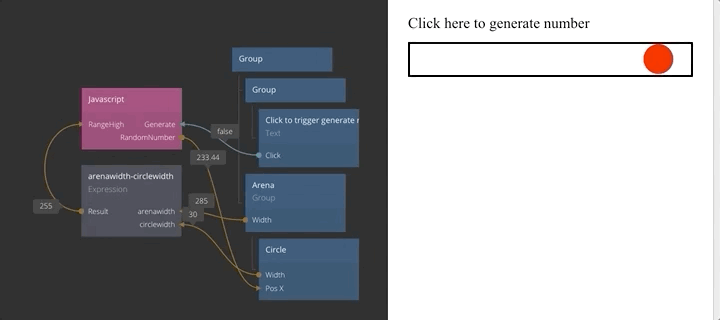
Reading inputs and setting outputs
You can read the inputs directly through the members of the Script.Inputs object, typically Script.Inputs.AnInput.
There are two ways to set the outputs. Set the value by setting the appropriate property of the Script.Outputs object:
Script.Outputs.RandomNumber = randomNumber;
Set many outputs at the same time using the Script.setOutputs function:
Script.setOutputs({
  One: 1,
  Two: 2,
});
This is useful when you have an object that contains multiple values you want to send at once.
Finally if you want to send a signal on an output you need to use the output as a function, calling it when you want to send the signal.
Script.Outputs.MySignalOutput();
Now let's add a bit more code to our JavaScript example. Instead of the Generate signal we will implement Start and Stop signals and have the JavaScript node generate new numbers continuously. We will start a timer in Start that will trigger after a random time, influenced by the Lambda input. The higher the Lambda the shorter the time and the higher the rate of generated numbers.
?> See the Poisson process for the math behind generating a random number using a Poisson distribution.
When the timer is triggered, a random number is generated based on the ranges provided to the node. Finally a signal to notify that a new number has been generated is sent and the timer is restarted with a new timeout.
When the Stop signal is triggered the timer is stopped.
Here's the code that generates the random numbers with a Poisson distributed time in between them.
Script.Inputs = {
  Lambda: "number",
  RangeLow: "number",
  RangeHigh: "number",
};

Script.Outputs = {
  Trigger: "signal",
  RandomNumber: "number",
};

var timer;

function generateRandNum(rangeLow, rangeHigh) {
  return Math.random() * (rangeHigh - rangeLow) + rangeLow;
}

function calculateIntervalMs(lambda) {
  let interval = -Math.log(1.0 - Math.random()) / lambda;
  // translate from seconds to milliseconds
  return interval * 1000;
}

Script.Signals.Start = function () {
  console.log("Start");
  let timeOutFunction = () => {
    // generate the random number
    let randNum = generateRandNum(
      Script.Inputs.RangeLow,
      Script.Inputs.RangeHigh
    );
    // set it on the output "RandomNumber"
    Script.setOutputs({ RandomNumber: randNum });
    // Trigger the signal "Trigger"
    Script.Outputs.Trigger();
    // restart the timer at a new interval
    timer = setTimeout(
      timeOutFunction,
      calculateIntervalMs(Script.Inputs.Lambda)
    );
  };

  // start the first timer
  let interval = calculateIntervalMs(Script.Inputs.Lambda);

  timer = setTimeout(timeOutFunction, interval);
};

Script.Signals.Stop = function () {
  clearTimeout(timer);
  timer = undefined;
};
Changed inputs
You can run code whenever an input is changed. In this particular case, when the Lambda input of the random number generator is changed, the timer interval should be updated to avoid waiting for the next timer to time out for the change to take effect. To handle a case like this, a function with the same name as the input, Lambda, is added in the Script.Setters object. An additional state variable, started, is added to make sure that changing the value when the timer is stopped won't cause it to start.
var started = false;
Script.Setters.Lambda = function (value) {
  if (started === true) {
    clearTimeout(timer);
    startTimer();
  }
};
The final code
After some small refactoring the final code looks as below:
Script.Inputs = {
  Lambda: "number",
  RangeLow: "number",
  RangeHigh: "number",
};

Script.Outputs = {
  Trigger: "signal",
  RandomNumber: "number",
};

var timer;
var started = false;

function generateRandNum(rangeLow, rangeHigh) {
  return Math.random() * (rangeHigh - rangeLow) + rangeLow;
}

function calculateIntervalMs(lambda) {
  let interval = -Math.log(1.0 - Math.random()) / lambda;
  // translate from seconds to milliseconds
  return interval * 1000;
}

function startTimer() {
  let timeOutFunction = () => {
    // generate the random number
    let randNum = generateRandNum(
      Script.Inputs.RangeLow,
      Script.Inputs.RangeHigh
    );
    // set it on the output "RandomNumber"
    Script.setOutputs({ RandomNumber: randNum });
    // Trigger the signal "Trigger"
    Script.Outputs.Trigger();
    // restart the timer at a new interval
    timer = setTimeout(
      timeOutFunction,
      calculateIntervalMs(Script.Inputs.Lambda)
    );
  };

  // start the first timer
  let interval = calculateIntervalMs(Script.Inputs.Lambda);

  timer = setTimeout(timeOutFunction, interval);
}

Script.Signals = {
  Start() {
    started = true;
    startTimer();
  },
  Stop() {
    clearTimeout(timer);
    started = false;
  },
};

Script.Setters.Lambda = function (value) {
  if (started === true) {
    clearTimeout(timer);
    startTimer();
  }
};
Using script nodes
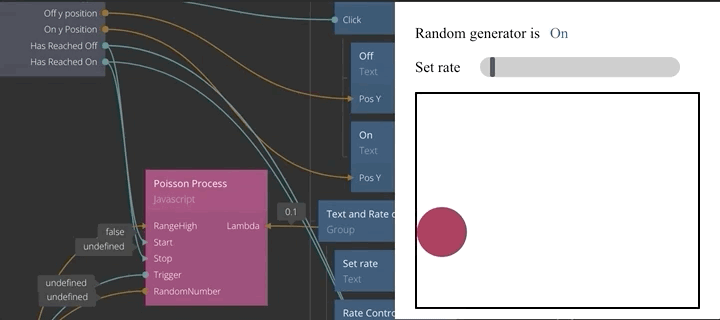
Connecting to the the inputs and outputs, the Script nodes can be used as any other nodes in Noodl. As an example, the Random Generator Script node has been combined with a simple UI to control the inputs. The output of the random generator is used to move a circle on the screen and trigger state changes. We have also copy & pasted the Script node and use it two times. This works great, but remember that the JavaScript code is cloned if you are using an inline source so changing the code in one Script node does not affect the other. It's often a good idea to encapsulate a reusable Script node in a Noodl component.
Debugging
As with any coding, you will sooner or later make a mistake in your code. Noodl will catch both syntax errors and runtime errors and highlight the Script node causing the error. You can also find errors in the warnings popup.
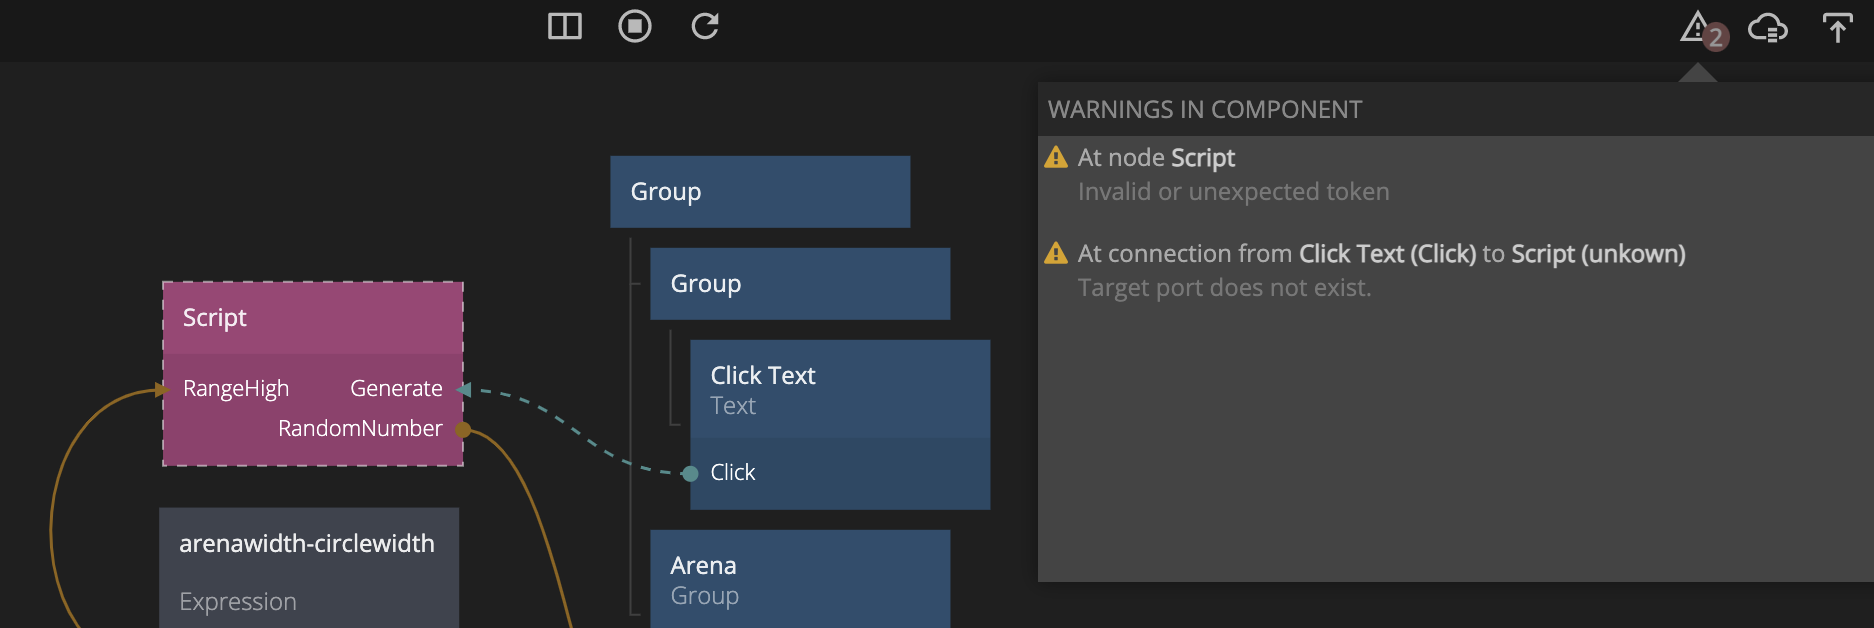
As seen in the image above, syntax errors in the code can cause inputs and outputs of the node to becomes invalid. Fixing the syntax error will restore the connections.
To debug your javascript you can launch the web debugger from the viewer window by clicking the bug icon.

In the web debugger you can find any external source files that your are using in your script nodes, but if you want to set a breakpoint in an internal file you can use the debugger command. Here's an example:
Script.Signals.Stop = function () {
  debugger; // This will cause the debugger to break here when running
  clearTimeout(timer);
  timer = undefined;
};
Running code when a Script node is created or destroyed
A Script node is created when the Noodl component that it belongs to is created. Components are created when the app is first launched, when navigation happens, and when a Repeater node creates items. The Script.OnInit function is automatically called by Noodl when the Script node is created.
Components can be destroyed when doing navigation or when removing items from a list used by a Repeater node. This will run the Script.OnDestroy function.
Here's an example that sets up an event listener on the body element and removes it when the node is destroyed to avoid memory leaks.
function setPosition(e) {
  Script.Outputs.PointerX = e.clientX;
  Script.Outputs.PointerY = e.clientY;
}

Script.OnInit = function () {
  document.body.addEventListener("mousemove", setPosition);
  document.body.addEventListener("mousedown", setPosition);
};

Script.OnDestroy = function () {
  document.body.removeEventListener("mousedown", setPosition);
  document.body.removeEventListener("mousemove", setPosition);
};