OpenAI
note
This prefab only works on Noodl hosted cloud services.
The OpenAI prefab is a great starting point for creating your own chat bots based on the ChatGPT API. This prefab includes a few cloud functions and logic components that can get you started quickly. Here is a quick guide on how to use the prefab to build a very simple chat bot.
To be able to follow this guide properly we recommend that you are well versed in a few Noodl concepts already.
- Cloud Data. You know how to set up cloud services and work with cloud data, start here.
- Cloud Functions, how to create logic that run in the cloud, take a look here.
Make sure you have a cloud service active for your project. Next you need an account and API key for OpenAI.
Setup
Start by cloning the prefab into your project, you can read more about how prefabs work here. After the prefab is cloned into your project you will see a warning. Don't worry we will sort this out next.
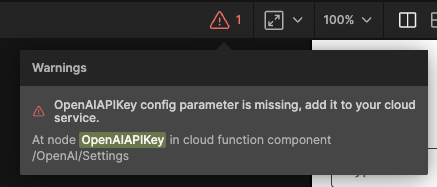
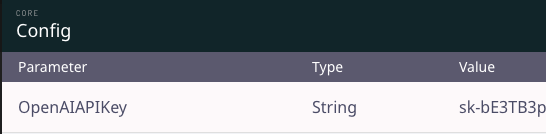
First you need to find and add the OpenAI API Key to your cloud services backend. Launch the cloud services dashboard for your project and find your way to the Config tab, here you will need to create a new config parameter called OpenAIAPIKey (case sensitive) where you need to put the API Key from your OpenAI Account. Then create the config in your cloud service, and make sure that access is restricted to Master Key Only. This will keep the API key safe in your cloud service.
Completing this task should remove the warning.
A basic chat
Let's take a look at a basic chat. With the setup above in place we can move to the frontend component of the prefab. It includes a very basic chat frontend that you can put into your project as a starting point.
note
The cloud functions of the prefab require the user to be logged in so for this very basic example we are expecting there to be a user with username test and password test. Either create a user with those credentials in your backend, or if you already have users in your app you can modify the example below.
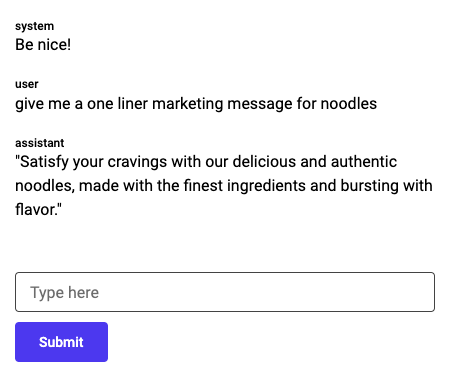
You can find it in the OpenAI folder it's called Basic Streaming Chat. Drag it into your app and lets review how it works below.
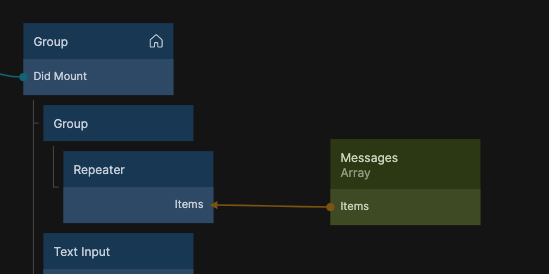
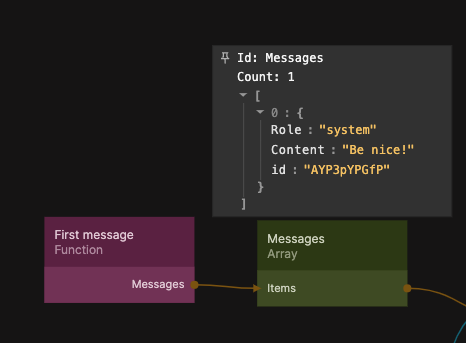
First we keep the chat log in an array called Messages, in this example the array is only kept in memory on the client. The content of the array is displayed using a Repeater.
The content of the array has the following format, for details please review the OpenAI Documentation:
[
    {
        Role:'system', // this can be any of system, user or assistant
        Content:'the content of the message',
    }
]
When starting up the array is initialized with just the system message.
The meat of the chat is represented with these nodes, let's review them in detail.
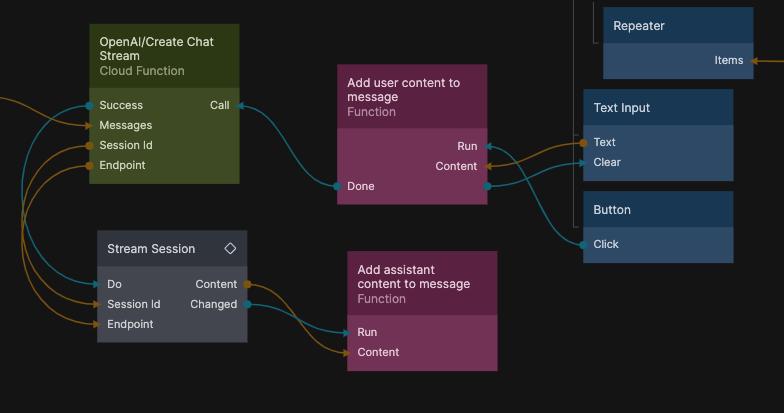
There are two UI components a Text Input where the user can input the chat message, and a Button that when clicked the message is sent to the OpenAI API. This is done with the cloud function (included in the prefab) OpenAI/Create Chat Stream, this function expects the full chat history on the Messages input in the format detailed above.
So we have simply connected the Messages array directly to the input. When the submit button is clicked a function node is called that add the message to the chat history, it has the following code:
Noodl.Arrays.Messages = Noodl.Arrays.Messages.concat([{
    Role:'user',
    Content:Inputs.Content
}])

Outputs.Done();
note
Remember to always create a new array when modifying arrays. This is the only way it will be propagated as a change to the UI.
When the array has been update the cloud function is called, now with the complete chat history. The cloud function will return with a chat stream session and an endpoint that can be used with the Stream Session logic component. This component will stream the reply from the AI and emit the content on the Content output along with a Changed signal when the outputs is updated.
In this simple chat example we simply feed it into another function node that appends the message from the AI assistant to the chat history. Here is the code:
let last = Noodl.Arrays.Messages[Noodl.Arrays.Messages.length-1];

if(last.Role !== 'assistant') {
    Noodl.Arrays.Messages = Noodl.Arrays.Messages.concat([{
        Role:'assistant',
        Content:Inputs.Content
    }])
}
else last.Content = Inputs.Content;
It simply checks if the last message on the chat history is an assistant type message, if not a new message is added (just like we added user messages above). If there is an assistant message at the bottom of the chat history we simply change the content of the message.
Changing the chat message history in the Messages array will automatically update the user interface so we don't need any additional logic for that.
Thats basically it for the frontend of the basic chat. Let's review the cloud function as well.
Create Chat Stream
The cloud function is very simple. It just uses the Chat Completion Stream logic component which requires a Messages input with the same format and an optional User Id (this can be used by OpenAI to track misuse of the AI).
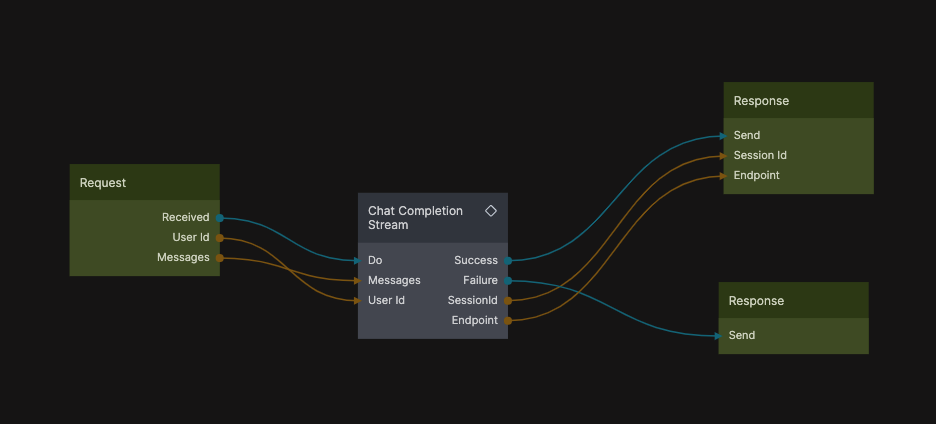
The Chat Completion Stream creates a stream session with the provided chat history and parameters that can later be used on the frontend with the Stream Session logic component. Besides the chat history you have a number of properties you can modify:
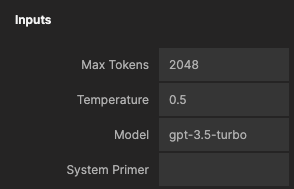
Please review the OpenAI Documentation for more details on these properties.
The prefab also includes a Completion Stream and an accompanying cloud function Create Completion Stream, this uses the completion OpenAI API that only accepts a single prompt input and now a full chat history. More information on the API here. It aslo has slightly different parameters.