Stripe
Accepting payments and managing subscriptions is an important part of many digital products and when building in Noodl this is best done using Stripe, to go-to service for integrating payment into apps. This prefab and this guide will cover some of the key aspects of enabling you to accept payments from your users.
First you need to create an account and make sure you have access to the Stripe Dashboard, you don't need a fully approved account to complete this guide, it's actually preferable that you start with the test version of your account.
To be able to follow this guide properly we recommend that you are well versed in a few Noodl concepts already.
- Cloud Data. You know how to set up cloud services and work with cloud data, start here.
- Cloud Functions, how to create logic that run in the cloud, take a look here.
- Pages and Navigation, how to create pages and navigation, start here.
- User Management, you need to have an app where you can create new users and log them in, start here
Setup
After installing the prefab you will find a folder of components both on your frontend and in your cloud functions called Stripe, in these folders you will find the good stuff we will use in this guide. But first you must complete the setup.
Launch the cloud services dashboard for your project and find your way to the Config tab, here you will need to create a new config parameter called StripeAPIKey (case sensitive) where you need to put the Secret Key from your Stripe Dashboard. Look for this section in Stripe, important it's the Secret Key that you need.
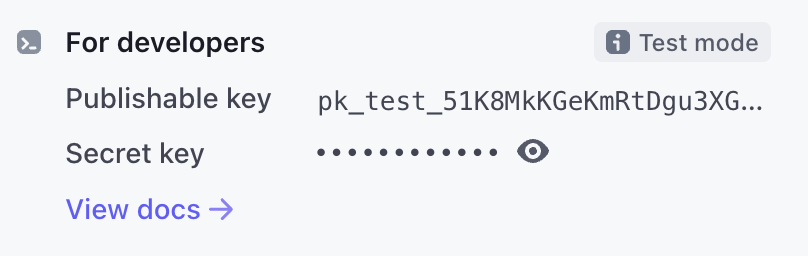
Then create the config in your cloud service, and make sure that access is restricted to Master Key Only. This will keep the API key safe in your cloud service.

Accepting a one time payment
Let's start with the basic example of your user buying a product from your application with a one time payment. First you need to make sure you have created the product in stripe and that it has a one time price. Find the Price Id in your dashboard, it will look like this.

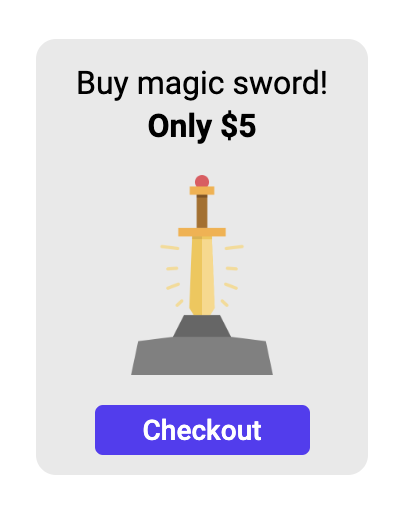
Copy it for we will use it in a bit. Let's say you are creating a game where you can buy virtual products, and you have a checkout screen that looks something like this:
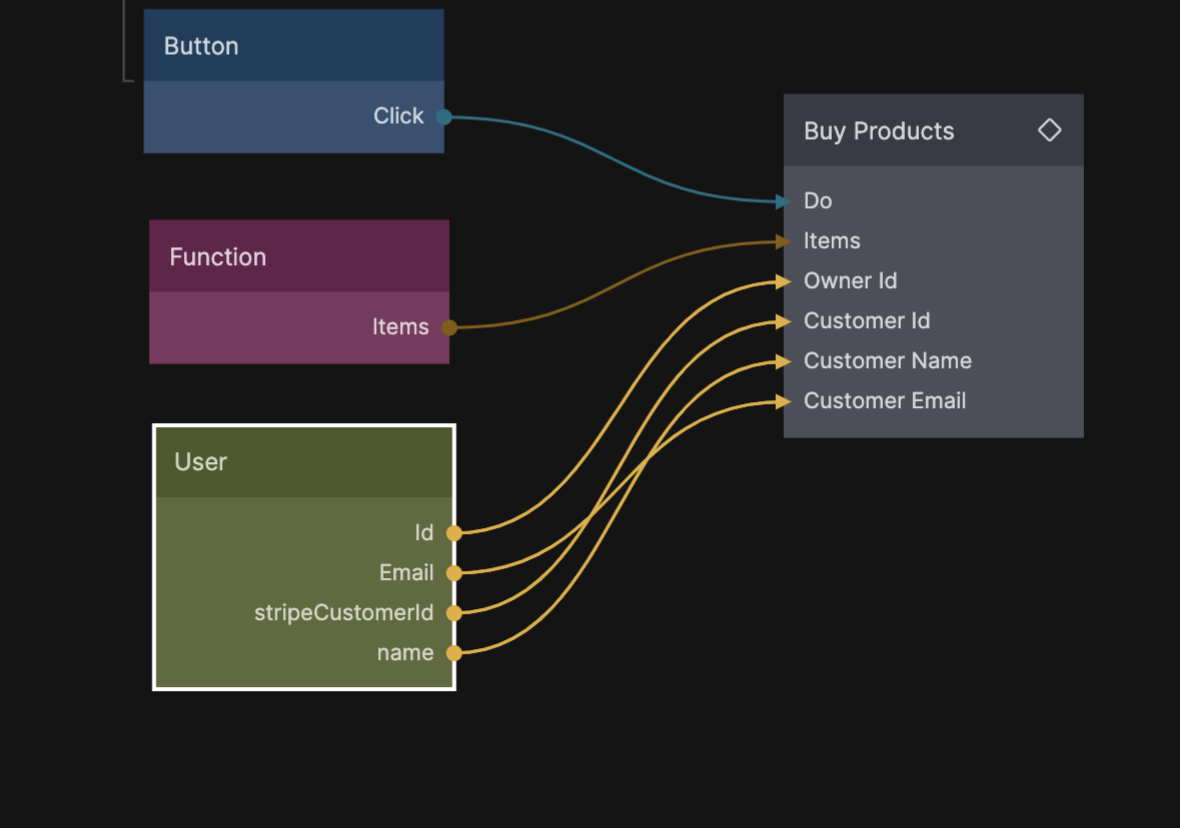
When the user clicks the Checkout button you will use the Buy Products logic component that is part of the prefab. It will redirect the user to a checkout page that is hosted by stripe where the user can provide credit card details and complete the purchase.
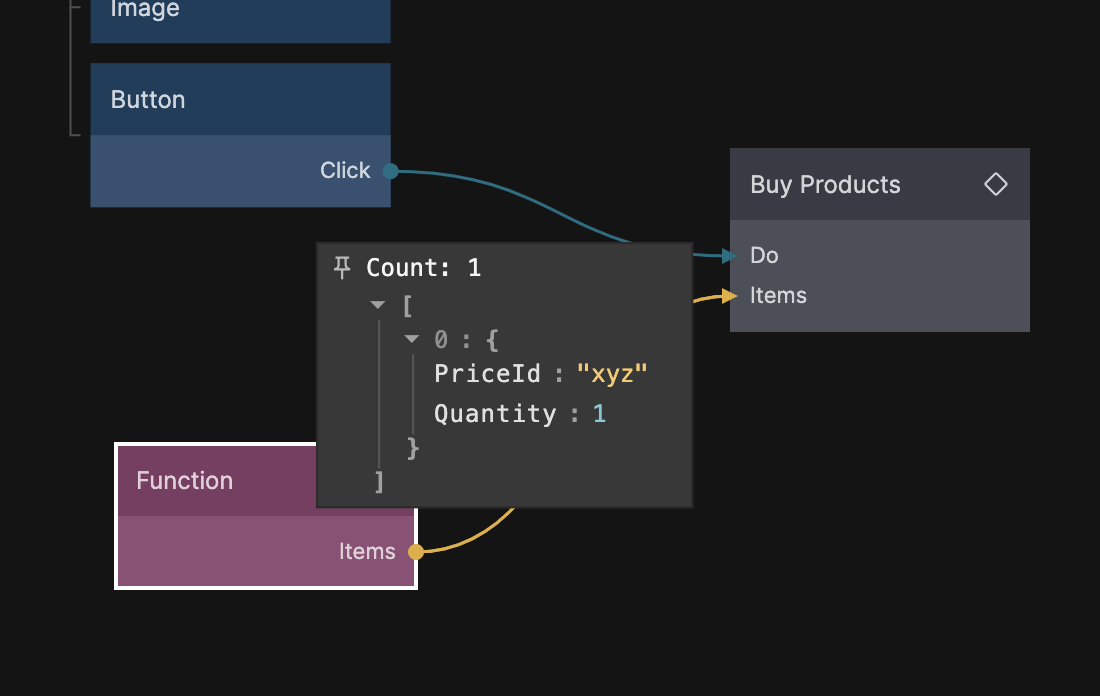
You need to send a signal to Do when you want the redirect to happen and you need to provide an array of Items that Stripe should prompt the user to pay for. This is an array of objects, one for each product type to purchase (kind of like a checkout cart). The function node in the graph above have the following short code:
Outputs.Items = [
    {
        PriceId:"your-price-id-from-stripe",
        Quantity:1
    }
]
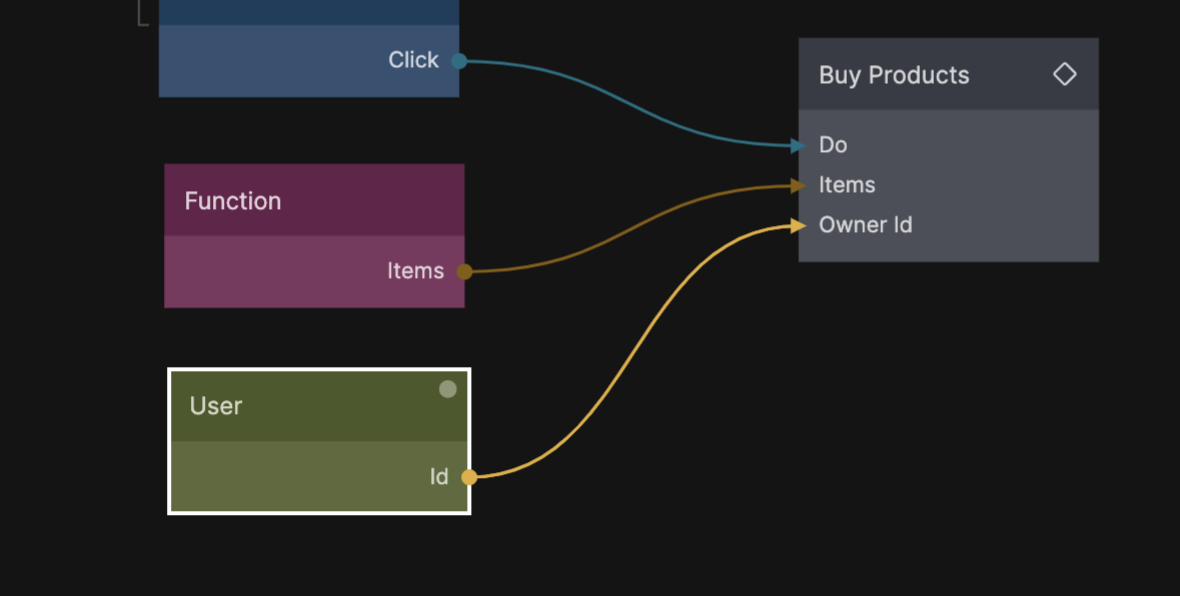
You also need to provide a payment Owner Id, this is simply an Id that you will need later to fulfill the purchase. In this case we are going to assign a magic sword item to our user so we need to pass in the user as the owner of the payment. More on this later under the fulfilment topic.
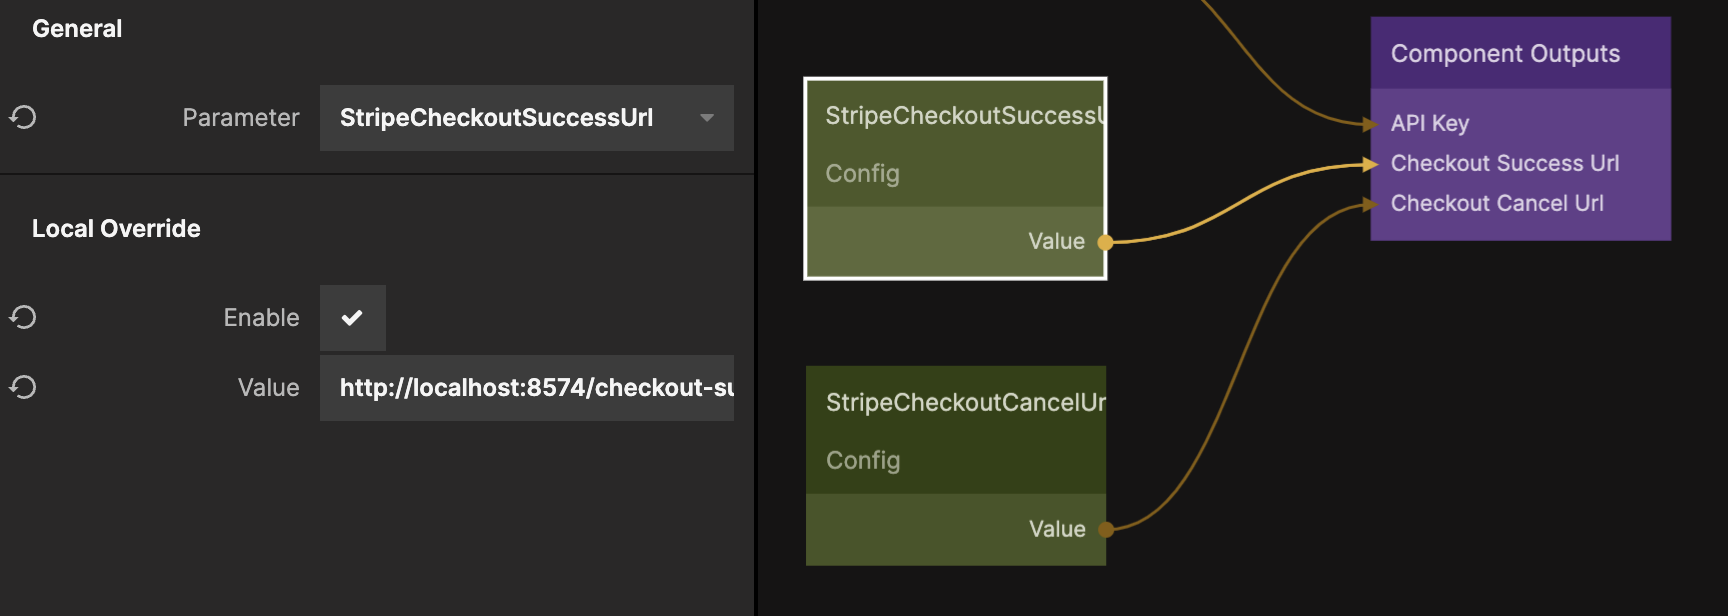
This will open a new tab with the stripe checkout page where the user can complete the purchase. When the user succeeds, or if the payment is cancelled Stripe will redirect back to your application. This is done using two redirect urls. You will need to add these to the Config of your application, the exact values should match your domain when you have deployed the app, but for now you can just put in any value:

Actually when running locally (while developing your app in the editor) they will get a different value, to customize this value look in the Stripe / Settings component among your cloud functions.
- The
Checkout Success Urlis overridden when working locally and set tohttp://localhost:8574/checkout-success - The
Checkout Cancel Urlis overridden when working locally and set tohttp://localhost:8574/checkout-cancel
You need to create pages that map to these urls, or update the two urls to match your application. To learn more about how to use configurations in your app check out the Config node.
note
If things don't work as expected (there are many things that can go wrong), the Developer part of the Stripe Dashboard is a good place to start looking. Here you can see all latest requests made and it will show you errors and might give you clues to what went wrong.
Fulfillment and webhooks
Now when the user has completed the checkout flow Stripe will notify your application that you can fulfill the request (in this case, give the user the magic sword). This is done using something called Webhooks, for us this means that Stripe will call a Cloud Functions of our choosing to let us know that the payment was successful. First you need to set up the webhook, and when developing Stripe has a neat tool that will let you test the entire flow in the Noodl editor before deploying.
Visit this page of your Stripe Dashboard to install the tools needed on your computer and perform the setup. Now when starting the tool you should use the following command:
$ stripe listen --forward-to localhost:8577/functions/stripe-webhook
Next you will need to create a cloud function called stripe-webhook (small case), this is the function that will be called when the checkout session is completed. Start by adding a Stripe / Events / Process Stripe Payment Event logic component to your function like this:
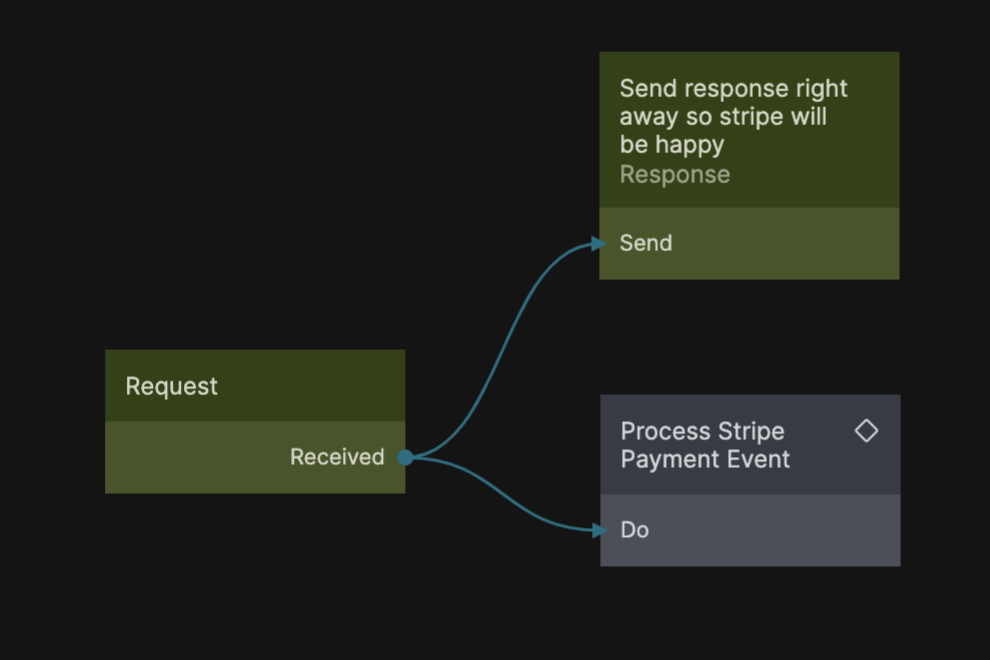
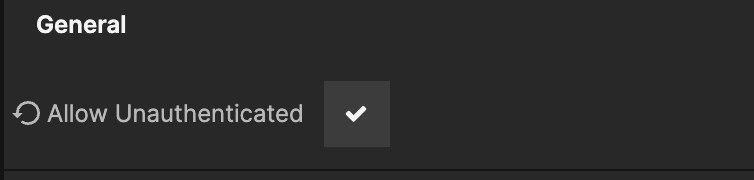
It's good practice to always return a successful response right away so stripe will be happy, then we can perform the task in the background. Also make sure your cloud function can be called without authorization since it will be called by Stripe and not be a logged in user in your app, edit the properties of the Request node.
When the payment is completed successfully a Payment Completed signal will be sent from the Process Stripe Payment Event node. We can use this to create our virtual magic sword and give it to our user. Here are a few important outputs that we get with the signal.
Payment Owner IdThis is the Id that we provided when starting the checkout session above with the Buy Products action. In this case it will point to the user making the purchase so we can use it when creating the sword.Itemsis an array with objects containing the items that was purchased (same as was sent into the Buy Products action) but augmented with some important data, this is what they look like:
[
    {
        Quantity, // The number of this item
        PriceId, // The price it was puchased at
        ProductId // The Id of the product from your stripe dashboard
    }
]
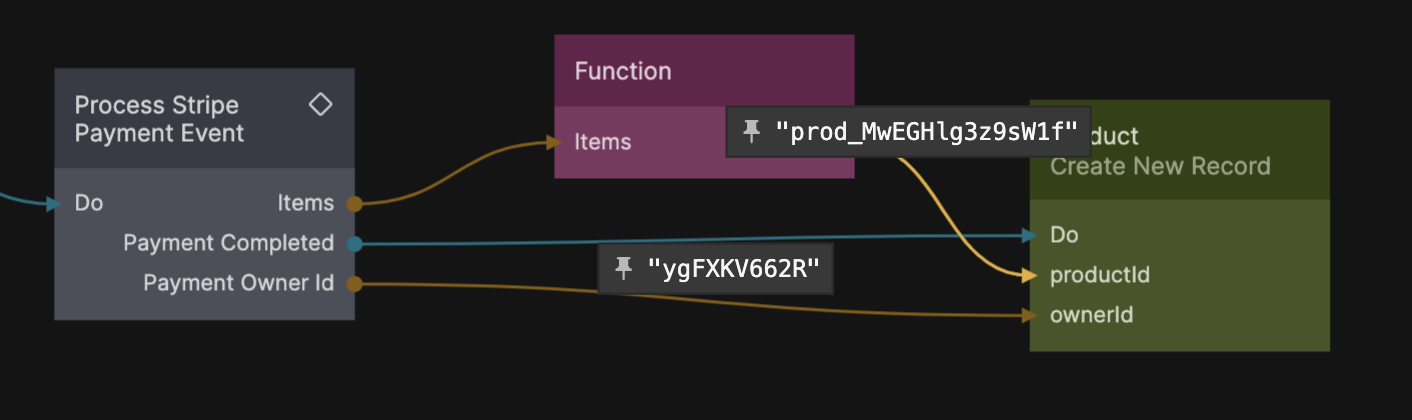
Let's say that we have a class of record in our cloud service called Product, here we will create items that have a productId that we get from stripe (this will tell us what was purchased), and a pointer to a user called ownerId so that later we can query all products that a user has purchased. We can hook it up like this:
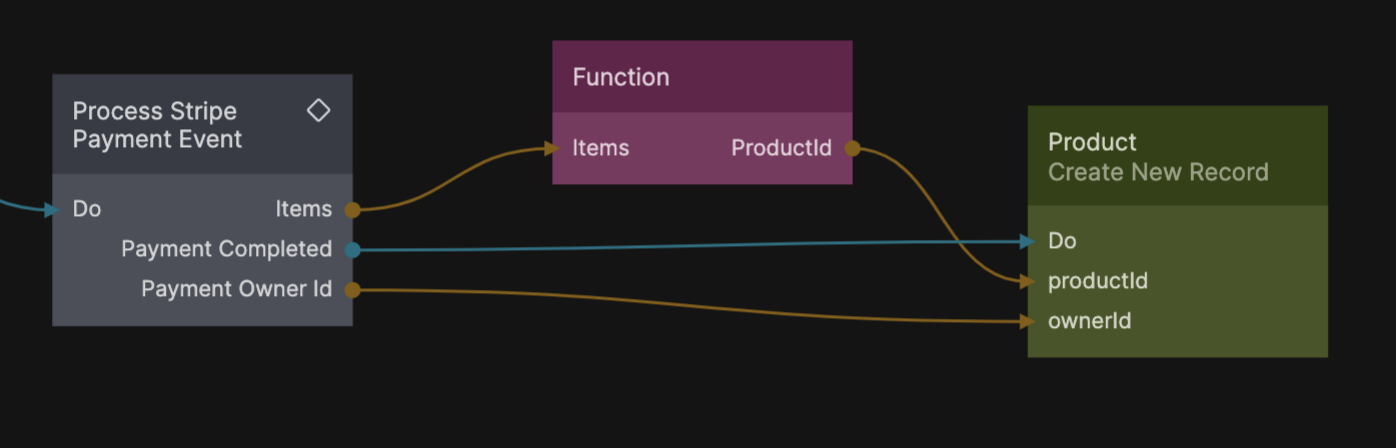
The little function node is used to extract the first product id from the Items array with the following little snippet:
if(Inputs.Items)
    Outputs.ProductId = Inputs.Items[0].ProductId
That's it, now we can sell virtual magic swords to our users. You can test out the payment flow in your application when running on your desktop by opening a browser and navigating to http://localhost:8574 where Noodl serves your application while running locally.
When you complete the payment flow you should see the cloud function light up as the signals is triggered and the data flows through the graph. You can also use this to find any problems by inspecting the data on the connections.
note
The Product Id from stripe (that you can find in your Stripe Dashboard) is a unique identifier for the product, it's good to use this same Id in your app to identify items of purchase.
When you deploy your application you need to make sure that the two redirect urls in your config above points to the correct domain, customer or sandbox. And most important you need to provide the deployed webhook function url to Stripe. First, you need to find the endpoint of your cloud services that you will use for your deployed app, go to the Cloud Services sidebar tab and then Manage cloud service.
This will show the follow popup, here you are looking for the Endpoint url.
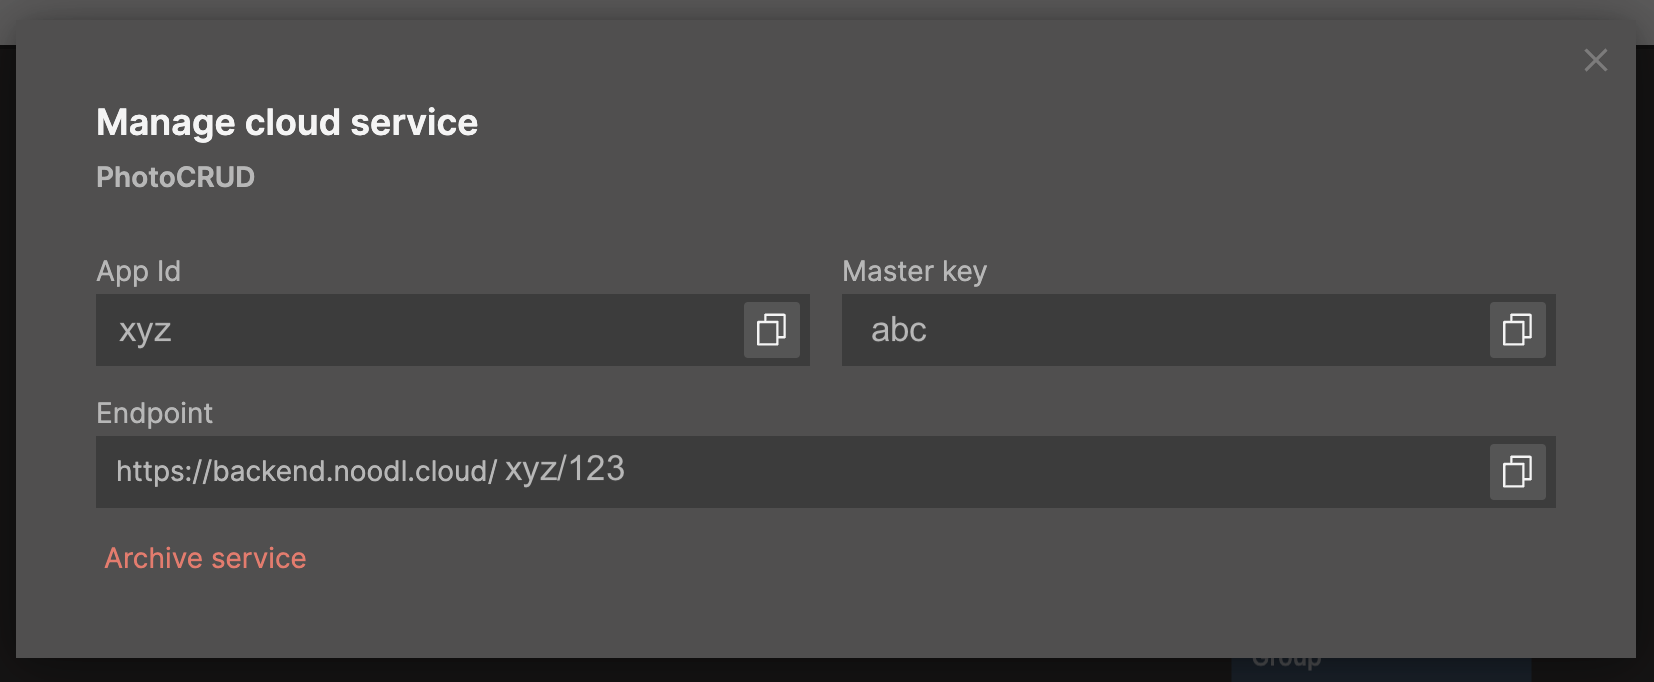
Now the endpoint for your Webhook function will be (replacing xyz and 123 with the values from your endpoint in the dialog above):
https://backend.noodl.cloud/xyz/123/functions/stripe-webhook
With that url in hand go to the Stripe Dashboard to add a new webhook endpoint. You also need to tell stripe what events you are interested in receiving. For one time payments you only need:
checkout.session.completedyou will find it under the Checkout tab.
Storing the Customer Id
The way we have set it up now Stripe will create a new customer for every checkout session, although this works it will create a lot of customers in your stripe dashboard and the user will have to fill out credit card details every time they make a new purchase. To avoid this we can store the Customer Id from Stripe in our app database and in later checkouts, let Stripe know it's the same customer. In this case, a customer maps to a User in our database, so let's create a new property on our user record called stripeCustomerId make sure it has the String type.
Then in your stripe-webhook cloud function, hook it up so the Customer Idreceived along with the Payment Completed signal is stored in the user record (remember we used the Payment Owner Id to keep the user when starting the checkout process).
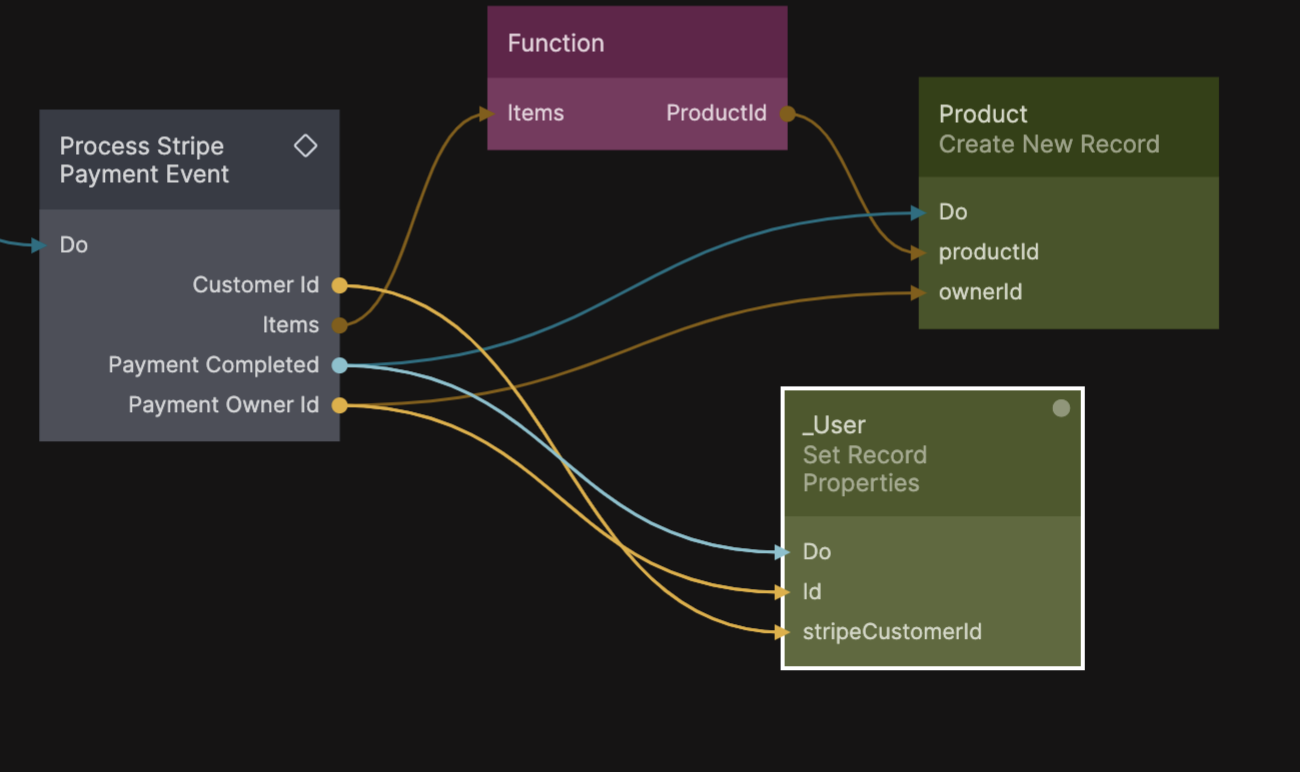
Now after the user has made one purchase we can use the stripeCustomerId property when initiating new checkout sessions. Add these connections to where you initiate the session with the Buy Products action.
You can also provide a Customer Nameand a Customer Email if you have them, in that case they will be prefilled in the form of the checkout session. With this hooked up, try the new flow two times and the second time you should see that it retains your details.
Subscriptions
With this prefab you can also build applications that offer subscriptions or plans for your users. It works much similar to above so make sure you have completed all the steps for one time payments as we won't go into as much more detail here.
Like for one time payments you need products set up and you need prices for your products. A product with a recurring price corresponds to a plan type (so maybe one for Basic, Pro etc), and a product can have several prices and billing periods. If there is no plan, we assume that your are on the free plan initially. So to get the prefabs working properly you need to start by initializing the Plans array that should contain all your plans, this can be done e.g. in your home App component.
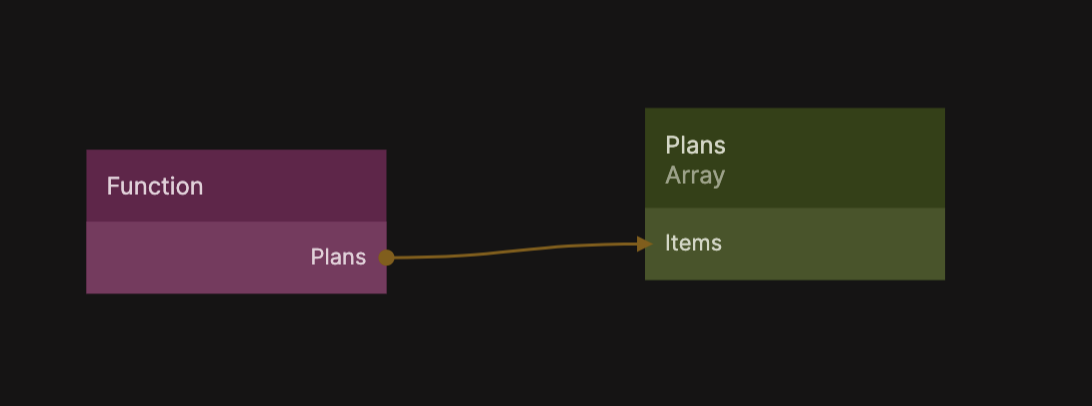
You need the array to follow a certain schema, this is an example of what you could put in a function node as above:
Outputs.Items = [
    {
        Name:"Free",
        Desc:"Description",
        id:"free",
    },
    {
        ProductId:"xyz",
        Name:"Basic",
        Desc:"With the basic plan you get features A,B,C. Its billed monthly.",
        id:"the-price-id-from-stripe-for-this-plan",
        Period:'month',
        Price:'$99',
        Details:[
            {
                'Text':'Sharing Tools',
                'InPlan':true
            },
            {
                'Text':'Design Tools',
                'InPlan':true
            },
            {
                'Text':'Private Messages',
                'InPlan':false
            },
            // ... more details
        ]
    },
    // .... more plans
]
You need the free product in there (as this will be the default displayed if there is no current subscription) and then one entry for each subscription product and price. The prefabs supports filtering on month and year billing periods so you can tag your entries in the array. Some notes:
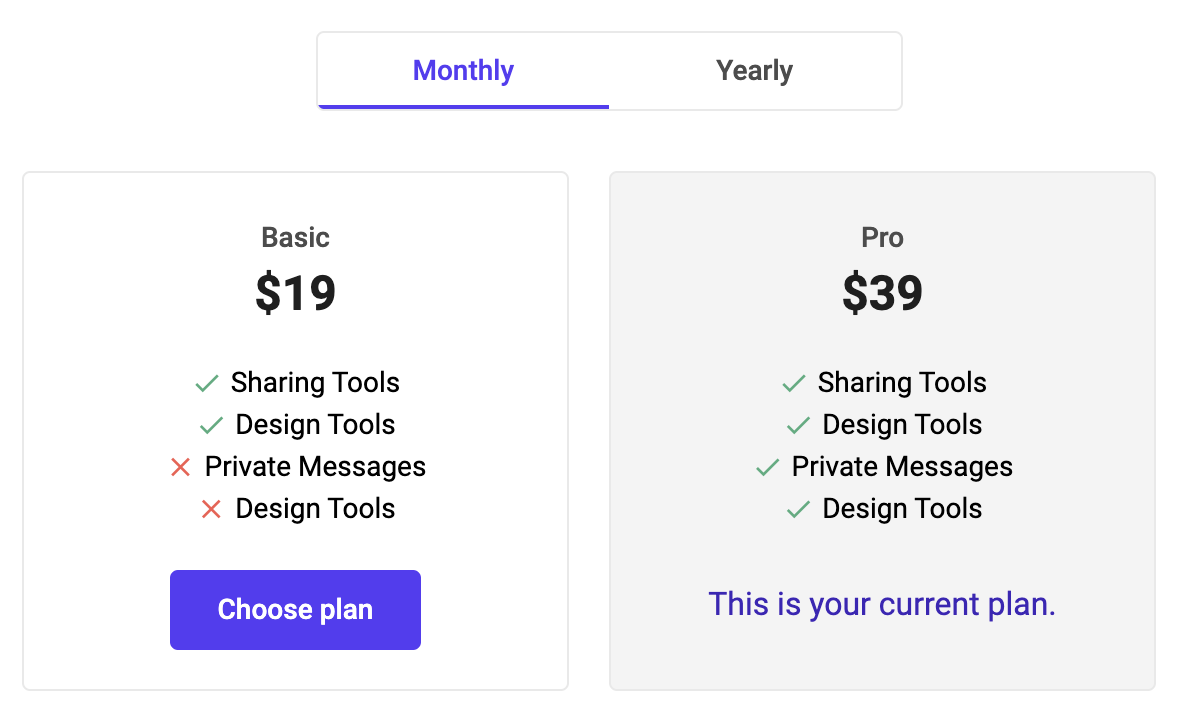
Detailsis an array of features for your plan. You can supply this and it will be shown in thePlan Pickervisual component that you can use if you like. You can provide a Text and IsPlan which is a boolean indicating if this specific feature is in the plan or not.
note
In the example below we are going to assume that the current User is the subscription owner, but in many cases maybe it will be a different record, such an Orginization or a Team. You would use the same pattern as below just with a different record class. In that case the Orginization or Team would be the customer so that is where you would store the stripeCustomerId and plan.
First let's use a handy little visual component to show the current plan, it's called Current Plan Badge and can be found in the Stripe/Subscriptions folder on your frontend. You can put the badge on a page where you will show the current plan and hook it up as below, as an example.
![]()
The most important thing is to hook up the stripeCustomerId from your user (or whatever record you use as subscription owner). This is needed to fetch the current plan and show it. There are a few good to know signals sent from this component.
- Upgrade This is sent if the user clicks the upgrade button. In this case we navigate to new page where we will show all the plans you can upgrade to. More on that later.
- Plan Canceled A signal is sent here if the plan was canceled.
- Plan Renewed A signal is sent here if the plan was renewed.
- Failure A signal is sent here if an operation failed, the error can be found on the Error output.
This is what it looks like:
![]()
However when you have a new user they will not have a plan, so it will display the free plan and ask to upgrade, in this example we navigate to a new page to show all options.
Buying a plan
When buying a plan we can use another handy visual component on your frontend called Stripe/Subscriptions/Plan Picker. Simply put that on a page and hook it up as shown below:
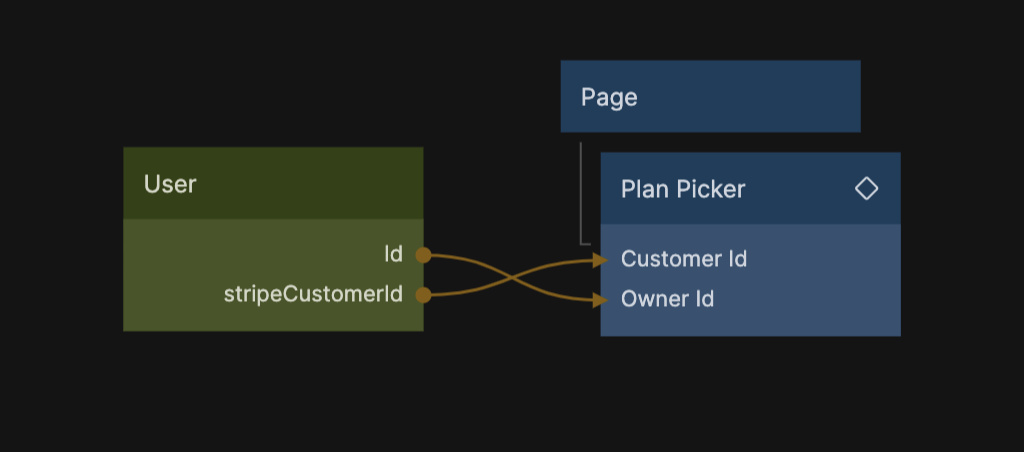
A few important notes on this. First we connect the stripeCustomerId like before, this allows the component to fetch the current plan and also to simply checkout by allowing Stripe to save customer info in the checkout process. Furthermore we need to provide a subscription owner id via the Owner Id input, just like above this will be used in the Webhook to assign the plan to the correct record. In this case we are using the User record as the subscription owner. This will result in something like this:
When the Upgrade button is clicked, the user will be redirected to the Stripe checkout flow just like for one time payments, and redirected back to your application using the same process.
Subscription fulfillment
Just like for one time payments stripe will alert us using the Webhook when we receive changes in subscriptions. This time we are going to use the Stripe/Events/Process Stripe Subscription Event component. This will emit signals on important events, namely when a subscriptions is started, updated or deleted.
First we create a new property on our User record in the cloud services dashboard. We call it plan and give it the String type, in this property we will store the current plan so we can use it to determine which features should be available in our application. Here is a simple way to hook it up so that we keep track of the current plan the user is subscribed to.
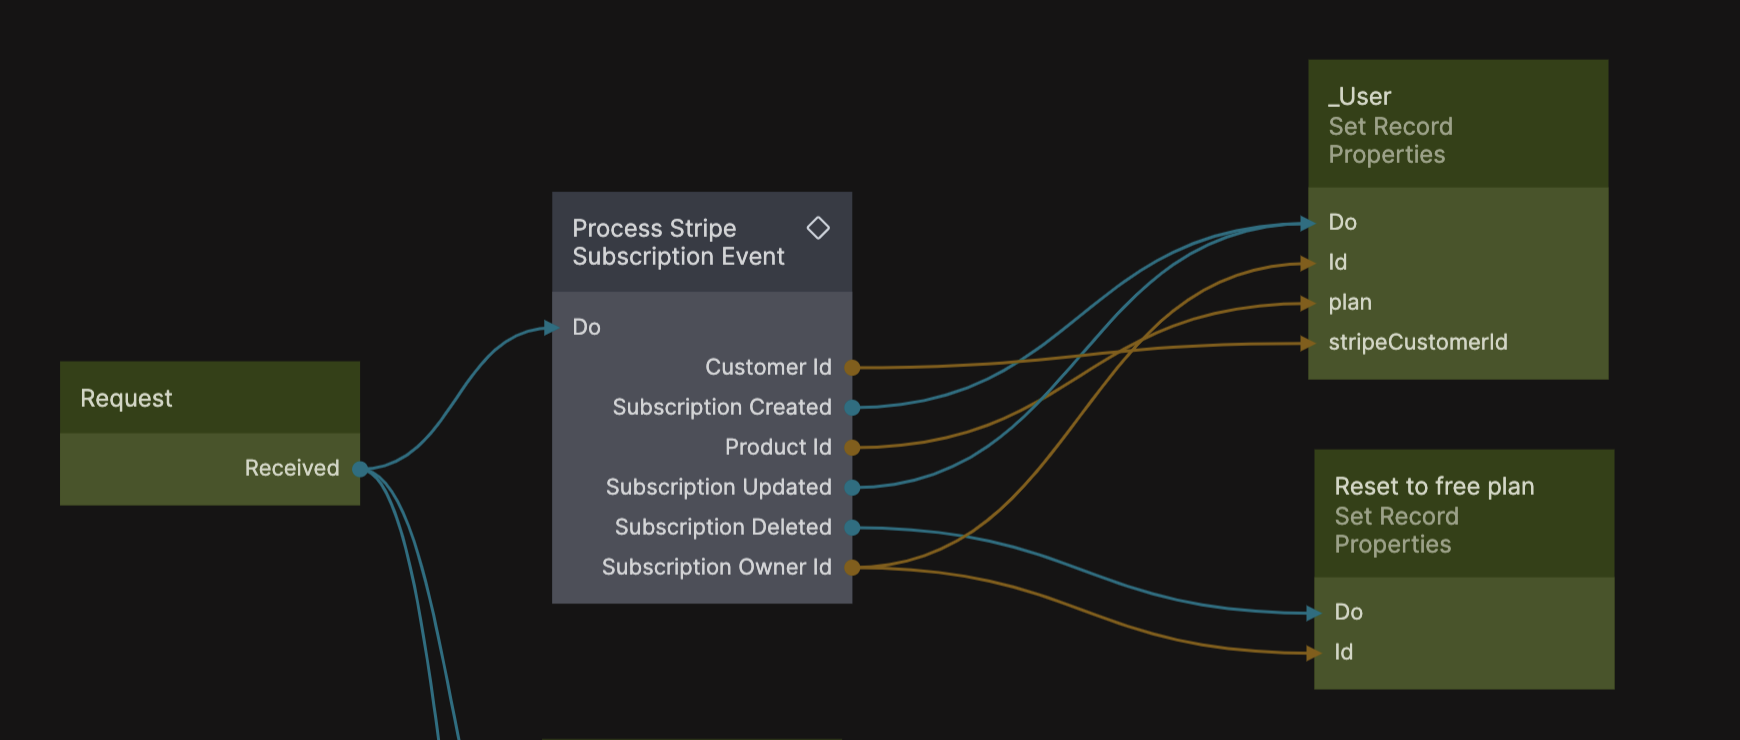
Let's review the three signals a bit:
- Subscription Created This is emited when a subscription is successfully bought, here we store the Customer Id with the record pointed to by Subscription Owner Id, which in this case is a User record. We also store the Product Id of the plan. We can use this Id in our user to determine which features should be available in our application.
- Subscription Updated A signal is emitted here if the user updates a plan, so we do the same as when created. We store the Product Id of the plan, so we can serve the corresponding features in our application.
- Subscription Deleted Finally, a signal is sent here if the subscription ends. Here we should revert back to the free plan. We do this using the Set Record Properties node on the subscription owner (the user) and by specifying
freefor the plan.

There you go, that is all needed to build a subscription purchase and management flow.
One final notice, when you register your deployed webhook with stripe (as described above, in the Stripe Dashboard), make sure to listen to these events, you find the under the Customer section:
customer.subscription.createdcustomer.subscription.updatedcustomer.subscription.deleted
Invoices
When your users are subscribed to plans and hopefully paying their bills they might need to viewer invoices and collect receipts. You can have Stripe email your customers when an invoice is successfully paid, but it might also be good to show a list in the billing part of your application. You can do this with the Stripe/List Invoices cloud function as shown below:
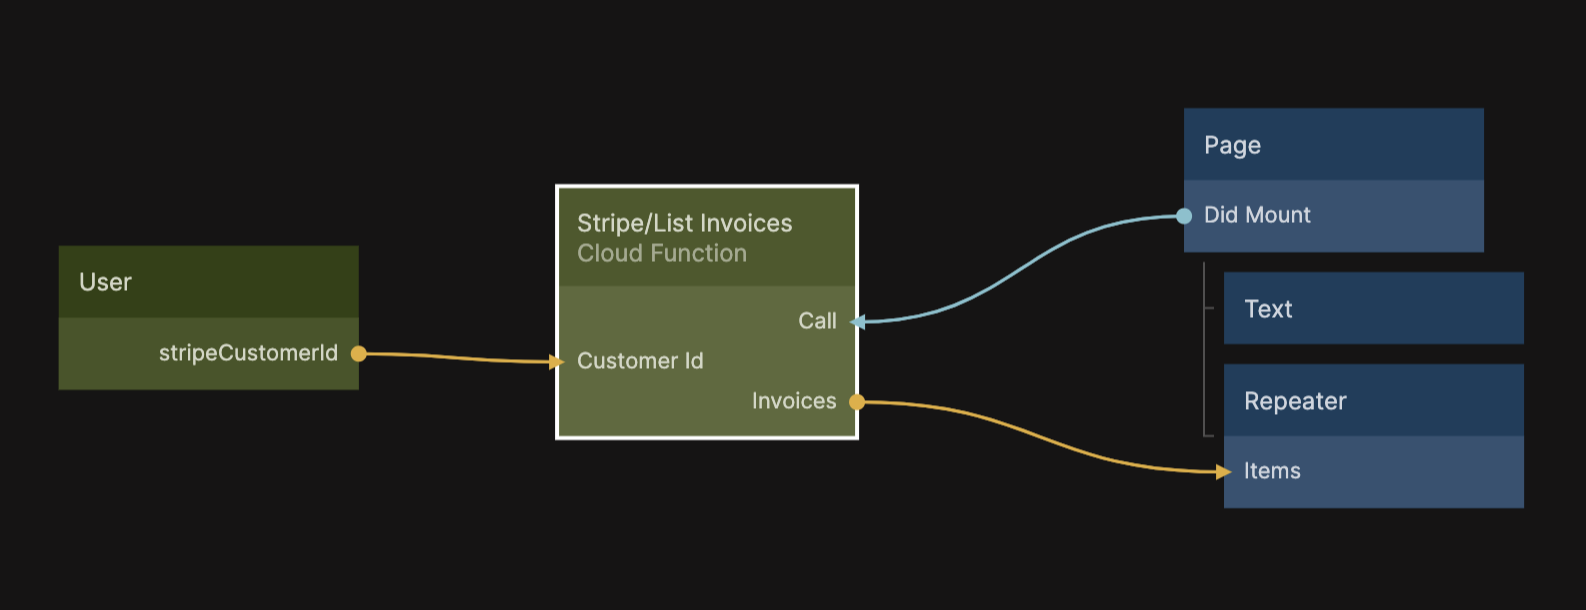
Make sure you provide the Stripe Cusomter Id that you should have stored in the previous steps. The array returned will have the following schema:
{
    id:"..."
    Status:"paid" // Check the stripe documentation for possible invoice statuses
    ManageUrl:"https://..." // An url where you can redirect the user to manage the invoice
    PdfUrl:"https://..." // An url where you can redirect the user to download the invoice as PDF
    PeriodStart:"2022-12-08T14:38:50.000Z" // Start of the invoice period
    PeriodEnd:"2022-12-08T14:38:50.000Z" // End of period
    AmountDue:3500
    AmountPaid:3500
    Currency:"usd"
}
I hope you have enjoyed this guide and thay you have some tools to start building great payment capabilities to your apps using Stripe.